How to Create a Hotel Booking Website (Step by Step Guide)
Do you want to create a hotel booking website like Booking.com, Expedia.com or Trivago.com?
Well, it’s very easy than you thought.
You probably thought building a hotel booking website is very complicated and expensive – you need to spend a lot of money ($15,000-$60,000) to hire developers and designers or else you need to learn to code to build your own hotel booking website, which can take years.
If you are thinking so……… I have good news for you. 😀
The good news is that you can create a hotel booking website under 30 minutes without hiring any developers or designers or even spending a lot of money.
In this tutorial, I am going to show how you can create a hotel booking website Like Booking.com.

But, before you start building a hotel booking website, let’s first know how the hotel booking businesses model work.
Here are the most common business models that hotel booking websites use.
Merchant Model
In this model, online travel agencies(OTA) like Booking, Expedia purchase a block of rooms in advance at a significant discount.
Let’s say they bought a block of 100 rooms in a hotel for $100 per night. Then, they resell the 100 rooms for $150 per night.
That means they are selling for 50% more than the purchase price.
Agency Model
In this model, online travel agencies don’t collect customers’ money.
For example, when a customer books a room on Expedia.com, they redirect the customer to a hotel.
Once the customer books a room, Expedia.com gets a commission.
Hotel comparison site
Sites like Trivago.com is a hotel comparison site that allows customers to choose a room based on their needs from numerous hotels and booking websites.
They get a commission when customers book a room through their link.
Ready to build your hotel booking website today? Let’s get started…
[thrive_text_block color=”note” headline=”Create a Hotel Booking Website Under 30 Minutes”]
- Get web hosting
- Register a domain
- Install WordPress
- Set up Your Site
- Install a Hotel Booking Theme
- Add Hotels to Your Website
- Add a Payment Gateway
- Customize Your Site
[/thrive_text_block]
What do You Need to Start a Hotel Booking Website?
The first thing you need to choose is the right platform for creating your hotel booking website.
There are several content management systems (CMS) available and it’s quite hard to choose the best one.
Thankfully, you don’t need to worry about it. We have tested many of them and tell you the most convenient one.
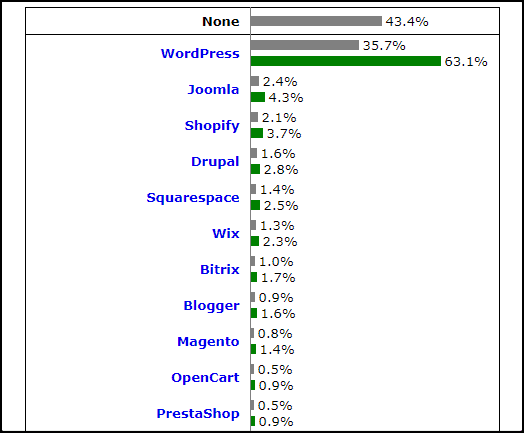
The most popular and best content management system is WordPress.
More than 27 million websites are powered by WordPress and growing rapidly.
Here’s why I recommend WordPress:
[thrive_custom_box title=”” style=”dark” type=”color” color=”#c5ecf7″ border=””]
- WordPress is open-source software and it’s 100% free to use
- You can create any kind of website using WordPress
- It’s fully customizable
- There are over 50,000 plugins and 50,000 themes available in the WordPress directory
- It’s well speed-optimized, secure and SEO friendly
- You can get WordPress-related support from almost everywhere, such as, on the official WordPress forum, on different Facebook groups and different WordPress blogs, etc.
- It’s always up to date
- and there’s many.
[/thrive_custom_box]
To create a hotel booking website, you need a domain name, web hosting, and an SSL certificate.
- What’s a domain name? A domain name is your website’s address on the internet. For example, “Google.com” is a domain name.
- What’s a web hosting? Web hosting is where your website is hosted or stored online. Once your domain and hosting are connected, you can see your website online.
- What’s an SSL certificate? An SSL certificate is highly required if you collect customers’ details such as email, password, payment details. Without an SSL certificate, hackers can hack your site easily.
Generally, domain registration costs around $14 for 1 year, web hosting $9-$14 per month and $60-$240 per year for an SSL certificate.
That’s too much if you are just getting started.
Luckily, Hostgator offers FREE domain registration and FREE SSL certificate with its hosting plan which starts only at $2.75 per month.
HostGator is one of the oldest web hosting providers (founded in 2002) and they are now powering over millions of websites worldwide.
They offer various types of hosting such as shared, WordPress hosting, VPS, Cloud, Dedicated.
HostGator shared hosting’s top features:
- FREE domain registration
- One-click WordPress install
- Free WordPress site transfer
- Latest control panel
- Free SSL certificate
- Unmetered bandwidth & storage
- 24x7x365 support
- 99.98% uptime
- 45 days money-back guarantee
[thrive_link color=’blue’ link=’https://www.wpmyweb.com/offer/hostgator-shared-plan’ target=’_blank’ size=’big’ align=’aligncenter’]Visit HostGator[/thrive_link]
How to Create a Hotel Booking Website
1. Get Web Hosting
The first thing you need to choose a hosting plan based on your needs.
I recommend you go with HostGator’s shared hosting plan as it’s super affordable.
Step 1, First, go to HostGator’s website. I have added a coupon in this link which will give you a 60% discount. You can also enter the promo code WPMYWEB60 while filling up the payment details.
Or,
Click here to go to ==> www.hostgator.com <== website.
Step 2, Choose a shared hosting plan.
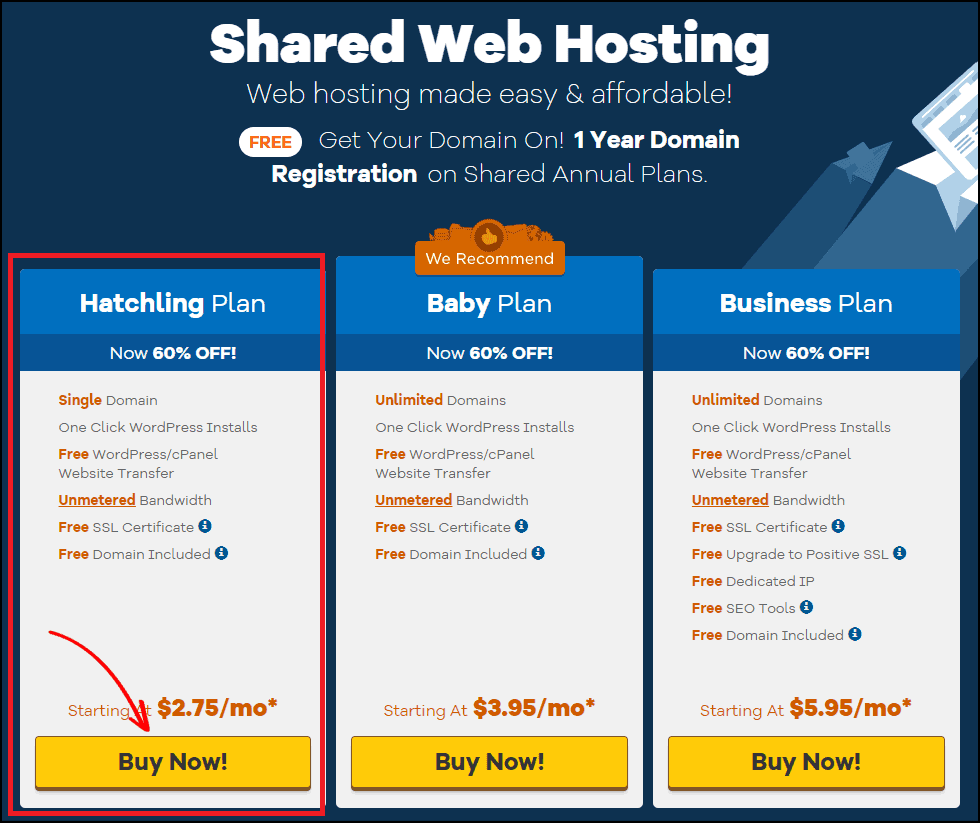
HostGator offers 3 different shared hosting plans, Hatchling, Baby, and Business.
If you want to host only one website right now, then Choose the Hatchling plan. Although, you can upgrade your current plan at any time.
Click on the Buy Now button to get started.
After that, you will be redirected to the domain registration page.
2. Register a Domain
Before building your hotel booking website, you need to choose a domain name for your website.
Choosing the right domain name for your business or website is very important.
Because a domain name represents your business online and it is the first thing that people notice when accessing your website.
If you choose the wrong domain name, you may not grow your business well.
Here’s a quick guide on how to choose the right domain name for your business:
a) Always go for .COM domain
I highly recommend you to register a .com domain, as .com is the most popular domain extension and has a huge number of users. So it’s easier to build a brand.
Besides, the .com was primarily created for commercial businesses, eCommerce websites, blogs, or any kind of profitable websites.
Read, .Com vs .Net – which domain extension you should choose.
b) Keep your domain name as short as possible
Try to keep your domain name as short as possible. The ideal domain length is 5-14 characters.
Shorter names are easier to remember and also memorable.
c) Avoid hyphens and numbers in your domain name
Never add any hyphens or numbers in your domain name. Domain name with hyphen or number doesn’t look legit and most of the time scammers use it.
d) Don’t repeat any letter
When choosing a domain for your website, you should not repeat any letter. For example, in this domain, “petttshoop.com” which contains one or more repeated letters, isn’t good to use.
These types of domain names often confuse people.
e) Think of new domain names
Due to the massive popularity of the .com domain name, it looks like all the good domain names are already registered which can’t be registered again. If this happens, you need to think of new names until you find a good one. You can also use your name for your brand.
Let’s register a domain.
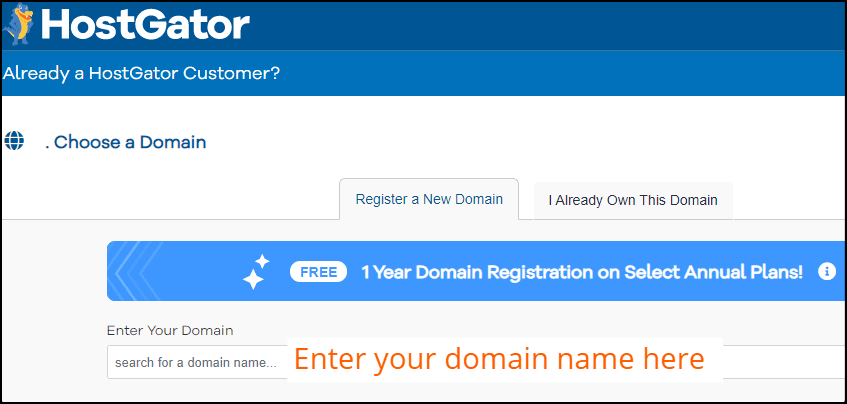
Step 1, Choose a domain
From this page, you need to register your domain name.
At first, enter your domain name and it will automatically check if the domain is available to register.
In case the domain you entered is already taken, try a new name.
Now, click on the Register a New Domain.
Step 2, Add domain privacy
Once you enter your domain name, it will show you the Domain Privacy Protection option. By default, it’s checked.
I highly recommend you to add Domain Privacy Protection.
However, it will cost you an extra $14.95, but it will save you from spammers.

Domain privacy basically hides all your contact information from domain lookup tools, such as Whois, ICANN Lookup, etc.
If you don’t have domain privacy activated, spammers will collect your name, phone number, email address and spam you all the time.
Next, you need to complete the HostGator order form.
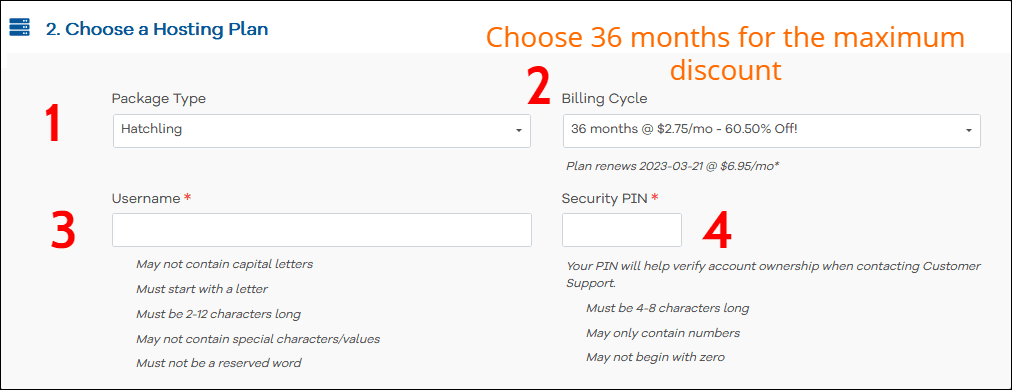
Step 1, Choose a Hosting Plan
From this section, you can choose how many WordPress sites you want to host right now.
After that, you need to choose your hosting’s billing cycle.
I recommend you to choose 36 months package for the maximum discount.
Then set username as well as a security PIN.
Step 2, Enter Your Billing Info
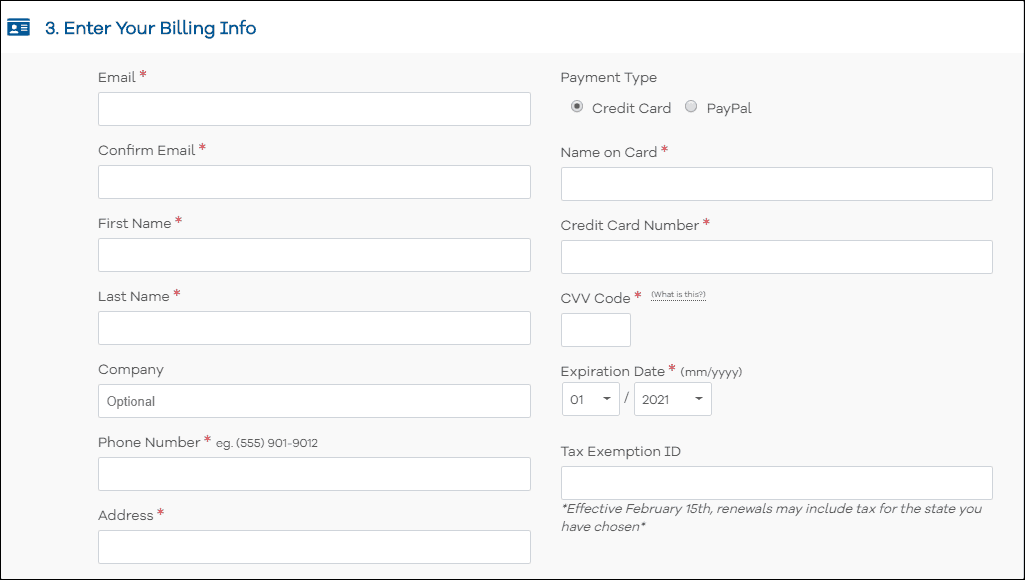
Here, you need to enter your billing information, such as Email address, your name, phone number, etc.
On the right side, enter your payment info. You can pay using both Credit Card and PayPal.
Step 3, Add Additional Services
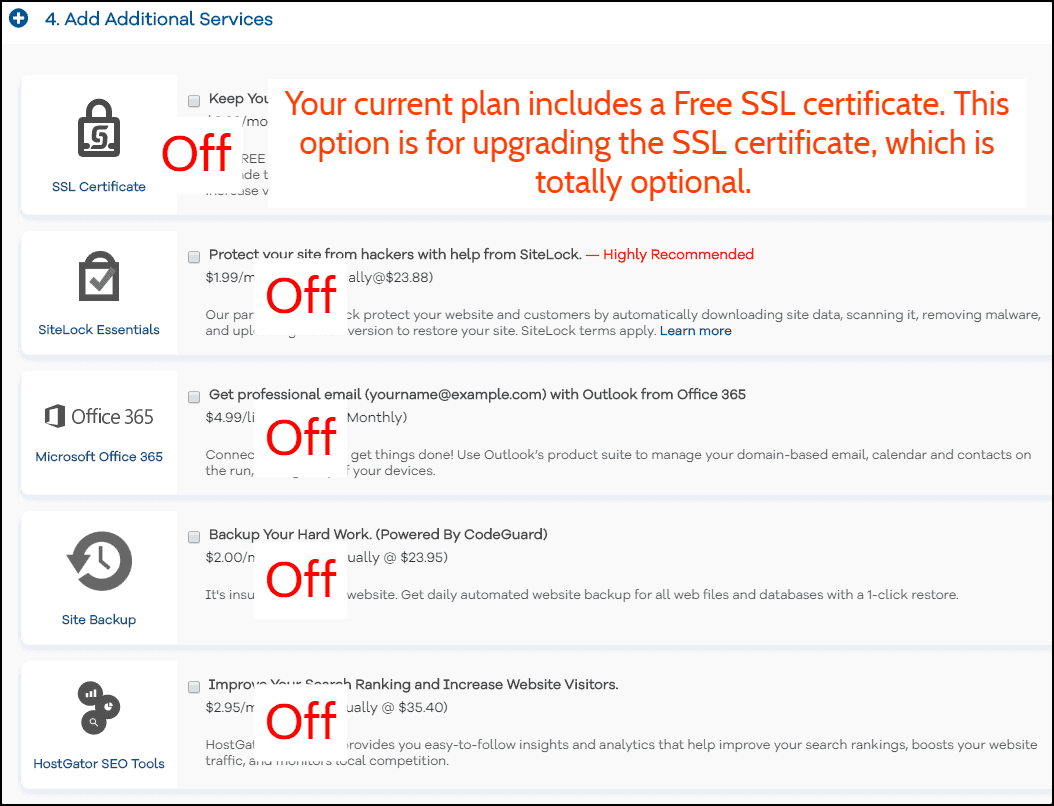
You will be asked to add additional services such as SSL certificate, SiteLock Essentials, SiteBackup, HostGator SEO tools, but it’s totally optional.
You can add additional services If you want.
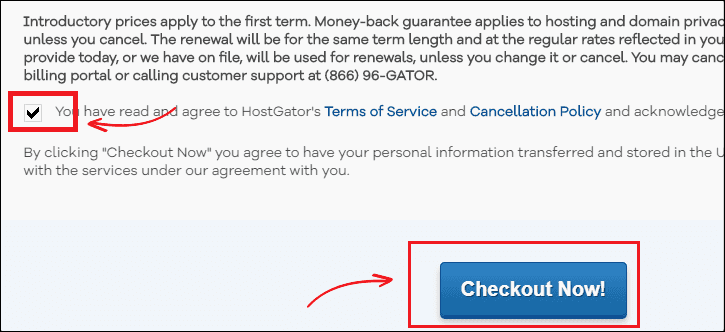
Step 4, Checkout Now
Now check the “Terms of Service” box and click on the Checkout Now button.
Step 5, Check Your Email
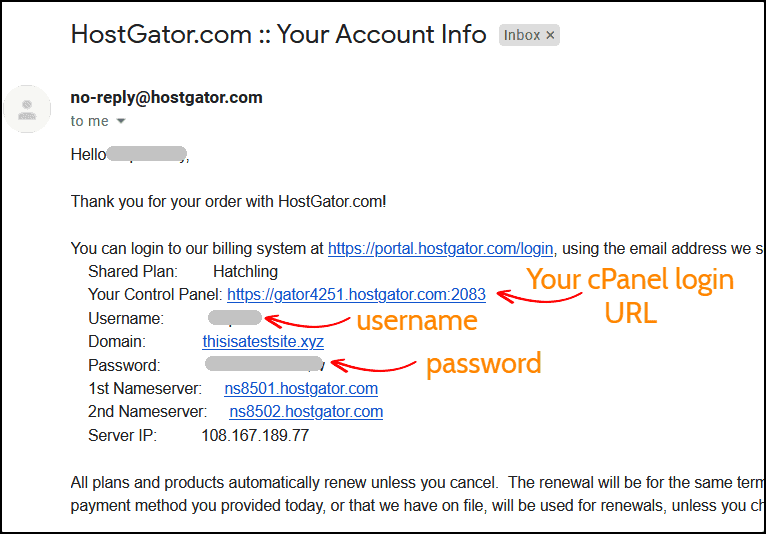
Once the payment is done, you will receive HostGator’s cPanel login details on your email.
Click on the Your Control Panel URL and then enter your username and password for logging into HostGator’s dashboard.
3. Install WordPress
First, log in to your hosting account using the login details that you received on your email.
Step 1, Go to WordPress Installer
At the top under popular links, you will see a WordPress Installer option. Click on it.

Step 2, Select Domain for Installation
First, click on the drop-down menu and select your domain. Leave the directory field blank and click on Next to start installing WordPress.

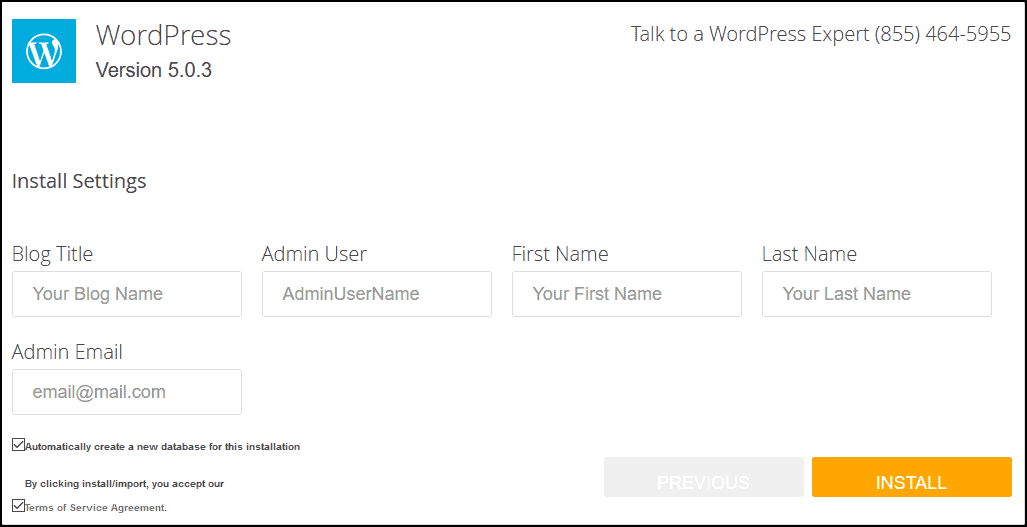
Step 3, Install Settings
Before installing WordPress, you need to complete the setup process. Enter your blog title, admin user name, your name, and your email.
Once done, click on the Install button to start the process.
Step 4, Save Your Login Details
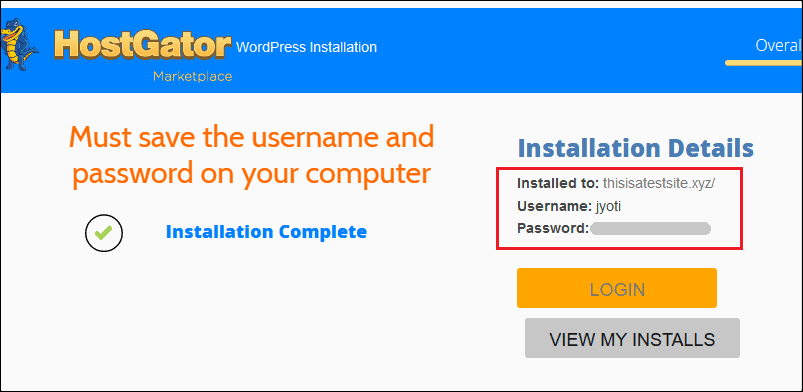
It will take a minute or so to complete the WordPress installation.
Once done, you will see your admin login details: username and password.
I highly recommend you save the username and password in a notepad file.
4. Setting Up Your WordPress Site
Once you install WordPress on HostGator, it’s time to set up your WordPress blog.
First, log in to your WordPress admin panel.
If you don’t know your admin login URL, simply add wp-admin at the last of your website’s name. For example, yoursite.com/wp-admin
Then enter your admin username and password to access your WordPress dashboard.
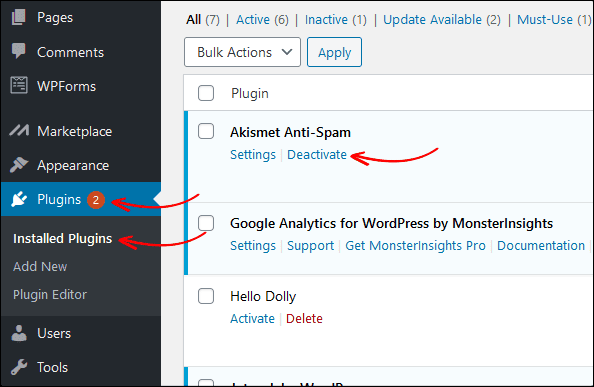
Step 1, Uninstall and delete the default plugins
The first thing after installing WordPress is to uninstall and delete the default plugins.
To delete a plugin, go to Plugins > Installed Plugins and scroll below to see your installed plugins.
Step 2, Setup SSL Certificate
By default, you already have an SSL certificate installed and your website can be accessed using both HTTP and HTTPS protocol.
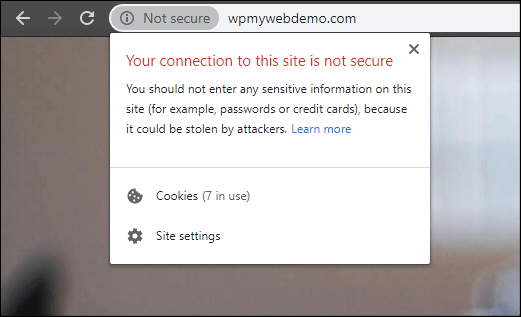
However, if you open your site on the Google Chrome browser, you may see “your connection to this is not secure” message. This is because Google advises webmasters to run websites over the HTTPS only.
And, this can be fixed by forcing your site to load only with HTTPS (SSL) connection.
Forcing your site to redirect to HTTPS is very simple.
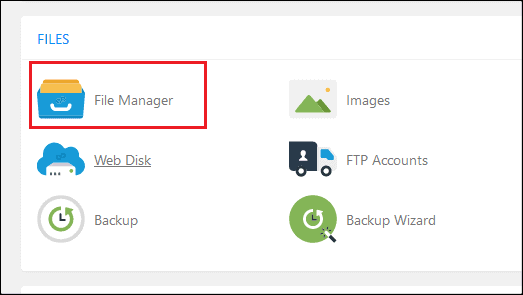
Step 1, For that, you need to log in to your hosting cPanel.
Step 2, Go to File Manager > public_html
Step 3, Find and edit the .htaccess file
However, sometimes the .htaccess file is hidden by default. In this case, go to the settings and check the option that says “Show Hidden Files”.

Step 4, At the end of the .htaccess file, add the piece of code.
RewriteEngine OnRewriteCond %{HTTPS} offRewriteRule ^(.*)$ https://%{HTTP_HOST}%{REQUEST_URI} [L,R=301]
Step 5, Save the file.
Step 6, Now, from your WordPress dashboard, go to Settings > General
Step 7, Change the HTTP protocol with HTTPS

Step 8, Click on the Save Changes at the bottom. Once done, you will be automatically logged out.
That’s it. Now your website will open only with HTTPS.
Read, 3 Different ways you can redirect HTTP to HTTPS in WordPress
5. Install a Hotel Booking Theme
In this part, I will show you how to install a hotel booking theme for your WordPress site.
There are tons of hotel booking WordPress themes available in the market and it’s hard to find the best one.
But, you don’t need to worry about it. I have researched and tested several hotel booking themes for you and will suggest the best one.
Soho is the hotel booking theme for WordPress.
Here is why:
- It is one of the highest-selling hotel booking WordPress themes.
- It’s always up to date
- It comes with several premium plugins
- Mobile and SEO friendly
- Fully responsive and customizable
- Well speed optimized
- It comes with 6 different homepage layouts
- Easy Booking.com, Airbnb, etc. integration
- and many more.

The theme has a huge list of features. You can check all the features here.
Here is how the theme looks like.


You can check the DEMO here.
Buy Soho Hotel WordPress Theme
However, if you would like to use a different type of hotel booking theme, you can find more themes here.
Step 1. Once you purchased a hotel booking theme, download all the files.
Step 2. Extract the ZIP file on your computer.
In that file, you will have the theme files, dummy data, and plugins.
Step 3. Once extracted the file, open the theme folder.

Step 4. Upload the soho-hotel.zip and soho-hotel-child.zip files on your WordPress site.
Step 5. To upload the theme files, go to Appearance > Themes from your WordPress dashboard.
Step 6. Then click on Add New > Upload Theme and then upload the theme files (zip).
Step 7. Once uploaded, activate only the Soho child theme.
Upon activation, it will ask you to activate the theme using its license key.
How to get the theme’s license key?
As it’s a paid theme, you need to activate the theme using a license key. For its license key, first, log in to your Envato account, and go to the downloads section.
From there, click on the Licence certificate and purchase code (text) option and you will get your license key as well as purchase code. Once you have this, you can activate your theme.

Step 8. Once done, it will tell you to install theme recommendation plugins. Click on the Begin installing plugins option and then activate them.

Now, let’s import the theme’s demo data.
Import Theme’s Dummy-data
To import the dummy content, go to your WordPress dashboard.
Click on the Demo Import option.
First, you need to delete all existing data and then import the data one by one.

That’s it. Now your website is ready to use and you can visit your homepage.
But, don’t worry. You can change everything on your site such as color, background image, font, layouts, widgets, and many more.
Now, let’s see how to make a hotel booking page.
6. Adding Hotels to Your Website
Now, I will show you how to add hotels to your page.
But before we start, make sure the WPbakery page builder which comes with the Soho WordPress theme is available on both pages, post, accommodation, and testimonial sections.
Because, by default, the WPBakery page builder is activated only on pages.
So, you wouldn’t able to edit your posts, accommodation, and testimonial sections using the WPBakery page builder.
To enable WPbakery page builder on every content section, go to WPBakery Page Builder > Role Manager.
Then, choose Post Types > Custom and check all the options, post, page, accommodation, and testimonial.

Once done, click on the Save Changes button.
Let’s now add a room to your page.
However, you already have the demo content installed, so you don’t need to build each page manually.
Click on any prebuilt page and customize using the WPBakery page builder as you want.
However, I will also show you the manual process for adding a room. So that you can easily customize a page later.
Step 1. Go to Accommodation
From your WordPress dashboard, go to the Accommodation page.
On that page, you can find several pre-added rooms that come with the theme’s demo content.
To add a new accommodation, click on the Add New Button.
Then click on the Backend Editor option to edit the page with the WPBakery page builder.

Step 2. Add an Image Carousel
At first, click on the Add Element button and choose the Image Carousel.
You can also use the search option to find an element.

From the settings, you can set images, slider size, slider speed, autoplay, etc.
Once done, click on the save changes button.
Step 3. Add Title
Then, click on the plus icon to add a new element.
Search for Title and edit it.
In my case, I am giving it the name “Room Description“.
You can enter any name on your choice.

Now click on Save Changes.
Step 4. Add Text Block
In this area, add a short description of your hotel.

Step 5. Add Tabs Content
In this section, I will show you how to add a tabs content.
Here’s how tabs content looks like.

This will give you a professional look to your page and most importantly, customers can easily check a room’s overview with just a click.
First, add a tabs element.
In the tabs element, add the Raw HTML element.

In this section, you need to put the HTML code for showing a table like a picture above.

Here’s the code below you can use.
<div><div><div><table><tbody><tr><td data-title=”Column 1″><i></i>Hi speed wifi</td><td data-title=”Column 1″><i></i>Airport pickup</td><td data-title=”Column 1″><i></i>24 hour front desk</td></tr><tr><td data-title=”Column 2″><i></i>Swimming pool</td><td data-title=”Column 2″><i></i>Chauffeur service</td><td data-title=”Column 2″><i></i>Ensuite bathroom</td></tr><tr><td data-title=”Column 3″><i></i>King size bed</td><td data-title=”Column 3″><i></i>Room service</td><td data-title=”Column 3″><i></i>Luggage storage</td></tr><tr><td data-title=”Column 4″><i></i>Coffee machine</td><td data-title=”Column 4″><i></i>Minibar</td><td data-title=”Column 4″><i></i>Room safe</td></tr></tbody></table></div></div></div>
You can also add or remove any option.
However, to add an icon, you need to use font awesome icon.
You can find more font awesome icons here, https://fontawesome.com/ and https://codesprogram.com/icons.
For example, I want to add Apple Pay icon, so the code I need to put is:
<i></i>
Don’t forget to save it.
Step 6. Add an Image Gallery
After that add an image gallery to show your hotel rooms.
You can add multiple images. However, I recommend you use the same dimension images.

- Widget title – Image Gallery
- Gallery type – Image grid
- Image size – Medium
Once done, click on the Save Changes button.
Step 7. Add a Frequently Asked Questions (FAQ) Section
At the bottom of the page, you can add a frequently asked questions (FAQ) section.
This is basically common questions that most of the customers often ask.
Add an FAQ element and enter a question as well as answer.

You can add multiple FAQs.
Once done, click on the Save Changes.
7. Add a Payment Gateway
By default, you can activate four different payment gateways:
- Pay on arrival
- Bank transfer
- PayPal
- Stripe
To enable a payment gateway, go to Hotel Booking > Settings > Payment Gateways.

Once done, don’t forget to save the settings.
8. Customize Your Site
Here comes the most important part.
From the Customize option, you can change your site’s look, such as title, description, fonts, colors, logo, widgets, header, footer, and many more.
From your WordPress dashboard, go to Appearance > Customize and change settings according to your needs.

Once you made the necessary changes, click on the Publish button.
What’s next?
Now you have finished creating a hotel booking website.
But Wait…
Before you start accepting booking orders, there are many things you need to change, for example, your site’s logo and favicon, permalink, product images, adding payment gateway, etc.
First, head over to the Soho theme’s documentation page. This documentation explains how to set up the theme and booking system.
Second, here I have listed the most important things to do after installing WordPress. (This is highly recommended).
Next, you need to install a security plugin for your WordPress site so that you can protect your site from hackers.
But, most importantly, you need to use a backup plugin for your WordPress site.
Because if you face any issue with your site or broken, you can store your site from the backup. It’s highly recommended.
Last but not the least, you need to go through all the options and check what thing does what.
You can also visit other hotel booking websites like Booking.com, Expedia.com, Airbnb.com, etc. for ideas or even you can implement their design and their processes.
One more thing.
As you are are using the Soho Hotel Booking WordPress theme, you may have support questions in mind or want to customize your theme with the help of code.
In that case, you need to reach out to the theme provider’s support team.
Here are a couple of ways you can contact the support team.
- On the ThemeForest page – Visit here
- By creating a support ticket – Visit here
That’s it. This is how you can build a hotel booking website.
Frequently Asked Questions (How to Create a Hotel Booking Website):-
How to create a hotel booking website like Booking.com?
Building a hotel booking website like Booking.com is very easy. In this article, I have created a step by step tutorial on this.
What is the cost to create a hotel reservation website?
The cost to start a hotel reservation website is around $100-$150.
Do you need to hire developers for building your Hotel booking website?
No. The estimated cost for hiring developers is around $20,000-$80,000.But, if you build the hotel booking website, the cost will be $100-$150 in total.
What do you need to make a hotel reservation website?
To make a hotel reservation website, you need a domain, web hosting, an SSL, and a theme.
In this tutorial, I have shared how you can build a hotel reservation website like Booking.com.
If you find this tutorial helpful, don’t forget to share it with your friends.
For more Amazing content like this, subscribe to our email newsletter below.
You may also like this article,
How to make an eCommerce site like Amazon (Step by Step Guide)
*This post may have affiliate links, which means I may receive a small fee if you choose to purchase through my links (at no extra cost to you). This helps us to keep WPMyWeb up and running and up-to-date. Thank you if you use our links, we really appreciate it! Learn more.
