How to Move WordPress Site to New Host or Server (with No Downtime)
Whenever you want to create your new website, I always prefer to build with WordPress as it comes handy, there are tons of plugins and themes available and most of all web hosting. But most of the people take the wrong decision when they choose a web hosting based on their cheap price. The problem comes when your site starts getting traffic. Then generally your site becomes slower and massive downtimes. In this case, you need to move WordPress site to a new web host or server.
Many of web hosting company doesn’t offer free site migration or charges an extra penny to migrate your site to new host. But it is not a tough process and you can do it easily. Why pay extra when you can easily migrate WordPress site to new web host or server. So in this topic, I will write step by step guide how to move WordPress site to new web hosting or server without any downtime.
Step by Step Guide to Move WordPress Site to New Host (Without any Downtime)
There are few steps for migrating your WordPress site and you have to do it carefully. You probably wondering if your site will go offline and lose your traffic during the migration process. The answer is NO. Your site will stay online like before and will be visible to everyone. So let’s start migrating WordPress site to new host.
In case you don’t know where to move your WordPress site or which WordPress hosting will be better and also offer free migration service, then here are few recommends that you can go with.
Recommended WordPress Hosting:
- Best Shared Hosting: Siteground is the best shared WordPress hosting. It is recommended by WordPress, free SSL certificate and has datacentres centres. They offer free WordPress migration service. To move WordPress site, you can request them and will do it in next few hours. They also provide the best customer support in web hosting industry. Their price starts from $3.95/month. Visit SiteGround hosting (%Discount coupon added in this link).
- Best Managed WordPress Hosting: If your website has a high volume of traffic, then go for WPX Hosting. It is the best managed WordPress hosting and comes too cheap. Not to mention that they will migrate WordPress site free in next few hours. Their basic plan allows you to host 5 sites and all plans include unlimited SSL. Their plan starts from $24.99/mo. Visit WPX Hosting (%Discount coupon added in this link)
- Best VPS Hosting: In case you need more power, you can get a VPS hosting. We recommend InMotion Hosting. You can host your unlimited domains and all their servers are powered by top-notch SSD drivers. On request, their WordPress expert will migrate WordPress site in next few hours. Their basic VPS plan starts from $24.99/mo. Visit Inmotion Hosting (%Discount coupon added in this link)
Important – Things to do before migrating your WordPress site:
Before we start, go to your old web host and:
- Take a backup of your files and database
- Delete all spam comments
- Clear cache if you are using any cache plugin
- Optimize your WordPress database. See how to optimize WordPress database.
Step 1, Install Duplicator WordPress Plugin
Duplicator is the best migration plugin for WordPress. It has over 1+ million downloads and highest rated migration plugin. It is a free plugin and using this plugin you can backup, clone and easily migrate WordPress site to new host.
One of the best things of Duplicator plugin is that your site will not go offline while you move WordPress site to new host.
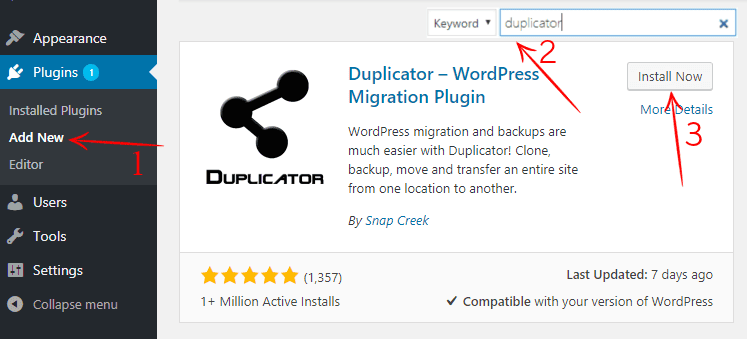
To use this plugin, first go to WordPress plugins> Add new and search for Duplicator. After this, install and activate this plugin.
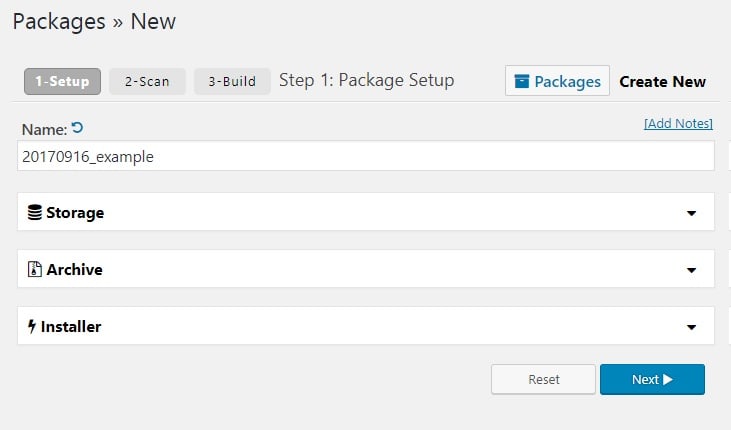
Now you need to create a new package for your site. Package contains your WordPress site and database. On the right top section, you will see “create package” and click on it. Then you will see the following options, click next.
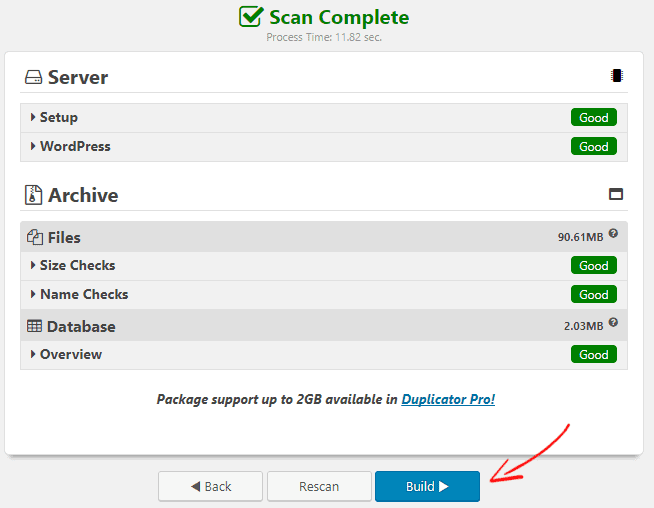
After that, it will scan your site and it may take few seconds to complete. When the scan is completed, you need to build your package but make sure all options are marked as good. In case of an option is marked as bad, you need to fix it. Now click on build and it will start building your package. It will take few minutes, so keep the tab open and wait for it to finish.
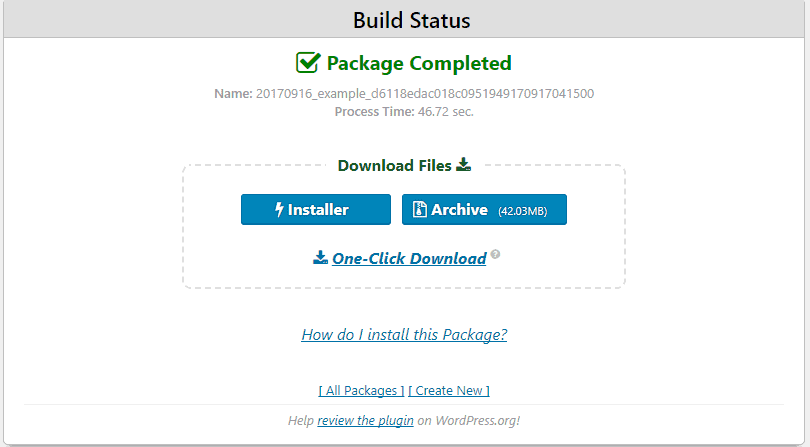
After finishing building packages, you need to download both “Installer” and “Archive” file. Download the files and keep it in a safe place. You will need it to move WordPress site to new host.
Step 2, Import Your WordPress Site to New Host
In the next step, you need to upload “Installer” and “Archive” files to your new host that you have downloaded. You can upload it through your hosting cPanel or FTP client.
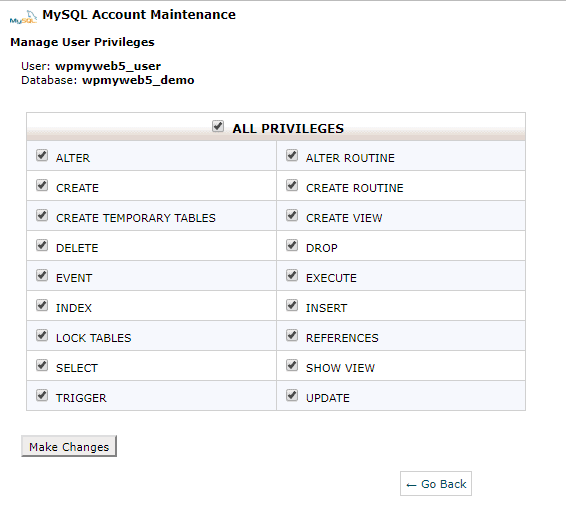
When you finished uploading files, you have to create a new Database from your new web host. But make sure you have given all privileges to the user. You need to keep your new Database username, user and password locally and we need it later.
Step 3, Edit Hosts File from Your Computer to Prevent Downtime
After you have uploaded your website files to your new host, you need to access your Installer file to start installing your site. You can access your Installer file by typing this on your web browser,
“http://www.yoursite.com/installer.php”
While you try to open this URL, you possibly get 404 error because your domain name is still pointing to your old web host. So now if you change your domain nameservers, you will get a broken website or your site will be offline. As a result, your site will be inaccessible.
To prevent the downtime, you first need to edit your hosts file from your computer. So by this, the hosts file maps the domain name to a specific IP address. But you can do it only from your computer. That means only you can see the website from the new host where rest of the world will see your website from your old host. I will show you how to edit the hosts file from both windows and mac.
The first thing you need to find the IP address of your new web host. Login to your new hosting cPanel and on the left or right corner you can see your hosting IP address. If you have trouble finding it, you can ask your web hosting provider. After that, copy the IP address and save it locally.
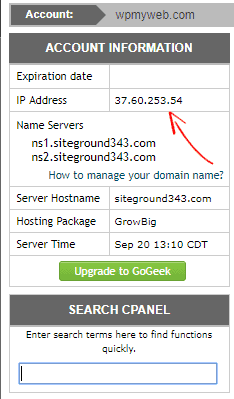
As you can see that my hosting IP address is 37.60.253.54, so I will copy and note it down. Your IP address will not be same as mine, so you need to write yours.
Then, if you are a Windows user, go to Programs> All programs> Accessories. Find notepad and run as Administrator. After that, to go “C:\ Windows\ System32\ Drivers\ etc“. There you will see your hosts file and open it.
C:\ Windows\ System32\ Drivers\ etc
For Mac users, go to Applications > Utilities > Terminal and enter the following command to run it.
sudo nano /private/etc/hosts
Now you just need to add the new IP address to your hosts file.

You have to enter your IP address and domain name instead of yourdomain.com. Don’t forget to save it. Now you can access your new website from your computer.
Step 4, Start Installing Process of Your Site to New Host
Now you are ready to run the installer file. To run the installer, you need to open your web browser and type your website URL with installer.php like below.
http://www.yoursite.com/installer.php
After entering the URL, you will see a page like this. If all options are shown as pass, then you are good to go. To process this, click on next button below.

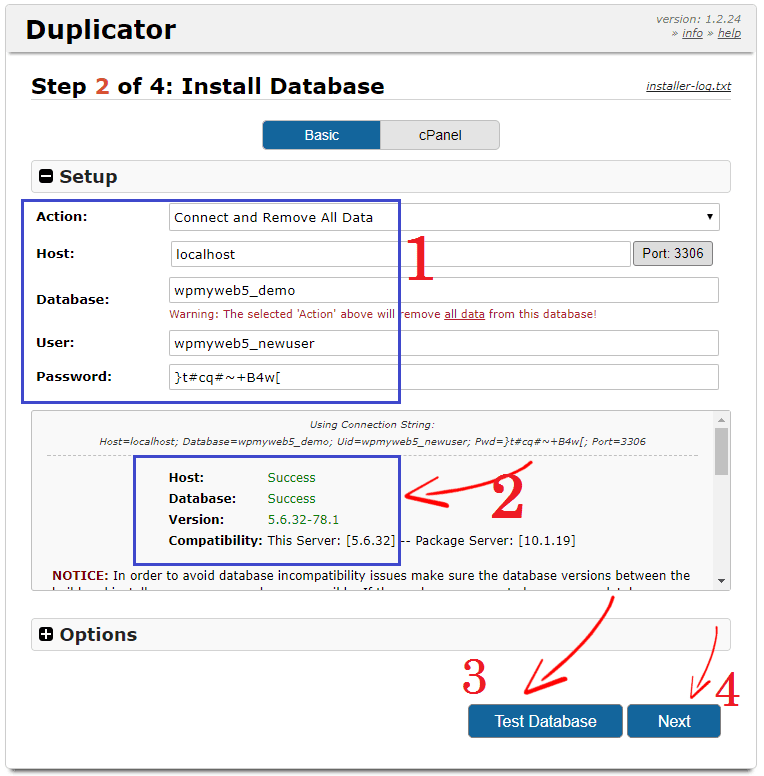
In this step, you need to enter your new Database name, user, and password that you have just created. But make sure there is no space between those characters. Now click on Test Database to check if you have entered Database details correctly. If the test passed, you need to click the next button for the next step.
In this field, you have to update your site. At first, enter your website URL in the URL field. By default, Duplicator plugin sets your website path, so you don’t need to edit it. You can enter your site title now or you can edit it later from settings.
As you are moving WordPress site to new host, you can create a new Admin Account but it is optional. Leave it blank, if you want to use your old admin account that you are using for your old site.

In the final step, you have to log into your site and check if everything is working properly.
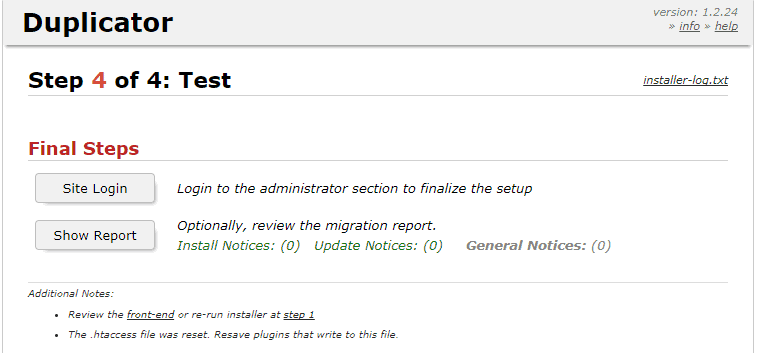
After you logged in, you need to remove the installation files, clear build cache, save permalinks and you are done. Now you have successfully migrated your WordPress site to new host.

Step 5, Change Nameservers
As you have just moved your WordPress site to new host, but your domain name is still pointing to your old web host. So you need to change your name server and In this guide, I will show you how to change domain nameservers.
First, go to your new web hosting panel, go to your account information, there you will find your nameservers. Now just copy your nameservers and note it down. In case of you can’t find your nameservers, you need to contact your hosting provider.
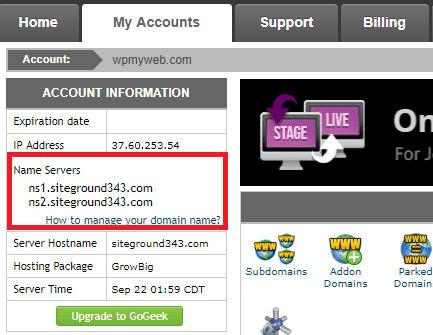
If you have registered your domain name with GoDaddy, NameCheap or any other domain name registrar, then you need to login there. As I have registered my domain name with GoDaddy, so I am showing you how to change nameservers. This process is same for all domain name registrars.
Now go to “My Products”, select your domain and click on Manage DNS.

After that, click on “Change Nameservers” and a box will pop up. Then enter your new hosting Nameservers that you have copied from your new host. After adding it, Click on save and you are done.
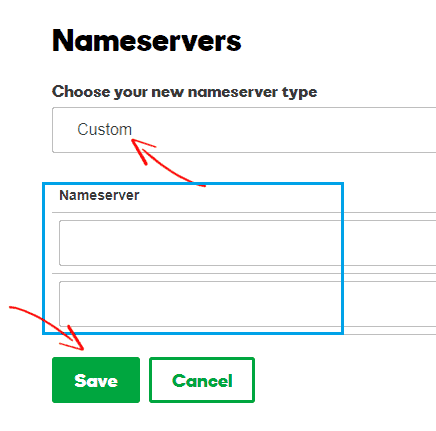
Now your WordPress migration process is totally completed. You have just changed your Domain Nameservers, it may take 6-24 hours to fully propagate. As your old and new host contains same website contents, so your site will be visible to everyone. This confirms 100% uptime of your site.
When the propagation is completed, don’t forget to change the hosts file back from your computer that you have changed in step 3.
After complete propagation, your new host will serve website files to visitors. But you should wait 5 days before you cancel your old host.
Conclusion
If your current web host is not good as you expected or you have high traffic on your site, then you should move WordPress site to a good web host. But you shouldn’t pay or hire an expert to migrate your WordPress site. Migrating a WordPress site to a new host is very easy and quick process. In this tutorial, I have shown step by step process how to do it.
For migrating WordPress site, I have used the best WordPress migration plugin called Duplicator as it comes free and handier. And the best thing of this plugin is you can easily create a backup of your site and easily move WordPress site to new web host.
I hope this tutorial helped you to successfully move or migrate WordPress site to new host without any downtime. If you have any question or any opinion regarding this tutorial, please drop a comment below. You can also connect us on Facebook, Twitter, Google+.
Here are more important WordPress articles you may like to see,
- 5 Best WordPress Migration Plugins to Safely Move WordPress Site to New Host
- 7 Best Google AdSense Plugins for WordPress [2017 Edition]
- 9 Best WordPress Hosting in 2017 [Expert’s TOP Picks]
*This post may have affiliate links, which means I may receive a small fee if you choose to purchase through my links (at no extra cost to you). This helps us to keep WPMyWeb up and running and up-to-date. Thank you if you use our links, we really appreciate it! Learn more.


Hi Jyoti Prakash,
Well described tutorial bro. Recently I have moved my site from old to a new web hosting by doing thing manually. That’s why I know how complex it is if someone doing this for the very first time.
I think your article will definitely help them who wants to move their site from one to another hosting by using duplicator plugin.
Thanks for sharing.