15 Most Important Things to Do After Installing WordPress
Many WordPress users ask what cool things to do after installing WordPress, what are the best WordPress settings or best setup for WordPress? These are common questions asked by new WordPress users.
Let’s say you have just installed WordPress and you are ready to publish your first post. But, are you going to leave your WordPress settings default as it is? By default, WordPress comes with its own default settings and preinstalled items which are not usable, not user-friendly and doesn’t look professional. When a user visits your website or a page, then the user understands how professional you are. If your content is great buy your website looks like super spammy, then the user wouldn’t give any value to your site. So all your hard works will go in vain.
But it is not hard as you think. To give a smart look to your WordPress site, you just need to follow some steps that are mentioned below. By implementing those settings to your website, you are not just giving a professional look, but also you are making your site SEO-friendly and user-friendly.
In this article, I am sharing 15 most important things to do after installing fresh WordPress.
15 Most Important WordPress Settings After Installing WordPress
There are a bunch of things that are already included by default when you install WordPress i.e: sample post, two or more preinstalled plugins and themes. You need to clear those unnecessary things as soon as you install your first WordPress site.
So, first things first. Let’s set up your WordPress site.
1. Change Site Title and Tagline
After installing WordPress, the first thing you need to change your website’s Site Title and Tagline. If you didn’t change the site title and tagline during WordPress installation, then you need to change it now. By default, WordPress uses “Just another WordPress site” tagline, so make sure to change it right away.
To change it, log in to your WordPress admin dashboard, go to Settings> General. There you need to provide your site title and tagline. Here’s how it looks like.

The Site Title is same of your website name and the Tagline is a short description that tells what your site about. Make sure to keep the Tagline description short as much as possible.
The Site Title appears in the title bar of your browser tab. In case, you are not using an image logo, then the Site Title will be used as text logo.
2. Enable or Disable Site Registration
If you want to run a multi-author WordPress blog where many users need to register, then you can enable the registration option on your site. You can disable the registration option if you are going to be a single author.

This option is useful if you accept guest post, so users can directly submit their guest post. We also recommend you to use No Spam Registration plugin to prevent spam registration on your site.
The second option is New User Default Role. Make sure you keep it to Subscriber. This way new users will have least access to your website. Later, you can promote any user account based on your choice.
3. Update Timezone
In the General Settings, scroll below and go to Timezone option. From there, update your WordPress site’s timezone that is same to your local timezone. You can update timezone by choosing a city or UTC timezone offset. Click on the drop-down icon to select a timezone.
From there, you can also change date format and time format.

This function is very important to show date and time on your site and it is also useful for scheduling your WordPress post.
After you set up, your site’s Site Title, Tagline, Registration option, and Timezone, don’t forget to Save the changes.
4. WordPress Discussion Settings
WordPress discussion allows you to customize your WordPress comments. For example, you can enable or disable WordPress comments, if Trackbacks or Pingbacks are acceptable, if comments are needed to manually approve and much more.
First, go to WordPress settings> Discussion and then set up the options.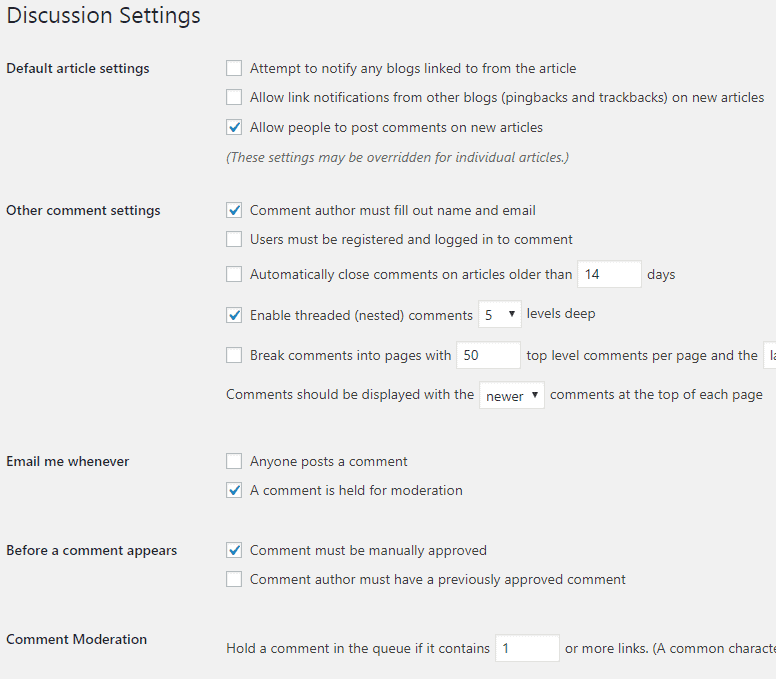
These are the exact WordPress discussion settings that I am using on my site. After you make any change, don’t forget to save the changes.
5. Update WordPress Ping Lists
When you publish a new post, WordPress automatically notifies to popular update services that you have updated your blog.
By default, WordPress comes with only one ping service. You can add more ping services from your WordPress admin dashboard directly. By adding more ping services, your site will be notified to popular update services, this way you can increase your site traffic.

To update WordPress Ping list, go to Settings> Writing and enter ping list there. After adding it, click on Save Changes to update the settings. Check updated WordPress Ping list for faster indexing your blog posts.
6. Customize WordPress Reading Settings
WordPress reading settings allow you to set whether your page or posts will be displayed on your site’s homepage. You can either choose “Your Latest Posts” or “A Static Page”.
If you choose,
- Your Latest Posts: All the published posts will be displayed on your homepage. Use this option, if you want to show your blog posts accordingly. You can also set how many blog posts will be shown on the homepage.
- A Static Page: You can show any particular page to your homepage.
Don’t worry if you select an option now, you can change it later. Besides, you can change this homepage displays option from Appearance>Customize.
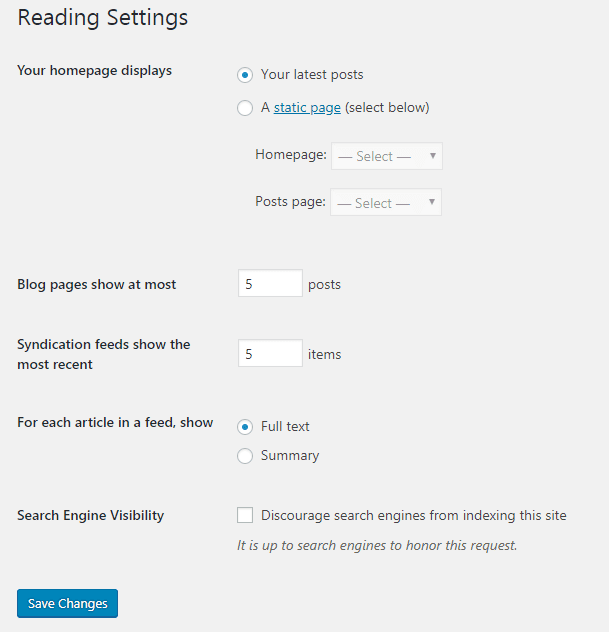
In the next, uncheck “Discourage search engines from indexing this site” and click on Save Changes. This will allow search engines like Google, Bing, Yahoo etc. to index your website.
7. Change WordPress Media Settings
By default, WordPress automatically generates all the uploaded images and create multiple dimensional images. This way it can create extra load on your web server. To prevent this, you can disable WordPress auto-generate images function.
Go to WordPress Settings> Media Settings. There you can see a list of maximum images dimensions to use when adding an image to WordPress media library.
Now simply add “0” into those fields to set it up. This will stop WordPress from generating your images.
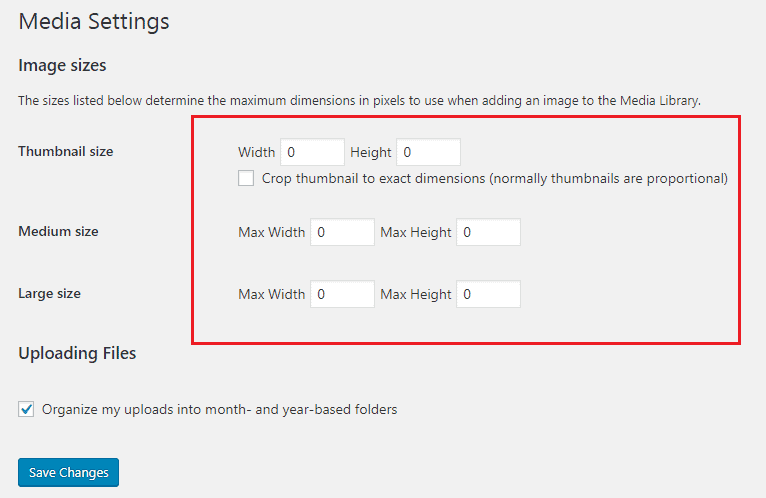
If you are using high-resolution images, make sure to compress them using image compressing WordPress plugin.
8. Change WordPress Permalink
Permalinks are a type of links to a webpage. If you enter to any website, you can notice the permalink of that site. For example, “http://www.yoursite.com/sample-page” or “https://example.com/what-is-a-permalink“. A permalink can contain with different tags i.e. date, time, post name, numeric etc. and depends how webmasters set their permalink structure.
Permalinks are an important part of your site and it has a great role in your site SEO. By default, WordPress uses a permalink structure which isn’t SEO friendly and it looks ugly. So you can change your WordPress permalink structure which is SEO friendly.
Go to WordPress Settings> Permalinks. WordPress offers 5 different permalink structures and you can use any of them. For example, a good SEO-friendly structure is “http://www.example.com/sample-post“.
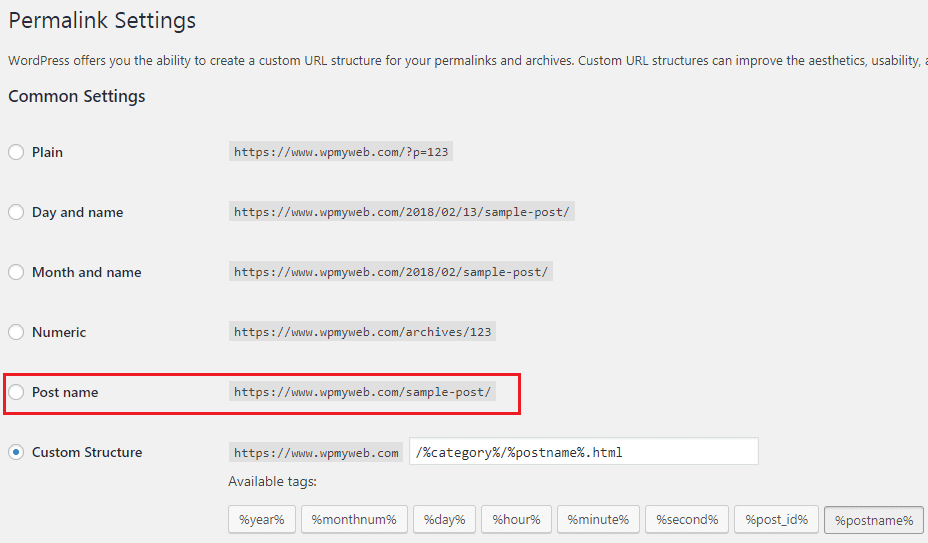
After you change your permalink, click on Save Changes.
[thrive_text_block color=”note” headline=”Note”]Once you change your permalink, don’t change again. By changing permalink, all the URLs get changed, so all your posts and pages with come up with 404 error pages and you will lose your site rank, then you have to start from Zero.
So, I highly recommend you to change it only once after you install your new WordPress site. [/thrive_text_block]
9. Delete WordPress Sample Post and Page
When you install WordPress for the first time on your domain, you will notice a sample post and page that are already created. You can see the sample post “Hello World” from your WordPress site’s homepage. This is just an example how your site looks like and it’s better to see something instead of seeing a blank or broken page. So, you can delete the sample post.
Deleting “Hello World” sample post from your site is very easy. From your WordPress dashboard, go to Posts and click on All Posts, then Trash the post.
This is not done yet. You also need to permanently delete the post. Once you trashed the post, go to Trash and click on Delete Permanently. Now you have successfully deleted the “Hello World” sample post.
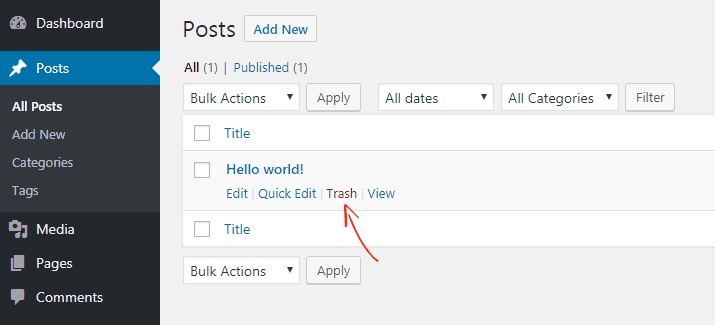
Similar way, you can delete the Sample Page by going Pages> All Pages.
10. Delete Unused WordPress Themes
Many newbie WordPress users try different themes on their website to check what suites to their sites most. After many themes install, they usually use one with keeping other themes. But keeping many themes on a site can create many problems.
Like other WordPress updates, WordPress themes also need to update frequently. It can create a great headache to update all themes and if you don’t update them, it will become outdated and it can be a security issue for your site.
Hopefully, deleting unused WordPress themes can be the fix. To delete a theme, go to Appearance> Themes. There you can see how many themes you have installed. Now click on Theme Details of a theme and click on Delete from the left bottom corner.
11. Upload a Favicon
Favicon is another important thing of your website and it has same value like your website name. Favicon carries a unique identity of each website. You can a notice favicon in the browser tab before Site Title and each website has its own icon.
By default, WordPress uses its own Favicon and sometimes many WordPress hosting companies add their logo which is not suitable for your site. So you need to change the Favicon right away.
To add a Favicon, go to Appearance> Customize> Site Identity and there you will see Site Icon.
![]()
There you need to upload your site icon and make sure the image size at least 512×512 pixels.
After you upload, click on Publish from the left top corner. Now refresh your browser to see the Favicon. Here are few alternate ways to add Favicon on your WordPress site.
12. Customize Widget Area
After installing WordPress, you can see few widgets are already added to the sidebar e.g. Search box, Recent Comments, Archives, Categories, and Meta. By default, WordPress automatically adds them and it also depends on a theme. For example, the default Twenty Seventeen WordPress theme contains only one single sidebar and two footers, so you can add any widget in those areas.
To add or remove a widget, go to Appearance> Widgets, there you can see total available widgets for your website. If you have installed a new WordPress theme, then you can see more widgets. But I recommend you to remove few default widgets from the sidebar i.e. Recent Comments, Archives, and Meta.
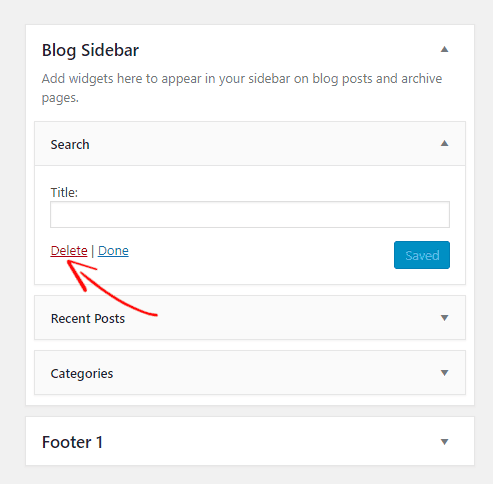
To remove a widget, simply click on a widget and a box will appear like above, from there click on Delete to remove the widget. Don’t panic, you can add or remove any widget to sidebar or footer area.
13. Complete Your User Profile
Before you publish any post on your site, you should complete your user profile first, no matter if you are the site administrator or a contributor. Everytime you publish a post, an author bio box will appear at the end of the post. If your user profile is completely blank, users wouldn’t give much value to your site.
So, always keep your user profile complete and updated. Go to Users> Your Profile from your WordPress admin panel.
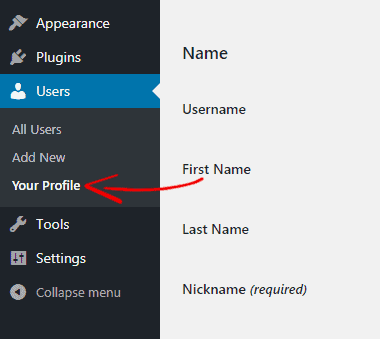
From there, you can enter your user details and choose how your name will be displayed on posts. Besides, you can also change your password, photo and add a short biography.
Once you finished updating your profile, click on Update Profile to save the changes.
14. Disable Directory Browsing
Sometimes, when your web server doesn’t find an index.php file, it automatically displays an index page which shows all the directory of your site. This way anyone can see your important files, copy images, site structure etc. Many times hackers use a vulnerability process to access your files.
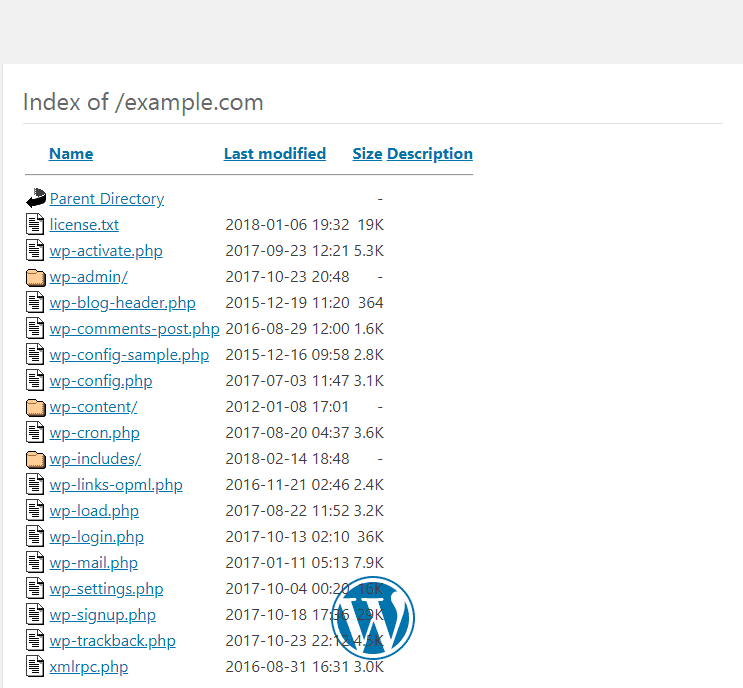
By disabling directory browsing, no one can see your WordPress site files.
For this, you need to access to your .htaccess file. You can do it from your web hosting cPanel or using an FTP client. Now open your .htaccess file and add the following code at the end.
[code]Options All -Indexes[/code]
Now save your .htaccess file. After this, your directory browsing will show this message instead of showing all directory from your site.

15. Install an Anti-Spam Plugin
After your WordPress site goes live, most probably you will start getting tons of spam comments every day. This is so annoying and it may hurt your SEO as well. If you don’t manage them from the start, it will be a huge problem for your website.
Thankfully, there is an anti-spam plugin available for WordPress. Once you setup Akismet plugin from your WordPress admin panel, the plugin will take care all the comments. All the comments are filtered by Akismet and it separates all the spam comments to a different area and only legit comments will be shown for approving. This way you can save your time and can focus on your work.
Conclusion
After installing WordPress, there are many cool things to do with WordPress. In this article, I have written 15 most important things after you install WordPress.
Many new WordPress users don’t change their default WordPress settings and end up showing other company’s logo, sample post, default site name etc. and it becomes hard to rank a site on search engines.
So, it is highly recommended that you change your WordPress setting after installing WordPress. Mentioned above 15 different settings are the best for newly installed WordPress and the best setup for WordPress.
I hope this tutorial helped you to perfectly setup your WordPress site. If you have any question in your mind, please let us know in the comment section. If you like this article, please do share with your friends.
Related Articles,
- Blogger Vs WordPress? Which one to choose and why?
- 13 Best Tips to Speed Up Your WordPress Site
- 20 Must Have WordPress Plugins for All WordPress Sites in 2018
*This post may have affiliate links, which means I may receive a small fee if you choose to purchase through my links (at no extra cost to you). This helps us to keep WPMyWeb up and running and up-to-date. Thank you if you use our links, we really appreciate it! Learn more.
