How to Make a Website like Amazon (Under 30 Minutes)
Do you want to make a website like Amazon or eBay or Flipkart?
Or, you always wanted to create an eCommerce site like Amazon where you can sell products online but didn’t start yet.
Well, I can guess why.
You thought creating an online store like Amazon or eBay is way too hard, you need a lot of money ($10,000- $50,000) for hiring web developers and designers or having full coding knowledge?
That’s not the truth.
You can make an online store like Amazon under 30 minutes.
In this article, I will guide you through step by step processes on how to make a website like Amazon or eBay or Flipkart (from start to finish). Once done, you can sell your products online.
Before we begin, let’s check a couple of things that you need to know.
- Creating a website like Amazon takes around 25-30 minutes
- You don’t need to hire any developers or designers
- You don’t need to learn to code
- You don’t need a lot of money
- You can start selling products once it’s done
Ready to make a website like Amazon today? Let’s get started…
How to Make a Website like Amazon in 30 Minutes
- Get web hosting and register a domain name
- Install WordPress and WooCommerce
- Setting up your WooCommerce Store
- Install an SSL certificate
- Install a WooCommerce theme
- Adding products to your online store
- Customize your WooCommerce store
What do You Need to Make a Website like Amazon?
The first thing you need to choose the right platform for your online store.
There are several eCommerce platforms available and it’s quite hard to choose, especially for beginners.
But, you don’t need to worry about it. We have tested all the eCommerce platforms and tell you the most convenient one.
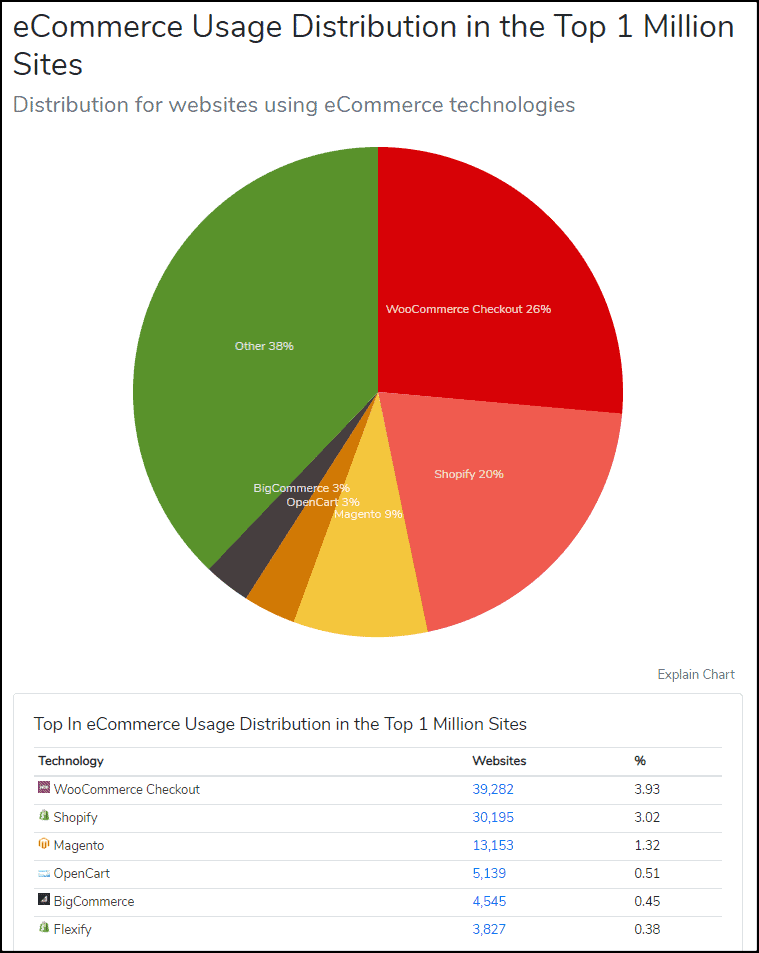
The most popular eCommerce platform is WooCommerce.
Over millions of eCommerce sites are powered by WooCommerce and growing massively.
[thrive_highlight highlight=’#eded49′ text=’dark’]There are many benefits to using the WooCommerce platform.[/thrive_highlight]
[thrive_custom_box title=”” style=”dark” type=”color” color=”#c5ecf7″ border=””]
- It’s an open-source software which is 100% free to use
- It’s very simple to use (beginner’s friendly)
- It’s fully customizable
- It’s well speed-optimized and secure
- Cost of building an online store using WooCommerce is very low
- You can get WooCommerce related support from almost everywhere, for example, on the official WooCommerce forum, on different Facebook groups, from different WooCommece blogs, etc. And it’s completely free.
- You can create any kind of online store including sites like Amazon or eBay
- Developers always keep WooCommece software up to date
- and there’s many.
[/thrive_custom_box]
To make a website like Amazon, you need:
- a domain name
- web hosting
- an SSL certificate
In a nutshell, a domain name is your website’s address on the internet.
Web hosting is where your website’s files are stored on the online. You can say web hosting is your website’s home. Without web hosting, you can’t make your website.
An SSL certificate is a must-have if you run an online store where sensitive information is delivered such as email, password, credit card details.
[thrive_highlight highlight=’#eeee22′ text=’dark’]Normally, a domain registration costs around $14 for 1 year, web hosting $14 per month and $60-$240 per year for an SSL certificate.[/thrive_highlight]
That’s too much for those who are just getting started.
Luckily, Hostgator offers a FREE domain registration and FREE SSL certificate with its hosting plan which starts only at $5.95 per month.
HostGator is one of the oldest web hosting providers (founded in 2002) and they are now powering over millions of websites worldwide.
They offer various types of hosting such as shared, WordPress hosting, VPS, Cloud, Dedicated.
[thrive_link color=’blue’ link=’https://www.wpmyweb.com/offer/hostgator-wordpress’ target=’_blank’ size=’big’ align=’aligncenter’]Click here to Register a Domain for Free[/thrive_link]
Let’s get started!
1. Get Web Hosting and Register a Domain Name
Registering a free domain name with HostGator is very easy.
Follow the steps below.
Step 1. Go to ==> www.HostGator.com <== website. Discount code added in this link.

Step 2. Choose the Starter plan. This includes 1GB of automatic daily backup, free SSL certificate, free domain registration, unlimited storage, automatic malware removal, etc.
Now, click on the Buy Now! button.
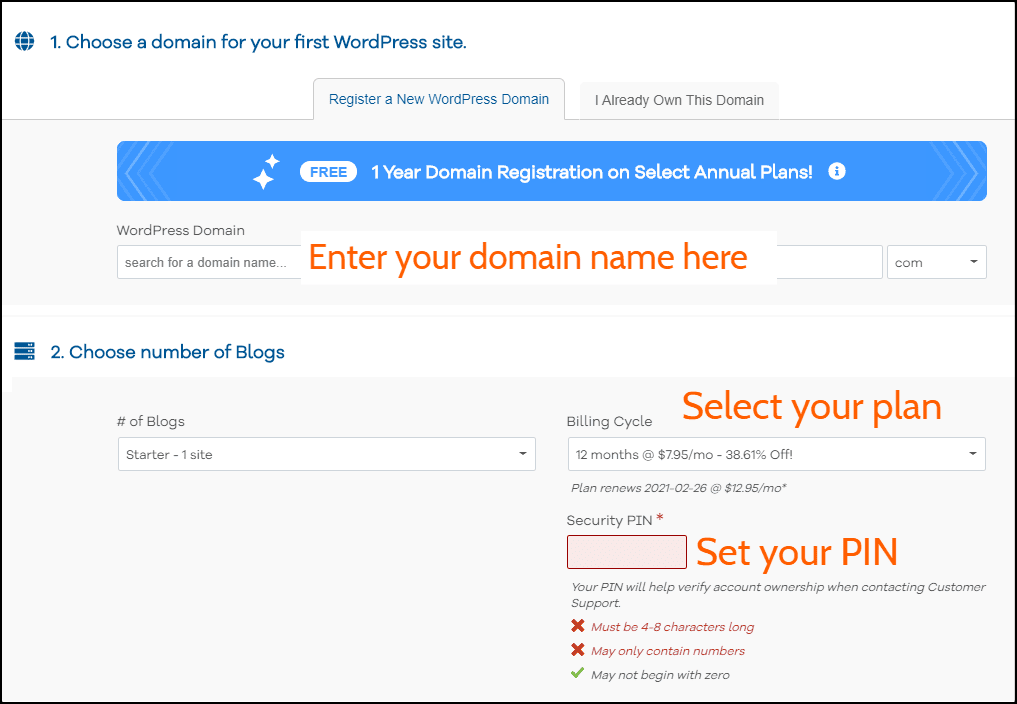
Step 3. On this page, you can register your favorite domain name.
First, enter your domain name, it will show you if the domain is available to register.
If the name you entered is unavailable to register, try with a different name. You can even enter your name.
With a domain name, you also need to choose an extension. The most popular domain extension is .com. However, if you are not sure which domain you should pic, read the difference between .com vs .net.
Once selected, go to the Billing Cycle section.
I recommend choosing at least for 12 months. You can also choose for 36 months if you want an extra discount.
Then set a security PIN. It should contain only numbers and must be 4-8 characters long.
Step 4. Enter your billing info. Also, select which payment method you want to use. You can make the purchase using both Credit Card and PayPal.

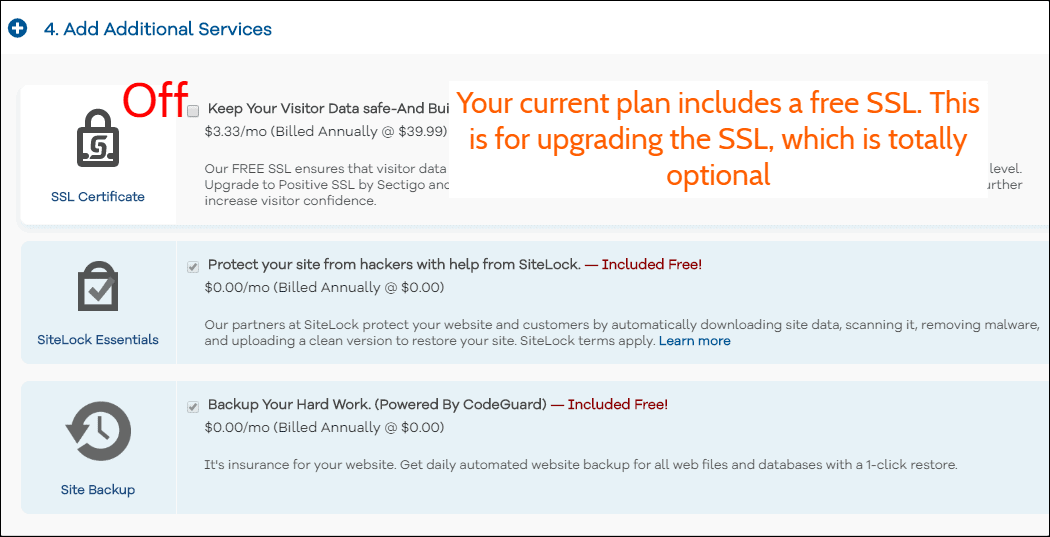
Step 5. By default, you are getting Site Backup and SiteLock Essentials.
Your current plan also includes a free SSL certificate. This option is for upgrading the SSL, which is optional.
Step 6. Check the Terms of Service box and click on the Checkout Now! button.

Step 7. Once done, check your email.
You will receive HostGator cPanel login details (Login Name and Password).

Now let’s install WordPress and WooCommerce.
2. Install WordPress and WooCommerce
First, log in to your hosting account using the login details that you received on your email.
In this step, we will install WordPress as well as WooCommerce.
As it’s a WordPress managed hosting, you wouldn’t see a regular cPanel. Although, you can do everything from your dashboard.
I am using it for a while and it’s super user-friendly.
Step 1. Once you logged in to your hosting dashboard, go to Hosting > Manage and click on the WordPress Admin button to log in to your WordPress admin panel.

It may take a few seconds to redirect you to the WordPress dashboard.
Step 2. That’s your WordPress dashboard. From there, you can customize your site.
[thrive_highlight highlight=’#eeee22′ text=’dark’]Before we start installing WooCommerce, let’s first uninstall the default plugins.[/thrive_highlight]
Go to Plugins > Installed Plugins. Select all the plugins > Deactivate and then Delete them.
[thrive_text_block color=”note” headline=””]
Before installing WooCommerce, check your WordPress version. If your WordPress version is outdated, you wouldn’t be able to install WooCommerce and some other plugins.
That’s why it’s very important to use the latest WordPress version.
[/thrive_text_block]
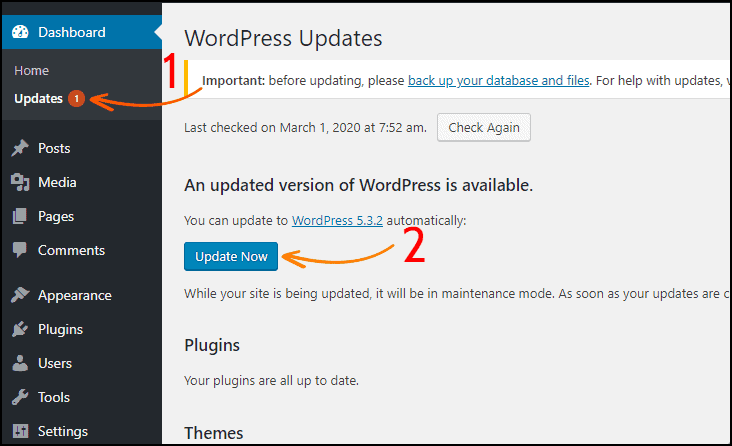
You can easily check your WordPress version by going to Dashboard > Updates. If it’s not updated, click on the Update Now button.
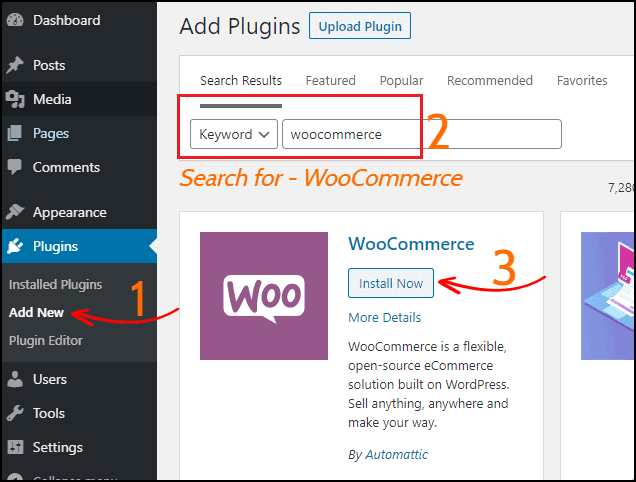
Now let’s install the WooCommerce plugin.
To install the WooCommerce plugin, go to Plugins > Add New and search for WooCommerce.
Once you installed and activated WooCommerce, it will ask you to set up your store.
In the next step, we will set up the WooCommerce Store.
3. Setting Up Your WooCommerce Store
Using these settings, you can set up your store’s location, currency, payment mode, shipping method, and many more.
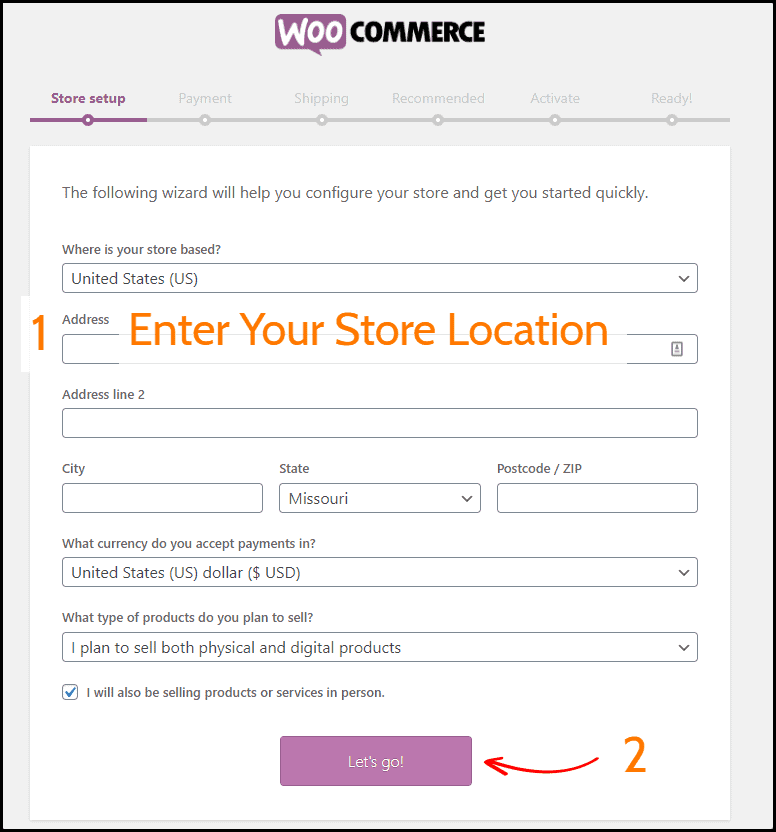
Step 1. Store setup: Enter your store’s address and then click on the Let’s go button.
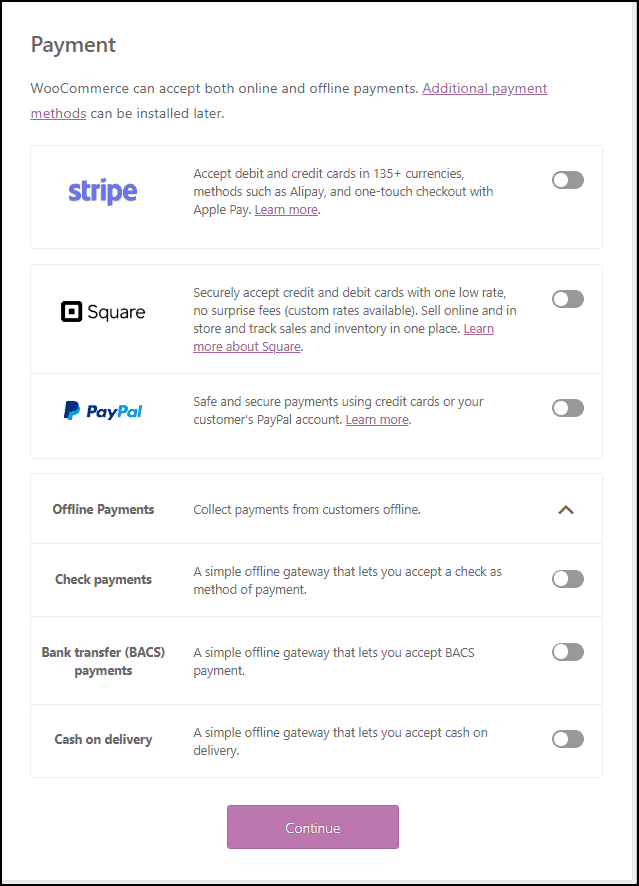
Step 2. Payments: From here, you can set up both online and offline payments. Activate the payment methods that you want to use in your store.
However, if you want to use a different payment method, you can install that later.
Step 3. Shipping: Using this option, you can print shipping labels at home.
Select the preferred weight and length units for your products.

Step 4. Recommended: In this tab, you can install a WooCommerce theme, set automated taxes, WooCommerce admin, Mailchimp email newsletter.
However, I only recommend activating only “Automated Taxes” and “WooCommerce Admin”.
We will install a WooCommerce theme later this step which will look like Amazon.

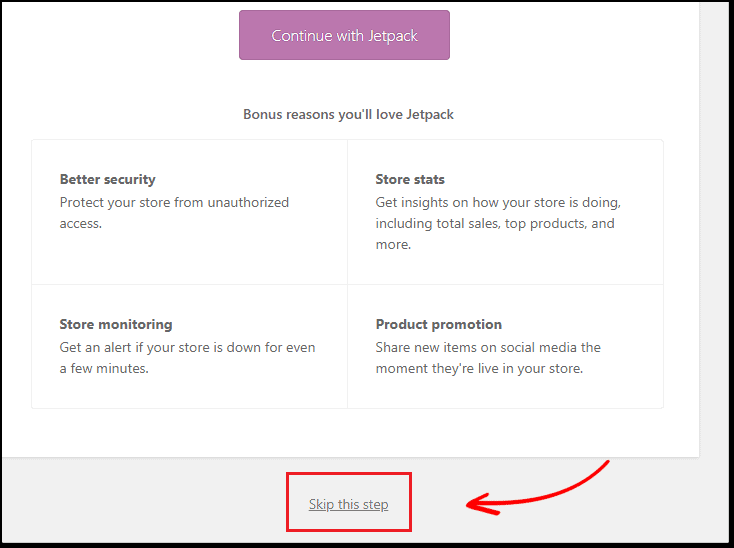
Step 5. Activate: It will ask you to install Jetpack. I recommend you to skip this step.
Step 6. Ready: You have successfully set up WooCommerce.
Now click on the Visit Dashboard option to go to your WordPress admin panel.

4. Change Your WordPress Admin Password
The next thing you need to change your WordPress admin password.
From the WordPress dashboard, go to Users > Your Profile and you can find the option “Account Management”.
There you need to click on the “Generate Password” button and it will automatically generate a new password.

Once done, click on the Update Profile at the button and you are done.
[thrive_text_block color=”note” headline=”How to Login to Your WordPress Admin Panel?”]
Here is your WordPress admin login URL – “yourwebsite.com/wp-admin”, that means you just need to add /wp-admin at the end of your website’s URL.
[/thrive_text_block]
I highly recommend you to save your admin login URL, username as well as password on your computer.
However, by default, WordPress doesn’t allow us to change the admin username.
In case you want to change the default admin username, read the guide on how to change default WordPress admin username.
Now we will install the SSL and force your site to redirect HTTPS (SSL).
5. Installing SSL and Force Your Site to Redirect HTTPS
As stated above that SSL is a must-have if you run an online store.
By default, you already have an SSL certificate installed. We just need to force your site to redirect HTTPS (SSL).
Now, if you open your site on the Google Chrome browser, you may see “your connection to this is not secure” message and might not able to login to your site.

This can be easily fixed by forcing your site to load only with HTTPS.
Step 1. For that, you need to log in to your hosting dashboard.
Step 2. Create an FTP account and save the password in a notepad file.

Step 3. Download and install the Filezilla client. Enter your FTP details into the Filezilla client and connect it with your server.
Step 4. Once connected, find the .htaccess file and edit it.
Step 5. At the end of the file add the piece of code.
[code]
RewriteEngine On
RewriteCond %{HTTPS} off
RewriteRule ^(.*)$ https://%{HTTP_HOST}%{REQUEST_URI} [L,R=301]
[/code]
Step 6. Now, save the file and reupload to your server.
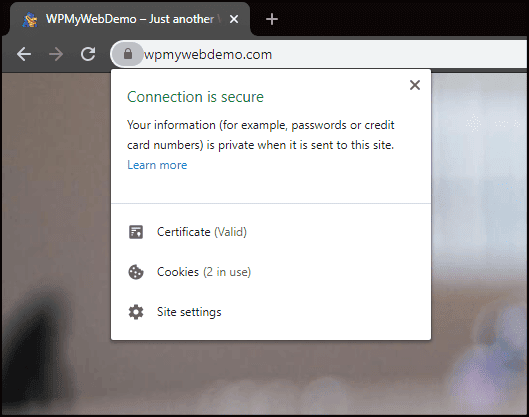
Step 7. Refresh your website and you will notice a lock sign that is appearing before your website’s URL. That means your website will open only with SSL.
Step 8. Go to your WordPress Settings > General
Step 9. Change the HTTP protocol with HTTPS. You can also add “www” before your website’s URL but it’s totally optional.
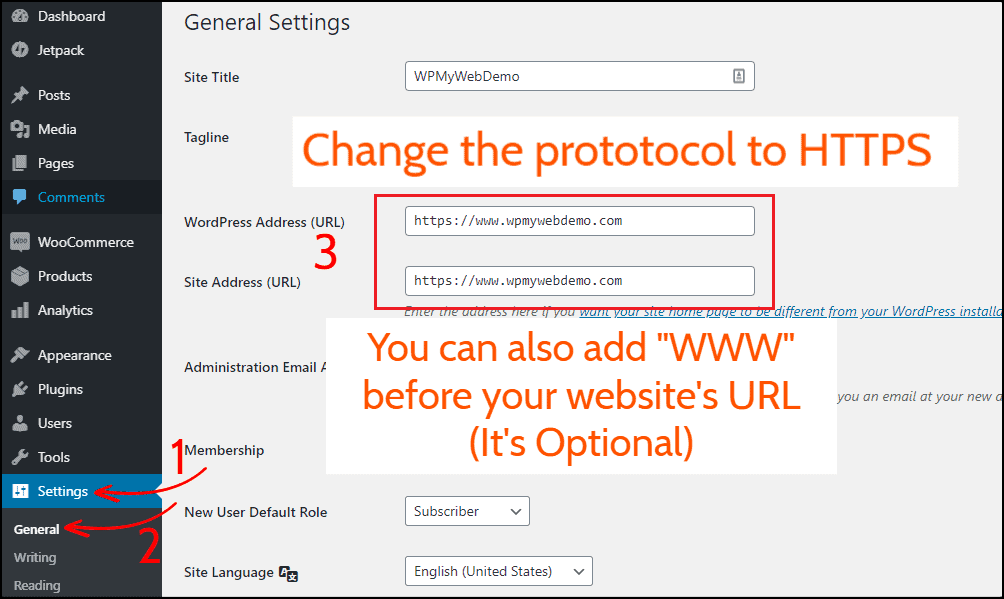
Step 10. Click on the Save Changes at the bottom. Once done, you will be automatically logged out.
That’s it. Now your website will open only with HTTPS.
Read, 3 Different ways you can redirect HTTP to HTTPS in WordPress
5. Installing WooCommerce Theme
Now, we will install a WooCommerce theme.
There are tons of WooCommerce themes available in the market and it’s hard to find the best one.
But, you don’t need to worry about it. I have searched and tested several WooCommerce themes and will suggest you the best one.
Electro Electronics Store is the best theme for WooCommerce.
Here is why:
- It is one of the highest-selling multivendor WooCommerce themes.
- It is the highest-rated WooCommerce theme.
- It’s always up to date
- It comes with several premium plugins
- Mobile and SEO friendly
- Well speed optimized
- It comes with 7 different homepage layouts

What this theme offers:
- Easy installation and setup
- Free lifetime updates and 24×7 support
- Comes with importable dummy data
- 6 Pre-defined header styles
- 9 Pre-defined color scheme
- 7 Different types of homepage layouts
- Responsive Megamenu
- 11 Pre-built Pages
- Includes 17 widgets
- WPML Compatible
- and many more.
Check the Electro theme demo here.
[thrive_link color=’blue’ link=’https://1.envato.market/BMad0′ target=’_blank’ size=’big’ align=’aligncenter’]Buy Electro WooCommerce Theme[/thrive_link]
However, if you would like to use a different type of WooCommerce theme, you can find more themes here.
Step 1. Once purchased, download all the files.
Step 2. Extract the ZIP file on your computer.
In that file, you will have the theme files, dummy data, plugins as well as a license key to activate your product.
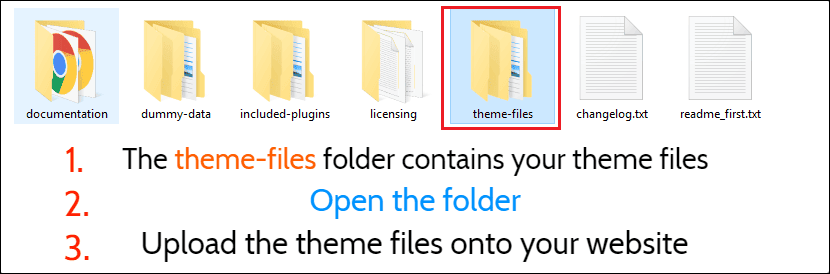
Now, we need to upload the theme files that are inside the theme-files folder.
Step 3. From your WordPress dashboard, go to Appearance > Themes.
As we are installing a theme manually, you need to click on Add New > Upload Theme and then upload theme files (ZIP) including the child theme.
Step 4. Once uploaded, activate only the child theme.
Upon activation, it will ask you to activate the theme using its license key.
[thrive_custom_box title=”How to get the theme’s license key?” style=”dark” type=”color” color=”#fefbda” border=””]
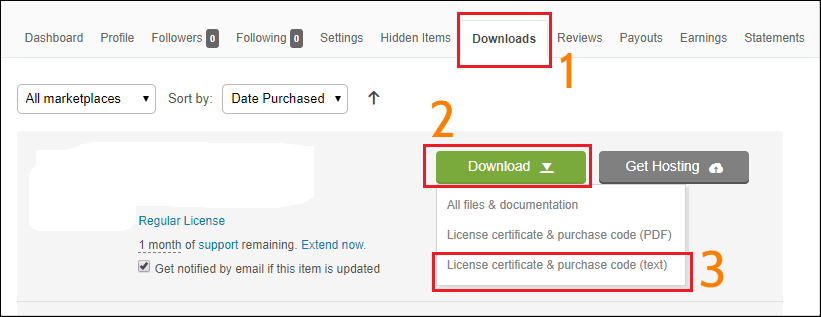
As it’s a paid theme, you need to activate the theme using a license key. For its license key, first, log in to your Envato account, and go to the downloads section.
From there, click on the Licence certificate and purchase code (text) option and you will get your license key as well as purchase code. Once you have this, you can activate your theme.
[/thrive_custom_box]
Step 5. Once done, it will tell you to install theme recommendation plugins. Click on the Begin installing plugins option and then activate them.

Now, you can visit your store’s homepage, but you wouldn’t see any products.
It’s because we haven’t imported the dummy data yet.
In the next step, I will show you how to import dummy data.
Import Theme’s Dummy-data
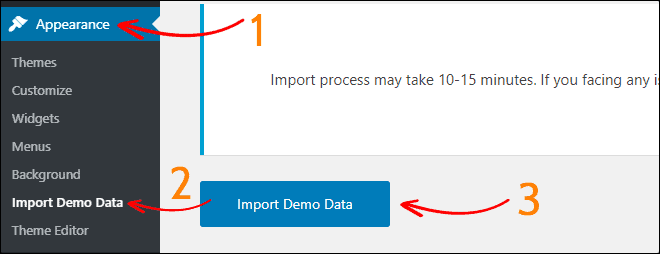
To import the theme’s dummy-data, go to Appearance > Import Demo data.
There are two ways you can import the demo data.
The default uploading method is One Click Demo Import which I highly recommend.
You can check your website’s homepage to check how it looks like. But, don’t worry. You can change anything you want such as color, background image, font, layouts, widgets, etc.
Now let’s start adding products to your online store.
6. Adding Products to Your Online Store
Adding products to your WooCommerce store is very easy.
To add a new product, visit Products > Add New.

There enter your product name as well as add the product’s description.
Product Data:-
Scroll below to add a product’s data.
From this section, you can add a product’s general information such as price, tax information, inventory, product availability, and many more things.

Now, move to the right side of the page. From there, you can set the product’s category, set the product’s featured image, add product gallery images, etc.

Once done, click on the Publish button to publish the product. After that, the product will be visible in your store.
7. Customizing Your WooCommerrce Store
The best thing about WooCommerce is that it allows you to change every part of your store.
To customize your WooCommerce theme, go to Appearance > Customize.
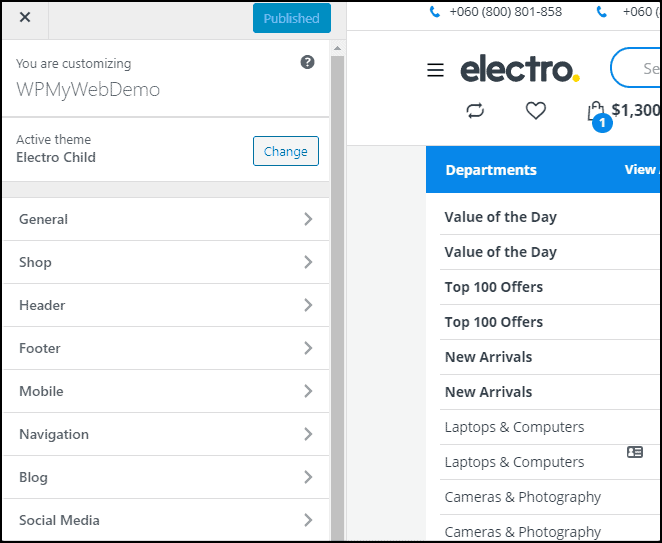
From the customize option, you can change your store’s layout, change header and footer, add favicon, add store’s logo, background color, and many more.
Once you make the changes, don’t forget to click on the Publish button.
That’s it. This is how you can make a website like Amazon or eBay or Flipkart.
What’s Next?
Now you are ready to sell products on your WooCoomerce store.
But Wait…
Before you start selling products on your site, there are many things you need to modify, for example, your site’s logo and favicon, permalink, product images, adding payment gateway, etc.
Here’s a guide on Most Important Things to Do After Installing WordPress.
Next, you need to install plugins for your WooCommerce site so that you can extend your store’s functionality.
But, most importantly, you need to use a backup plugin for your WooCommerce site. Because if you face any issue with your site or broken, you can store your site from the backup. It’s highly recommended.
Last but not the least, you need to go through all the options and learn what thing goes what. You can also visit the Amazon or eBay site to get some idea and implement on your site.
Frequently Asked Questions (How to Make a Website like Amazon):-
How much does it cost to create a website like Amazon?
To make a website like Amazon, you just need a domain, web hosting, and an SSL certificate.
The total cost of creating a site like Amazon or eBay is $5.95/ month.
How to create an eCommerce website like Amazon?
Creating an eCommerce website like Amazon is very easy. You just need a domain, web hosting, and an SSL certificate.
In this article, we have shared step by step guide on how to create an eCommerce website like Amazon.
How long does it take to build an eCommerce website?
It takes around 25-30 minutes to build an eCommerce website.
Which platform is Amazon’s website built on?
Amazon’s website is totally custom built by developers which cost them more than $100,000.
Fortunately, you can create a similar website like Amazon at a price of $6 per month.
Is it difficult to build sites like Amazon.com and Flipkart.com?
No. Building sites like Amazon.com and Flipkart.com is very easy.
You can make a website like Amazon under 30 minutes.
*This post may have affiliate links, which means I may receive a small fee if you choose to purchase through my links (at no extra cost to you). This helps us to keep WPMyWeb up and running and up-to-date. Thank you if you use our links, we really appreciate it! Learn more.