WordPress Security – 24 Tips to Secure Your Website from Hackers
WordPress security should be the first priority when managing a website. You design your website, publish content, sell products online, but if you do not take WordPress security seriously, your site can get hacked anytime.
Every day 30,000 websites get hacked and more than 2,000 websites get blacklisted by Google. You are not an exception. If a government website can get hacked, then why not yours?
One morning, you woke up and see your WordPress site is inaccessible and see random messages like,
“your website is hacked by xyz” – the site is hacked
“the site ahead contains malware” – blacklisted by Google
This is the worst thing you could ever face with your website.
But, why WordPress?
WordPress powers over 31%(80 million) of the total websites on the web. According to W3Techs, WordPress has 60% of the CMS market share more than other platforms, which is a pretty solid reason for attracting hackers.
But don’t panic. Hardening WordPress security is very easy and you can do it too.
In this article, I will share 24 best WordPress security tips to protect your website from hackers and malware.
“Why not make the gate to your palace vanish before they discover it?” – WPMyWeb
Common WordPress Security Issues
Before we deep dive into WordPress security best practices, let’s first understand a few common WordPress security issues.
Many users believe that WordPress isn’t a safe platform to use for a business, which is not true at all. This is due to the lack of knowledge of WordPress security, poor system administration, using outdated WordPress software and plugins etc.
Many WordPress beginners assume that creating a website is the end and it doesn’t require any security maintenance. This is how you are leaving your site vulnerable.
Once hackers find vulnerable in your site, they can easily exploit your site.
Let’s check out some of common WordPress Security Issues.
1. Brute Force Attacks:
In the brute force attack, an automated script is used to generate various combinations of usernames and passwords. Hacker uses WordPress’s login page to run brute force attack.
If you are using a simple username and password, then you could be the next victim of this attack.
2. Cross Site Scripting (XSS):
Cross Site Scripting is a type of attack where attackers inject malicious code/ script onto a trusted website. This hacking method is totally invisible to the users who are surfing the website.
These malicious scripts load anonymously and steal information from the users’ browser. Even if a user inputs any data into any form, the data could be stolen.
3. SQL Injections:
WordPress uses a MySQL database to store blog information.
SQL injection happens when hackers get access to the WordPress database. By hacking the WordPress database, hackers can able to create a new admin account with full access to your site.
They can also insert data into your MySQL database and add links to malicious or spam websites.
4. Backdoors:
By the name “Back-door”, you can understand what it means.
Backdoor is a hacking method which allows hackers to enter a website by bypassing normal authentication process and even staying undetected from the website owner.
After hacking a website, hackers usually leave their footprint, so that they can reaccess to the website even the hack is removed.
5. Pharma Hacks:
WordPress Pharma hacks is a kind of website spam that fills search engine results with spammy pharmacy content which are banned on the web like Viagra, Nexium, Cialis etc.
Unlike other WordPress hacks, pharma hack results are only visible to search engines. So you can’t spot the hack by just viewing your website or the source code.
Go to Google and type site:domain.com. If the search results show your website content(not pharmacy content), then your site is not affected by pharma hacks.
The goal of this hack is to exploit your most valuable pages by overriding the title tag with harmful links. Not to mention, if you do not inspect the matter early, search engines like Google, Bing can blacklist your website for providing malicious content.
6. Malicious Redirects:
WordPress malicious redirect is a kind of hack where your site visitors are automatically redirected to spammy sites like gambling, porn, dating sites. This hack occurs when an malicious code is injected into your website’s file or database.
If your site redirecting visitors to illegal or malicious sites, your site will possibly get blacklisted by Google.
Why WordPress Security is Important?
Your website represents your brand, your business, and most importantly the first contact with your customers.
It probably took you several years with lots of efforts to stand your business and grow your traffic. Your audience love your articles and trust your products, that’s why they keep in contact with you.
If your WordPress site isn’t secure, there are many ways both your site and your customers will be affected. Hackers can steal user’s personal information, passwords, credit card details, transaction information, and can distribute malware to your users.
If your site is hacked, you will notice your traffic is drastically dropping. Moreover, Google will blacklist your website.
According to the Google blog, the number of hacked websites are increasing by approximately 20% in 2016 compared to 2015.
In a study, Securi reports that Google blacklists over 10,000 websites every day.
If you are serious about your business, you need to pay extra attention to your WordPress security.
Best WordPress Security Guide
- Get a Good WordPress Hosting
- Keep WordPress version Updated
- Don’t Use any Nulled/ Cracked Theme or Plugin
- Use Strong Passwords
- Add (2FA) Two Factor Authentication
- Change WordPress Login URL
- Limit Login Attempts
- Back up Your Site Regularly
- Use a WordPress security plugin
- Automatically Logout Idle Users
- Add Security Questions to WordPress Login Page
- Change the Default “admin” Username
- Assign Users to the Lowest Role Possible
- Monitor File changes and User activities
- Install SSL Certificate
- Delete unused themes and plugins
- Disable file editing in WordPress dashboard
- Password protect WordPress login page
- Disable directory browsing
- Remove your WordPress version number
- Change WordPress Database Table Prefix
- Only use trusted WordPress themes and plugins
- Disable PHP error reporting
- Add HTTP Secure Headers to WordPress
Ready? Let’s start.
1. Get a Good WordPress Hosting
WordPress hosting plays a major role when it comes to improving WordPress security.
You are paying for the hosting service and your website stays under their control. So you should be careful before choosing a good WordPress hosting for your website.
Shared hosting like A2Hosting, Bluehost etc. are the best hosting option to run a low traffic blog. But in shared hosting, there always will be a chance for cross-site contamination.
Cross-Site contamination happens when a hacker is able to access the web server through a vulnerable website, and then exploit all the other websites on the same web server.
We recommend using a managed WordPress hosting provider. Managed WordPress hosting companies provide multi-layer security options for websites. Their hosting platforms are highly secured and they offer daily malware scan and prevents any external attacks. If anyhow, they find malware on their server, they take the responsibility and removes it instantly.
They also offer daily backups, free SSL certificate, 24×7 expert support.
We recommend WPEngine managed WordPress hosting company. They offer multiple security layers to protect your WordPress site. With their plan, you will get daily backups, free SSL, global CDN, and 24×7 expert support.
Visit WPEngine. [Discount code added in this link]
2. Keep WordPress Version Updated
Keeping your WordPress site up to date is a good security practice for hardening your WordPress security. This update includes the WordPress version, plugins, and themes.
In a recent study, Securi analyzed that 56% of the total WordPress infected websites were still out to date. If you are one of them, you are in danger.
Every day new vulnerabilities are discovered and there’s no way to stop them. Outdated software and plugins can contain vulnerabilities which hacker can use to exploit a site.
With every update, developers include new features, patch up security holes, fix bugs etc. Like WordPress software, you also need to update your WordPress themes and plugins.
The good thing is that WordPress automatically rolls out its updates and notifies to its users.
Updating WordPress version, plugins and themes are very easy and you can do it through your WordPress admin dashboard.
How to Update WordPress, Plugins, and Themes?
First login to your WordPress dashboard and go to Dashboard> Updates. There you can see if there’s a new update available.
Note: Before updating your WordPress version, take a full backup of your files and database. In case an error occurs, you can easily restore your site to the previous version. You can easily backup and restore your site using BlogVault with just a click.
From the page, you can see “An updated version of WordPress is available”. Click on Update Now button to update your WordPress version, this process may take a few seconds.
Once the update is completed, scroll down below to update your WordPress plugins. We recommend you update the plugins one by one. First, select a plugin and click on Update Plugins.
Similar way, update your themes below.

However, the updating process is a bit tricky for some users, especially those who are not tech-savvy.
Some managed WordPress hosting providers like SiteGround, Kinsta, FlyWheel provide auto-update feature. So, if you are in a busy schedule or lazy to update, this could be useful.
Also read, How to Manually Update WordPress Version, plugins and Themes
3. Don’t Ever Use any Nulled/ Cracked Themes and Plugins
There is no wonder that premium plugins and themes include more functionality and look professional. But, none of the premium products are free. It comes with a price and after purchasing any premium products, users need to enter the product key to activate the product.
But, there are many malicious websites available which provide premium themes and plugins for free. Those cracked themes and plugins don’t require a serial key to activate and never gets updated.
Here’s what I mean:
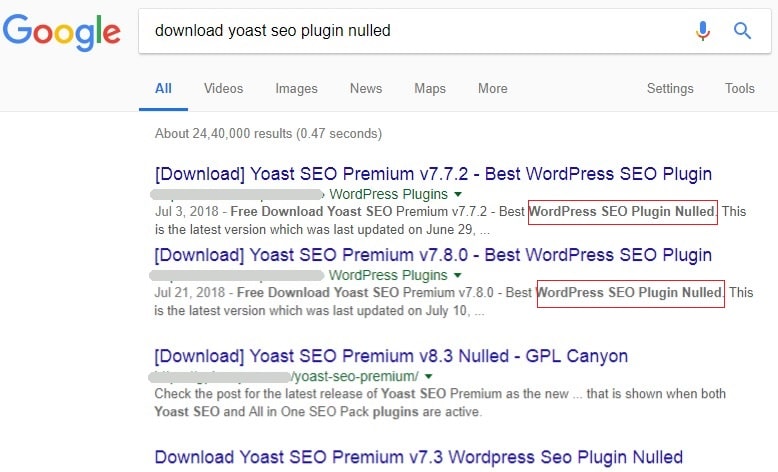
Those nulled themes and plugins are very dangerous for your site. Hackers specially inject malicious codes in it and make a backdoor to your site. So they can easily access your website and hack your website including the database.
So never use any nulled or cracked WordPress themes and plugins.
We highly recommended that you only download free themes or plugins only from WordPress.org.
We understand that free theme or plugin has very limited functions. But, those free themes or plugins are safe to use and get regularly updated.
Also Read, 7 Best Premium Blogging Themes for WordPress
4. Use Strong Passwords
A password is a primary key to access your WordPress site. If it is simple and short, then hackers can easily crack your password. Over 80% of hacking-related breaches happen due to weak password or stolen password.
In a recent study, SplashData revealed 100 worst passwords of 2017.
Here is a few of them:
- 123456
- password
- 12345678
- qwerty
- 12345
- 123456789
- letmein
- 1234567
- football
- iloveyou
- admin
- welcome
- monkey (lol)
If your password is simple like above, then immediately change it. A good strength password should be at least 10 digits and contain upper case, lower case, number, and special characters.
You can use an online password generator tool to instantly create thousands of secured passwords.
It is also necessary that you save the password to your computer.
To make it easier, you can use password manager software to manage all your password like LastPass, Dashlane etc.
Enforce Strong Password to Users
By default, WordPress doesn’t come with a function that prevents users from entering weak passwords. Most of the time users set a weak password for their account and hardly change it.
If you are running a multi-user WordPress blog, then you should force users to use a strong password.
To make this process easier, you can use a plugin. Install and activate Force Strong Passwords plugin and you’re done. This will prevent users and even admin from entering a weak password.
5. Add Two Factor Authentication (2FA)
Another simple method to harden your WordPress security is by adding two-factor authentication(2FA) to your WordPress login page. Basically, two-factor authentication or two-step verification is a security process that requires two methods to verify your identity.
By default, we usually enter username and password to log into a website. By adding two-factor authentication will require you an extra verification process like a smartphone app to approve the authentication process.
So, if someone knows your username and password, they need your smartphone to get the verification code for logging in to your site.
By adding two-factor authentication, you are not only securing your WordPress login page but also preventing brute-force attacks.
You can enable two-factor authentication easily by using Google two-factor authenticator WordPress plugin.
Once activated, go to Users> User profile and activate the plugin.
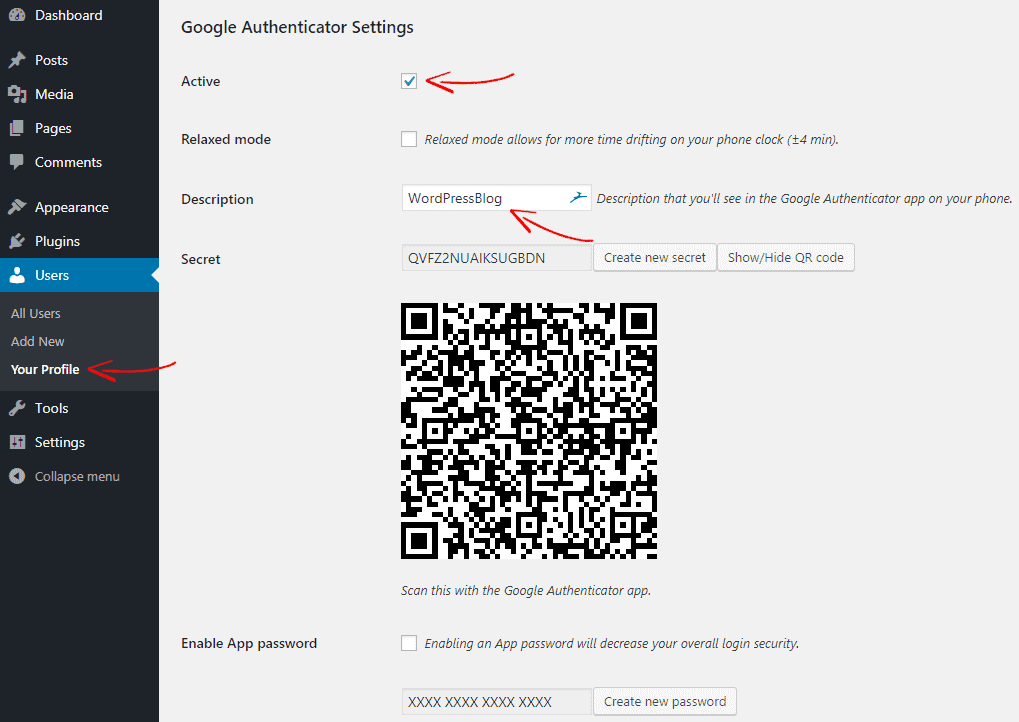
Then download Google authenticator app from your phone and scan the Barcode or enter the Secret code (see the screenshot above) from your site to add your website.
Once added, log out from your site. On the login page, you will see an extra field where you need to enter the verification code from the Google Authenticator mobile app.
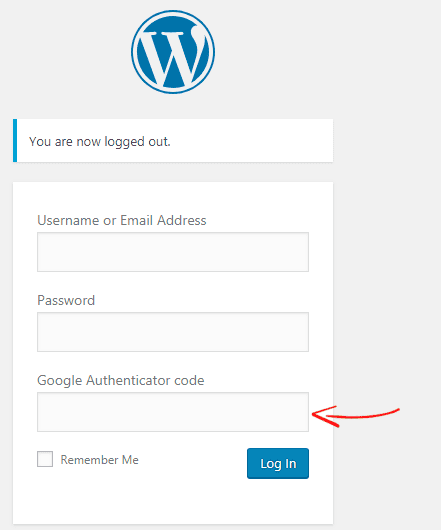
For detailed instructions, see the guide on how to add Google two-factor authentication on WordPress login page.
6. Change WordPress Login Page URL
By default, anyone can access your login page by simply adding “wp-admin” or “wp-login.php” at the end of your domain name such as: “domain.com/wp-admin” or “domain.com/wp-login.php”.
Guess what! Hackers can run brute-force attack using your login page. If you are using a very simple password, then hackers can easily crack your password and enter your website.
But what if they don’t know where to attack? Yes, you guessed it right.
If you hide or rename your login page URL, then hackers wouldn’t able to run a brute force attack.
In WordPress, you can easily hide or rename your login page by using a plugin. From the WordPress plugin gallery, install and activate WPS Hide Login plugin.
Once activated, go to Settings> General and at the bottom, you can find the WP Hide Login option.
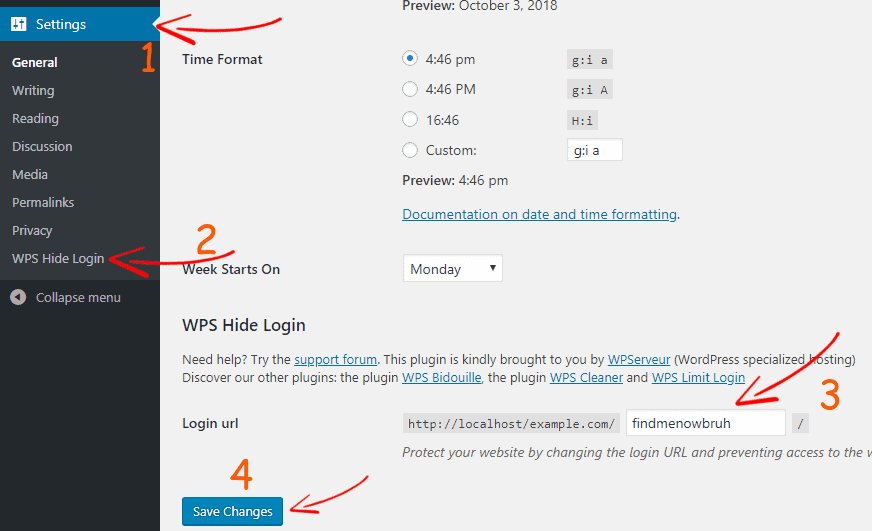
Simply change the login URL “login” to something else that is hard to guess and click on Save Changes.
Once done, bookmark the new login page and you are done.
7. Limit Login Attempts
By default, WordPress doesn’t limit the number of login attempts through the login form. That means anyone knows your login URL can try the login function as many time as they want. This way hackers run a brute force attack to crack your “username” and “password” to access your website.
By limiting login attempts, you can harden WordPress security and protect your login page from brute force attacks.
You can set a maximum number of incorrect login attempts a user can make from the same IP address. If the user exceeds the limits, the user’s IP will be blocked for a particular of time.
To limit login attempts in WordPress, install Login LockDown plugin. Once activated, go to Settings> Login LockDown to configure the plugin.
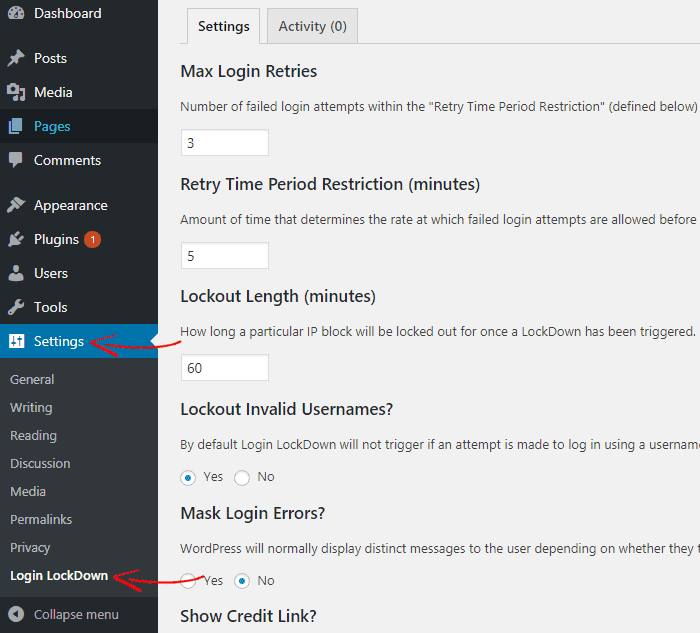
For detailed instructions, see our guide on how to limit login attempts in WordPress
8. Backup Your Site Regularly
Backups are like Time Machine. If you have it, your website is safe.
However, website backups don’t protect your site from hackers but it helps you to recover your site.
For instance, if something goes wrong with your site during the update or your website is hacked, how will you fix your site again? You probably lose your site.
But if you have backups of your site, you can easily restore your site before the point it was hacked or crashed.
That’s why we highly recommend you to use a reliable WordPress backup plugin. However, many hosting companies offer free website backup, but they can guarantee your site’s availability if there is a catastrophic failure. So you need to save the backups to a remote location like Google Drive, Amazon S3, Dropbox etc.
Thankfully, this can be done by using BlogVault or BackUpBuddy WordPress Backup Plugin. They both offer daily backups and one-click restore. You can also create a staging site at no extra cost.
9. Use WordPress Security Plugin
The next thing you need for hardening your WordPress security is a security plugin. There are many WordPress security plugins available which will lock down your site from hackers and malware.
WordPress security plugins will detect and eliminate malware if it’s present in your site. Besides, they monitor user activity in real-time, notify you if anything has changed, if a plugin contains a malware, block spam traffic and many more.
We recommend Securi WordPress Security Plugin. Securi Security offers a different type of security features such as security activity auditing, website monitoring, website firewall, and many more.
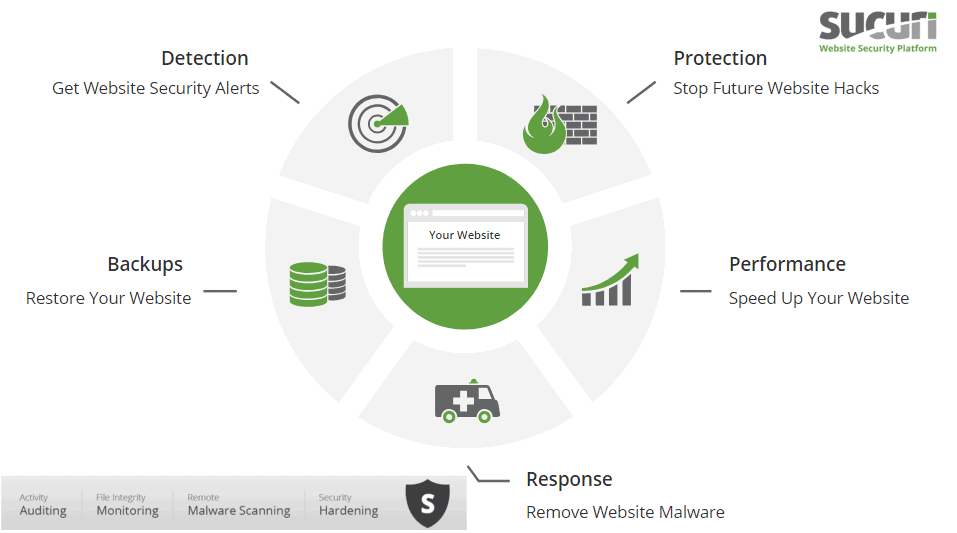
The best thing about Securi is that if your site gets hacked or blacklisted by Google while using their service, they guarantee that they will fix your site.
Most of the WordPress security experts charge more than $300 to fix a hacked site, whereas you will get all the security services at only $199 per year. It’s a good investment for hardening your WordPress security.
[thrive_link color=’green’ link=’https://www.wpmyweb.com/offer/securi’ target=’_blank’ size=’medium’ align=”]Secure Your Site with Securi[/thrive_link]
10. Automatically Logout Idle Users
If a user stays idle or inactive on your site for too long, this can cause brute force attack.
When a user stays inactive for too long, hackers may use cookie or session hijacking method to get unauthorized access to your website. That’s why most of the education and financial related websites like bank and payment gateway websites use user session timeout function. So, when a user navigates away from the page and doesn’t interact after a period of time, the website automatically logs out the inactive user.
The same function you can add to your WordPress site for improving your WordPress security. Adding automatically log out idle users on WordPress is extremely simple. All you need to install a plugin.
First, download and install the Inactive Logout WordPress plugin. Then activate it and go to Settings> Inactive Logout to configure the plugin.
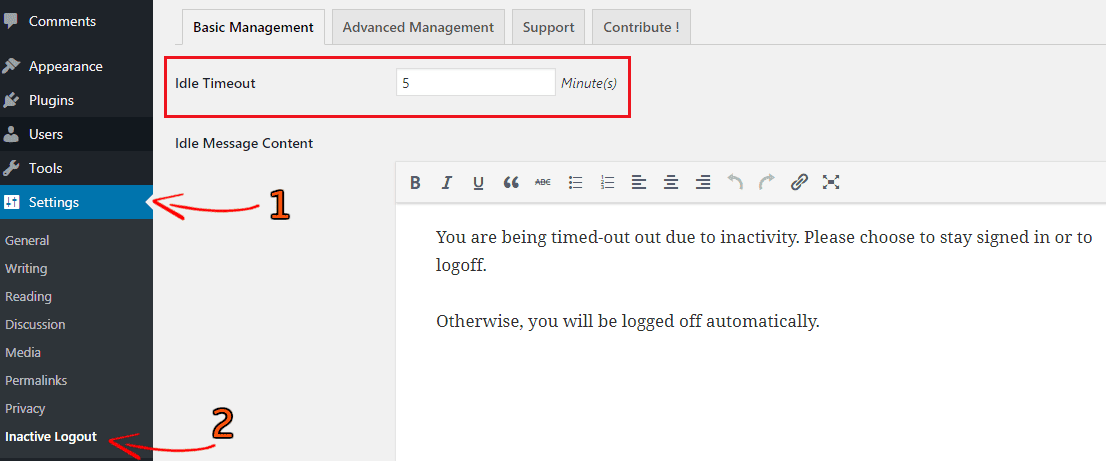
From the settings, you can change the idle timeout. So after the time, all the users in your site will be automatically logged out.
You can also change the idle timeout message and modify other settings if needed.
Once done, click on Save Changes to store the settings.
For detailed instructions, see our guide on how to automatically log out idle users in WordPress
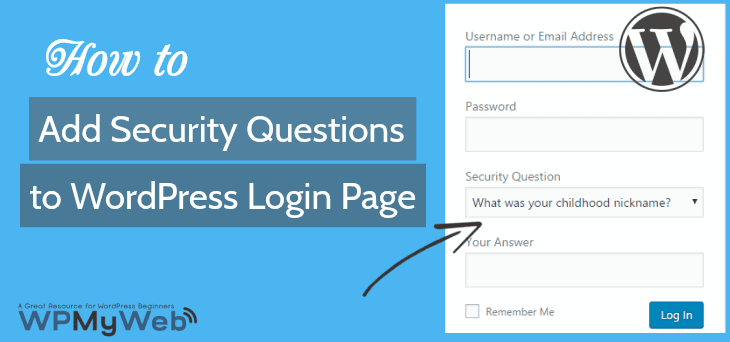
11. Add Security Questions to WordPress Login Page
By adding security questions to your WordPress login page, you will not only protect your WordPress login page but also hardening WordPress security.
The security question adds an extra layer of security to further authenticate your identity during login in. This is very useful if you are running a multi-author WordPress blog.
If any of your user’s or your password has been stolen, then security question can save the life.
Because username and password can be hacked easily, but opting in the right security question and answer is next to impossible. This way you can save your WordPress login page from hackers and brute force attacks.
To add Security question on the WordPress login page, install the WP Security Question plugin.
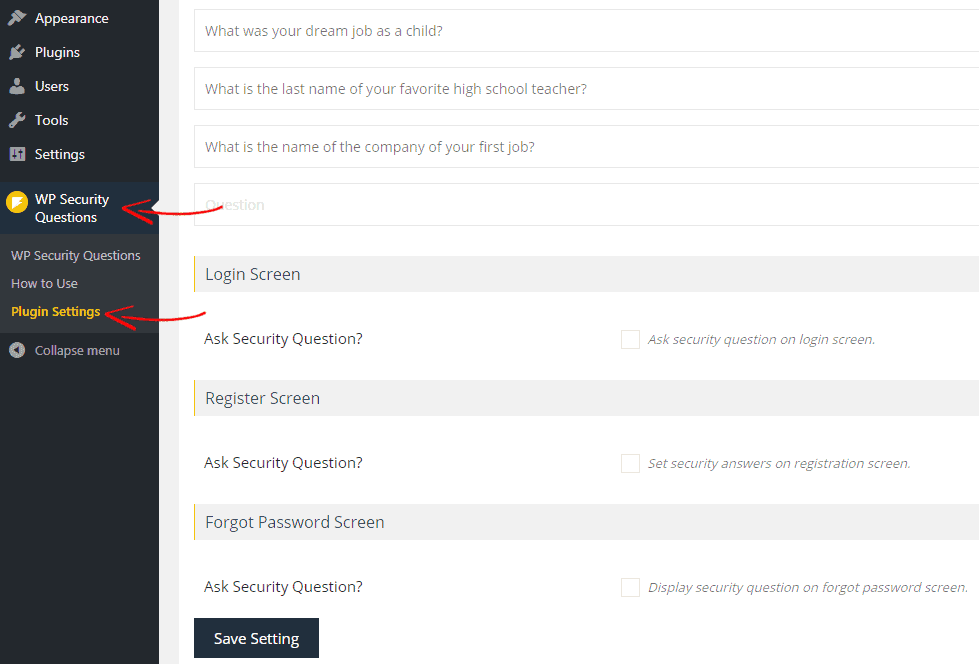
Once activated, go to WP Security Questions > Plugin Settings to configure the plugin.
By default, the plugin has many common questions added. But, you can add or remove any security questions from the list.
At the bottom, you can enable the security question on the login page, registration and forgot password page. After the plugin configured, don’t forget to click on Save Setting.
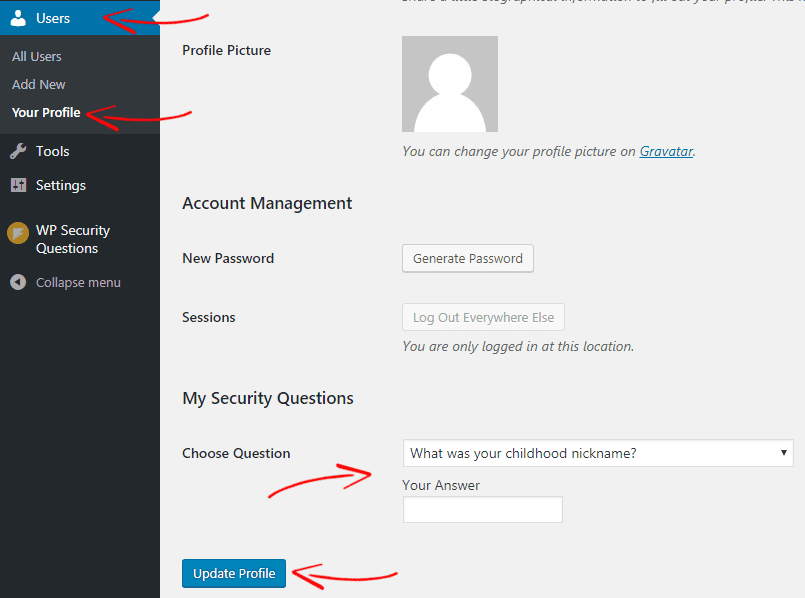
Note: Only new users can able to set their security question and answer during registration. So registered users need to manually set their own security question and answer. You can also set a security question and answer for them. This can be done from the User Profile page.
For detailed instructions, see our guide on how to add security questions to WordPress login page
12. Change the Default “Admin” Username
After installing WordPress, you can change your password as many time you want. But can you change your username once it’s set? No, right?
By default, WordPress doesn’t allow users to change username. But why should you change it?
If you are using a very common username like “admin”, then hackers can run brute force attach with the help of your username.
But don’t panic. There are several ways you can change your WordPress easily.
However, to make the process easier, we will use a plugin. First, download and install the username changer plugin. Then go to Users> Your Profile and find the username option. There you will find the “Change Username” option.

Click on Change Username button and enter your new username. Once done, click on Update Profile.
If you want to change your username manually (without plugin), check out the article 3 different ways to change WordPress username.
13. Assign Users to the Lowest Role Possible
If you are running a multi-author WordPress site, then you need to be careful before assigning a role to a user.
Many times WordPress site owners assign a higher user role to new users, this way you are giving all the privileges to users, and as a result, any user can able to perform any task whatever they want.
For example, if you don’t know what an Editor user role can able to perform and you assign the role to a regular user, then the user can delete all your posts, edit links, create spammy posts, add malicious links into your blog posts. This is how a user can easily ruin your website.
By default, WordPress comes with 5 different user roles.
- Administrator
- Editor
- Author
- Contributor
- Subscriber
- Administrator: Administrators are the most powerful user role in a WordPress site. They can create, edit and delete a user account, can perform any task throughout the WordPress admin panel, have control all over the content area and also moderate comments.
- Editor: Users with the Editor role have the full control all over the content. They can create, edit and delete any posts including the posts created by other users. They can also moderate comments and modify links.
- Author: Authors can only publish, edit or delete their own posts. They can upload media files to use into their posts. They can view the comments but can’t approve or delete any comments.
- Contributor: Users with the Contributor role can only write, edit or delete their own unpublished post, but they can’t publish their own post.
- Subscriber: Subscribers can only edit their account information including password, but they don’t have access to the content or site settings. They have the lowest capabilities in a WordPress site.
By understanding the WordPress user roles, you can easily manage them without any risk.
We also recommend you should set New User Default Role as Subscriber. Go to Settings> General Settings and from their set New User Default Role – Subscriber and click on Save changes.

For more details, read Beginner’s Guide to WordPress User Roles and Capabilities
14. Monitor File Changes and User Activities
Another smart way to harden WordPress security is by monitoring user activities and file changes.
If you are running a multi-user WordPress site, then you should track user behavior to better understand what are their activities throughout your WordPress site.
Who knows, if a user is doing some suspicious work or trying to hack your website? How can you know that?
The only way to track user activities and file changes is by using a user activity WordPress plugin. By using a user activity plugin in WordPress, you can able to:
- see who is logged in and what are they doing in real time
- when a user login and log out
- how many times a user tried to log in but failed
Besides, if an editor made any changes to a post or page without your permission, then you can easily find it out and revert it back. The good thing about a user activity plugin is that it instantly sends you an email notification if something goes wrong.
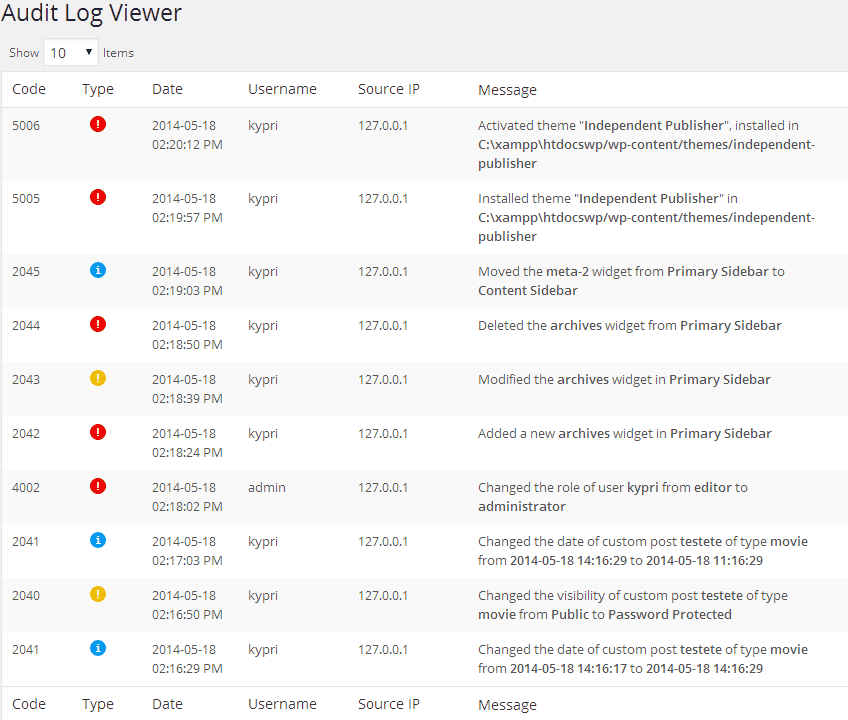
WP Security Audit Log is the best plugin to monitor user activities and file changes in real time. Here’s a screenshot below how the plugin works.
Also Read, 5 Best Plugins to Monitor User Activity in WordPress (alternate plugins)
15. Implement SSL and HTTPS
WordPress security can’t be improved without an SSL certificate. An SSL (Secure Socket Layer) is the backbone of website security.
SSL is a standard security technology that creates encrypted links between a server and a web browser in an online communication such as an online transaction. So all the sensitive data like passwords, credit card details etc pass through encrypted links.
If you run an online business or a blog where you accept payment, then an SSL certificate is a must. It will keep your customer’s data safe from hackers. For online stores or WooCommerce sites, SSL certificate costs cost around $20-$170.
In case you are running a WordPress blog, then you don’t need a paid SSL certificate. If you are using cPanel hosting like SiteGround, WPEngine then you can install SSL certificate for free with just one click.
First, log in to your hosting cPanel account and navigate to Security. (Here’s a screenshot below from SiteGround hosting cPanel.)

Go to the SSL/TLS Manager and click on Install SSL Certificate. From the page, select your domain and click on Autofill by domain. The process is automatic so you don’t need to edit or modify anything.
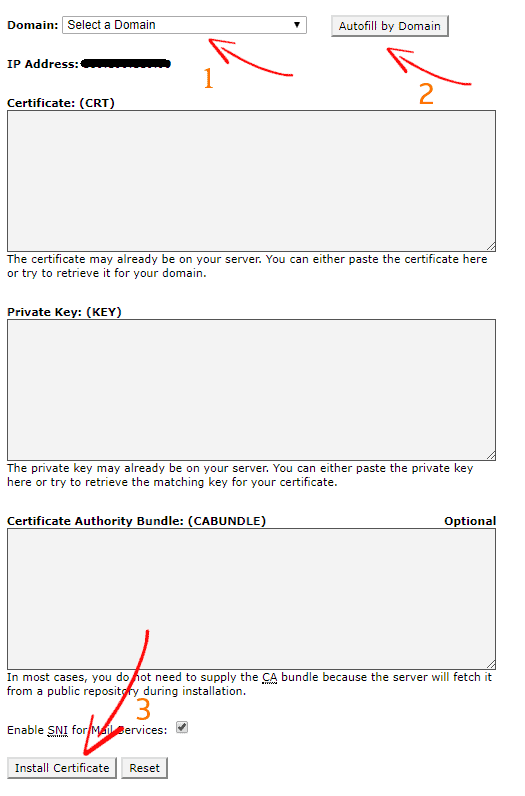
Now click on the Install Certificate button to finish the setup process.
Once done, login to your WordPress admin dashboard to modify your site URL. Go to Settings> General and add replace the HTTP with HTTPS before your site URL. Here’s a screenshot below.

Once updated, click on Save Changes.
How to Redirect HTTP to HTTPS in WordPress
If you have properly install SSL certificate, then your site is accessible with HTTPS.
But if someone types your website name only (i.e. domain.com) on the browser address bar, then the site may show “Connection is not secure” message. That means your site is accessible with HTTP.
To fix the issue, you need to force HTTPS in WordPress, so your site will only load with HTTPS. You can easily force HTTPS in WordPress.
First login to your hosting cPanel and go to the root folder of your website and find .htaccess file. Edit the .htaccess file and at the end add the following code.
[code]
RewriteEngine On
RewriteCond %{HTTPS} off
RewriteRule ^(.*)$ https://%{HTTP_HOST}%{REQUEST_URI} [L,R=301]
[/code]
Save the file and you are done. Now your website is only accessible with HTTPS.
If your web hosting provider doesn’t provide a free SSL certificate, then you can install an SSL certificate manually. Here’s the guide on how to install free SSL certificate.
16. Delete Unused Themes and Plugins
When it comes about hardening WordPress security, we shouldn’t ignore any small step that can make your site vulnerable.
Most of the time WordPress site owners install different themes and plugins to test which theme looks better on their site or which plugin has more functionality. That’s ok. But keeping those unused themes and plugins make your site vulnerable.
Because keeping many WordPress themes and plugins need regularly update like the one you are using. If you don’t update them, they became vulnerable and hackers can easily exploit your site through the vulnerable themes and plugins. Besides, keeping so many themes and plugin make WordPress site slower.
So you should always delete unused themes and plugin for improving site performance and WordPress security.
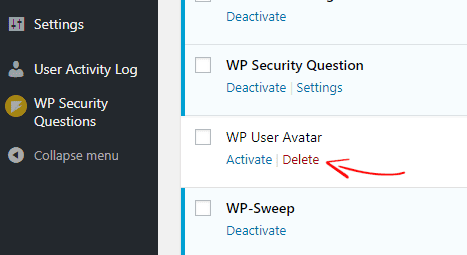
To delete an unused plugin, go to Plugins> Installed Plugins. Then find the plugin which you don’t need it anymore. First, deactivate the plugin and click on Delete.
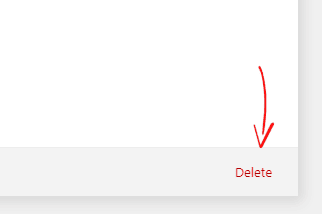
Similarly, to delete a theme, go to Appearance> Themes and click on Theme Details. Then at the bottom of the right side, click on Delete.
17. Disable File Editing in WordPress Dashboard
By default, WordPress allows users to edit theme and plugin file directly from WordPress dashboard. This is a useful option for users who frequently need to edit the theme and plugin file.
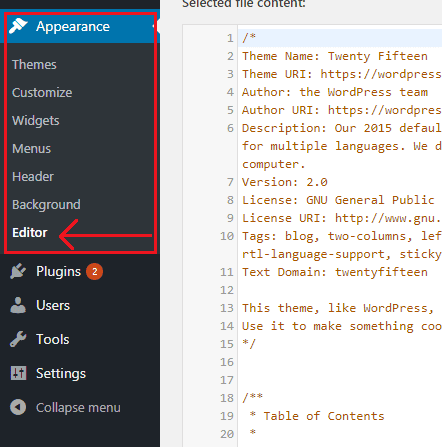
However, keeping this function enabled can be a serious security issue. If hackers access your website they usually leave their footprint by injecting malicious code into website files. If your WordPress file editing function is enabled, then hackers can easily inject malicious code into your theme or plugin file which will be unknown to you.
To improve WordPress security, you need to disable the file editing function from your WordPress dashboard. Disabling WordPress theme and plugin editor in WordPress is very easy process.
First, you need to login to your hosting cPanel account and go to the root folder of your WordPress site. From there, find the wp-config.php. Click on edit and add the following code at the end.
[code]
define( 'DISALLOW_FILE_EDIT', true );
[/code]
Now save the file and refresh your WordPress dashboard. You will see that the theme and plugin editor option has gone. With this little trick, you can easily improve WordPress security.
Read the detailed guide on how to disable theme and plugin editor in WordPress
18. Password Protect WordPress Login Page
Another great way to improve WordPress security is to password protect WordPress login page.
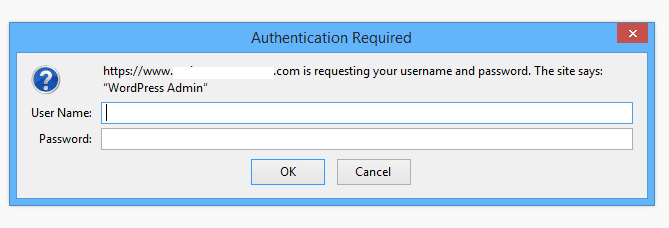
By password protecting your WordPress login(/wp-login.php) or admin(/wp-admin) page, you can prevent hackers from accessing your login page because it requires a password to access the login page. Once enabled this feature, your site will prompt all users accessing the login page with a username and a password window. In short, all the users need to login twice with different username and password before accessing your WordPress admin dashboard.
By doing so, you can strengthen your WordPress security and add an extra layer of security to your login page.
Read our in-depth guide on how to password protect WordPress login page.
19. Disable Directory Browsing in WordPress
By default, most of the web servers like Apache, NGINX, and LiteSpeed allows any user to browse the directories that contain WordPress files and folders. They can also see which theme and plugins you are using and know more about your website structure.
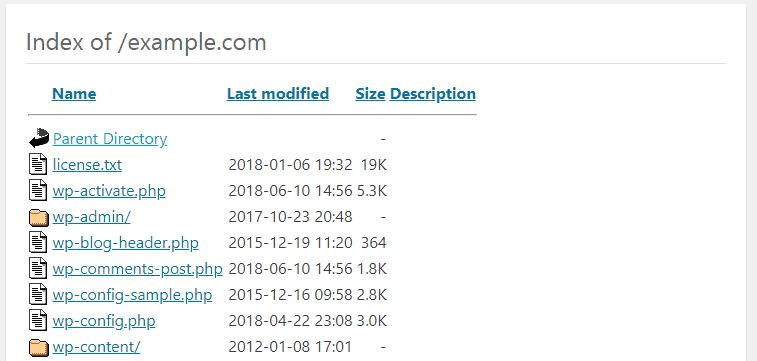
This information can lead your WordPress site vulnerable and help a hacker when trying to compromise your site.
In order to enhance WordPress security, we recommend you to disable this option. To disable directory browsing in WordPress, simply add the following line to your .htacces file.
[code]
Options All -Indexes
[/code]
For detailed instructions, read our guide on how to disable directory browsing in WordPress
20. Remove Your WordPress Version
By default, WordPress automatically adds meta tags in different locations which display the WordPress version you are using.
Here’s the thing: if hackers know you are running an outdated WordPress version, they can exploit your site through the known vulnerabilities that are present in the older WordPress version.
So it’s better that you remove your WordPress version to improve WordPress security. There are several places where WordPress adds the meta tags like, in WordPress dashboard, in the header, in style and javascript and in the RSS feed.
Removing the WordPress version from the header and RSS
To remove the version from the header and RSS, add the following line at the end of your functions.php file.
[code]
function remove_wordpress_version() {
return '';
}
add_filter('the_generator', 'remove_wordpress_version');
[/code]
Removing WordPress version number from Scripts and CSS
To remove the WordPress version from the CSS and scripts, add the following line at the end of your functions.php file.
[code]
// Pick out the version number from scripts and styles
function remove_version_from_style_js( $src ) {
if ( strpos( $src, 'ver=' . get_bloginfo( 'version' ) ) )
$src = remove_query_arg( 'ver', $src );
return $src;
}
add_filter( 'style_loader_src', 'remove_version_from_style_js');
add_filter( 'script_loader_src', 'remove_version_from_style_js');
[/code]
Once done, save the functions.php file.
That’s it. With this simple trick, you can surely improve your WordPress security. However, we always recommend you to regularly update your WordPress version as well as theme and plugins.
For detailed instructions, read our guide on how to hide or remove WordPress version
21. Change WordPress Database Table Prefix
During WordPress installation, it asks if you want to use a different database prefix. We usually skip this step, so WordPress automatically use (WP_) as default database table prefix. We recommend you to change it something strong and unique.
Using the default (WP_) prefix makes your WordPress database susceptible to SQL injection attacks. Such attacks can be prevented by changing the database prefix(WP_) to something unique.
After installing WordPress, you can easily change the default database table prefix using plugins or manually. Plugins like BackupBuddy, Brozzme DB Prefix allows you to change the table prefix with just a click.
For the sake of the tutorial, I am showing how to change it using Brozzme DB Prefix plugin.
Note: Before you do anything with your database, make sure you take a backup of your site and database. In case something goes wrong, you can restore your site.
First, install and activate Brozzme DB Prefix plugin. From your WordPress dashboard, go to Tools> DB Prefix and enter a new unique name for the database prefix.
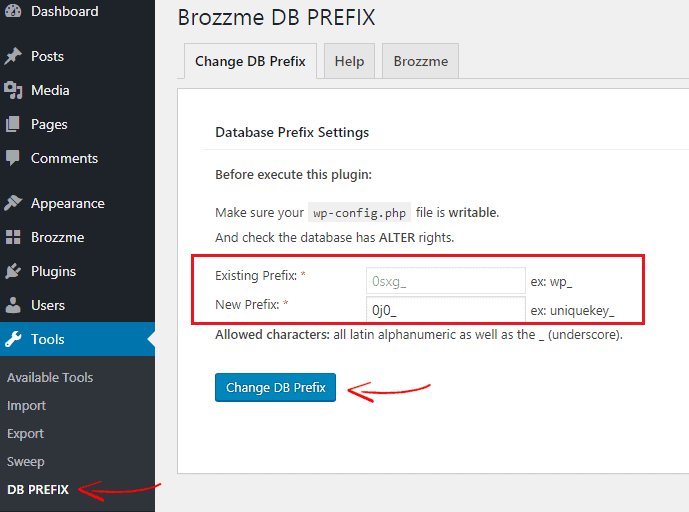
Once entered your new prefix, click on Change DB Prefix.
For the manual process, read on how to change database table prefix using phpMyAdmin
22. Only Use Trusted WordPress Plugins
WordPress comes with more than 48,000 plugins. That doesn’t mean that all the plugins are useful and safe to use.
Because there are many plugins available in the WordPress plugin gallery which don’t get updated from a long time and usually they became vulnerable. Besides, you wouldn’t get any support if the plugin breaks your site.
Before you use any free plugin, two important things you need to check,
- Check when the plugin was last updated: If the plugin doesn’t get updated frequently or no longer maintained by the plugin developer, then you should avoid the plugin.
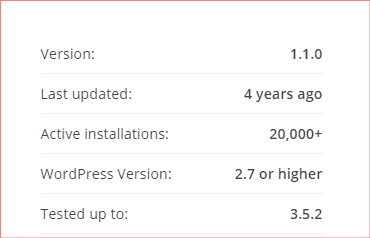
- Check if the plugin has maximum positive ratings: The next thing you need to check whether the plugin has maximum positive or negative ratings. If the plugin has maximum negative ratings, you shouldn’t use it.
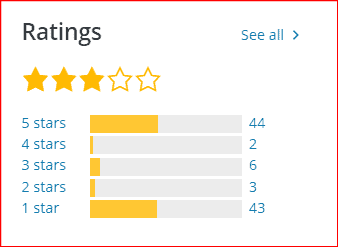
You can also check the plugin’s Reviews and Support page to see what other users are saying about the plugin.
But, don’t worry. There are many similar plugins available you can find from the WordPress plugin gallery.
If you would like to use a premium plugin, then you don’t need to worry about it. Premium plugins get updated regularly and you will get 24x support from the plugin developer.
23. Disable PHP Error Reporting
Another great way to harden WordPress security is by disabling PHP error report in WordPress. A lot of times, when you install an outdated plugin or theme, you may see the PHP error warning.
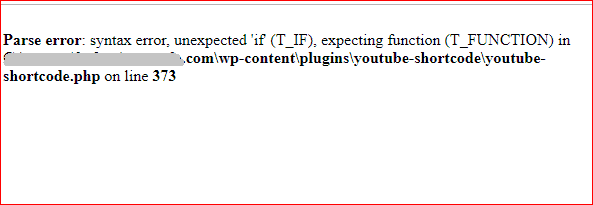
However, it can lead your site vulnerable if hackers obtain it as it shows the code and file location. To minimize the risk, you can disable PHP error reporting in WordPress.
Disabling PHP error warning in WordPress is very easy. First, edit your wp-config.php file and find that line that has this code:
[code]
define(‘WP_DEBUG’, false);
[/code]
You may see “true” instead of “false”. Now replace the line with the following code.
[code]
ini_set(‘display_errors’,’Off’);
ini_set(‘error_reporting’, E_ALL );
define(‘WP_DEBUG’, false);
define(‘WP_DEBUG_DISPLAY’, false);
[/code]
Save the file and you are done.
We also recommend you to use up-to-date and well-rated plugins to avoid this kind of issue.
24. Add HTTP Secure Headers to WordPress
Another great way to harden WordPress security is to add HTTP secure headers to your WordPress site.
When someone accesses your website, the browser makes a request to your web server. Then the web server responds with the requests along with HTTP headers. These HTTP headers pass information such as content-encoding, cache control, content-type, connection etc.
By adding secure HTTP response headers, you can improve your WordPress security and also prevents mitigate attacks and security vulnerabilities.
Here’re the HTTP headers below:
- HTTP Strict Transport Security (HSTS): HTTP Strict Transport Security (HSTS) enforces the web browser to only use secure connections (HTTPS) when communicating with a website. This prevents SSL protocol hacks, cookie hijacking, SSL stripping etc.
- X-Frame-Options: The X-Frame-Options is a kind of HTTP header which specifies whether or not a browser is allowed to render a website in a frame. This prevents clickjacking attacks and ensures your website isn’t embedded into other websites using <frame>.
- X-XSS-Protection: The X-XSS-Protection is a built-in feature of internet explorer, Google Chrome, Firefox and Safari browsers that block the pages from loading if a malicious script has been inserted from a user input.
- X-Content-Type-Options: X-Content-Type-Options is a kind of HTTP response header with the value nosniff that prevents web browsers from MIME-sniffing a response from the declared content-type.
- Referrer-Policy: Referrer policy is an HTTP response header that prevents cross-domain referrer leakage.
To add HTTP secure headers in WordPress, simply add the following lines of code into your .htaccess file.
[code]
Header set Strict-Transport-Security “max-age=31536000” env=HTTPS
Header always append X-Frame-Options SAMEORIGIN
Header set X-XSS-Protection “1; mode=block”
Header set X-Content-Type-Options nosniff
Header Referrer-Policy: no-referrer-when-downgrade
[/code]
[thrive_text_block color=”note” ] Note: To add those HTTP security headers, you must need a valid SSL installed on your site or else your site wouldn’t be accessible. [/thrive_text_block]

Now go to securityheaders.com to check whether the codes are working or not. We haven’t added “Content Security Policy” because it may break your site. However, it’s enough to make your WordPress site secure.
Conclusion
There are many ways you can harden WordPress security such as: using a managed WordPress hosting, using strong passwords for accounts, monitoring user activities, using a WordPress security plugin, implement SSL and HTTPS and many more.
Harding WordPress security isn’t rocket science. You can easily secure your WordPress site by implementing WordPress security best practices that we shared in this article. By implementing them, you will not just secure your WordPress site but also prevent hackers from accessing your site.
Once done, you wouldn’t need to worry about your WordPress security. Moreover, you can be more productive and free from strain.
NOW it’s your turn. Read the article thoroughly and implement them to your site. You will be happy you did it. 🙂
Have we missed any important WordPress security tips to mention here? feel free to let us know in the comment section.
WordPress Security Infographic

*This post may have affiliate links, which means I may receive a small fee if you choose to purchase through my links (at no extra cost to you). This helps us to keep WPMyWeb up and running and up-to-date. Thank you if you use our links, we really appreciate it! Learn more.
