How to Get Free SSL Certificate for Your WordPress Site
Did you hear that Google has announced: “HTTPS as a Ranking Signal”. That means those sites which have SSL enabled, get a ranking boost on Google. From then, hundreds of thousands sites are moving from HTTP to HTTPS. So if you want to move your site to HTTPS or want to install SSL certificate to your WordPress site, then this article is for you. If you are running a blog site just like me, then you can get Free SSL Certificate from Let’s Encrypt easily.
In this tutorial, I will share What is SSL Certificate, What are the benefits of having an SSL and How to install free SSL certificate to your WordPress site.
What is SSL Certificate?
SSL stands for “Secure socket layer”, is the backbone of internet security. This mechanism creates an encrypted link between a web browser and a server. So all the sensitive information ie: passwords, credit card details etc pass through the encrypted link and secures the information from hackers.
Normally, sensitive pieces of information like passwords, credit card details etc are delivered as a plain text from a user to the server and it is totally understandable. For example, a site doesn’t use SSL and collects sensitive data like password, credit card details for selling products. If hackers intercept the data, they can use and see the information that is transferred from a user to server.
On the other side, SSL enabled website’s information pass through a highly encrypted link that can’t be readable or even decryptable. So all the data remains safe between a user and a server.
Why Should You Use SSL Right Away?
If you haven’t added SSL to your site yet, then you need to use it right away. There are many benefits of adding SSL.
Google loves HTTPS
On 6th August 2014, Google officially announced that from now they will give more priority to HTTPS/ SSL enabled sites. They also said HTTPS sites will get the ranking boost as well. Who doesn’t want to rank higher on Google? Adding SSL to your site, your site will get a little ranking boost. Although it wouldn’t be a huge boost but a small boost is great.
If you run a blog, then you can get free SSL certificate to your site.
Your information remains safe
An SSL certificate protects all the sensitive information like: passwords, credit card details, account details that pass from a user to a server. As E-commerce websites collect all the sensitive data, so SSL is must for online stores.
Your customer trust your site
SSL is another effective way to build your customer’s confidence. Having an SSL on your site makes them sure that your website is protected and safe to provide information, and complete a transaction etc. This way you can build your customer’s trust and generate more sales.
Now Google also pushing webmasters to adopt HTTPS over HTTP on their website. This ensures that all the information remain safe.
How to Get Free SSL Certificate to Your Site?
If you running a blog website just like me, then you don’t need to purchase any expensive SSL. You can get a free SSL certificate from Let’s Encrypt easily and I am showing you the processes.
You will get all the benefits by using Let’s Encrypt SSL and your site URL will open with a green padlock, that means your site using SSL and can be opened as HTTPS. There are 3 ways you can get free SSL certificate and install it. Most of the time a free SSL can be installed from hosting cPanel directly or you can install it manually.
Method 1, Install Free SSL Certificate from Hosting cPanel
Most of all web hosting providers offer free SSL certificate. SiteGround is a great hosting that offers free SSL certificate, daily backup, and 1-click WordPress install.
Check out SiteGround Hosting(Now 60% off)
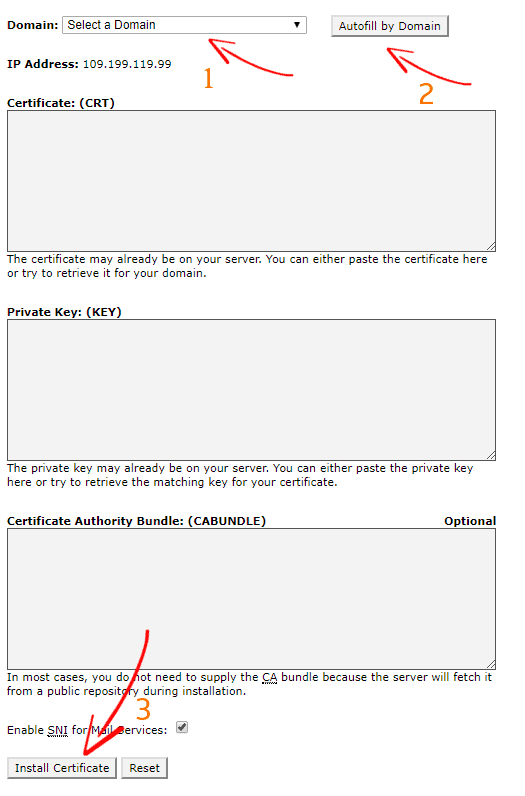
To set up free SSL certificate, you first need to login to your hosting cPanel. Then go to SSL/TLS Manager.

Then click on install SSL certificate. From there, select the domain that you want to install SSL and then click “Autofill by Domain”. Here you don’t need to enter anything, all the fields will be filled up automatically. Now click on Install Certificate.
After installing SSL certificate, you need to edit your site URL. So go your WordPress admin dashboard and Settings>General Settings, there you will see your site URL. Now change the address HTTP to HTTPS and click on save changes. For security purpose, you may be logged out.

Now you can see that your site is opening with HTTPS that means an SSL has been installed to your site.
Method 2, Use “SSL for Free” to Get Free SSL Certificate(Alternate Method)
If your web host doesn’t offer free SSL or charges an extra penny for it, then you can manually install SSL certificate to your cPanel.
To install a third party SSL on your cPanel, first go to SSL for Free. SSL for Free provides 100% free SSL certificate forever, but you need to renew your certificate on every 90 days to continue using their service.

Enter your domain name and click on “Create Free SSL Certificate”. After that, you need to verify your domain. There are few ways to verify your domain, but I will show you how to verify manually.
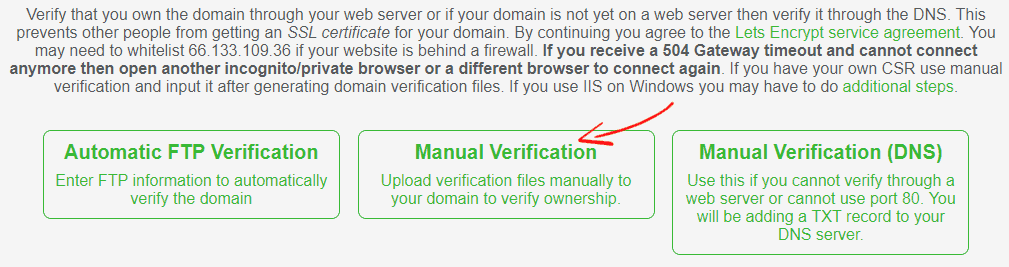
After clicking manual verification, you will see like this. Here you will see the instructions on how to verify files.
First, download the two files #1 and #2. Go to your cPanel, locate your domain folder and create a new folder “acme-challenge” under “.well-known” without ” “ sign. Then upload the two files(#1 & #2) in “acme-challenge” folder. Once you uploaded it, you need to verify the two files by clicking the following link. If the files show some random alphanumeric characters, then the files have been verified.
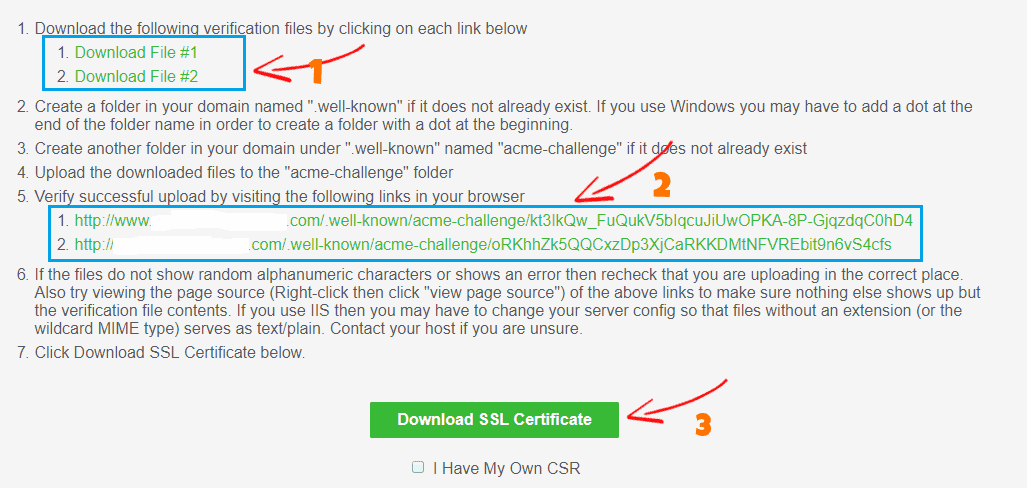
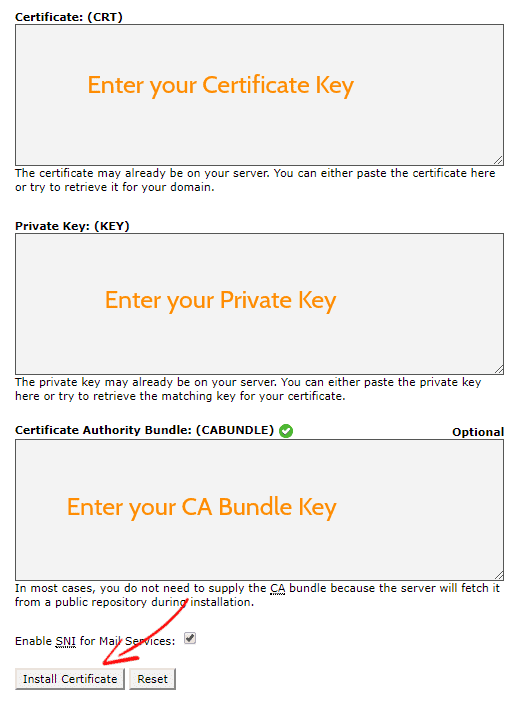
Now you need to download your SSL certificate files. It will be a zip file which contains total 3 files- private key, certificate and ca-bundle. Keep it safe, we will need it to install your SSL certificate from cPanel. (Don’t share your SSL keys with anyone)
In this step, go to your cPanel and then SSL/TLS manager. There you need to provide your keys. After adding the keys, click on install certificate and you are done. Now you have successfully installed Let’s Encrypt SSL on your site.
 After installing the SSL certificate from cPanel, you need to log in to your WordPress admin dashboard and change the site address to HTTPS.
Method 3, Get Free SSL Certificate from CloudFlare
While Let’s Encrypt is the most popular free SSL certificate provider, there is an alternate way to get free SSL certificate for your site.
If you are using CloudFlare, then you can easily add SSL to your site with just one click. Login to your CloudFlare account and head over to “Crypto” and from there you can add free SSL certificate to your site.

Conclusion
Whether you are running a blog or E-commerce site, SSL is necessary these days. As Google already announced that SSL/HTTPS enabled sites will get a ranking boost. More than that, an SSL also indicates that your site is secure and safe to provide sensitive data.
If you are currently running blog, then you don’t need a paid or premium SSL for your site. You can easily get free SSL certificate to your WordPress blog.
I hope this tutorial helped you to install SSL certificate on your site. If you are getting any problem or have a suggestion, please let us know in the comment section. I would like to hear from you. If you like, you can also connect with us on Facebook, Twitter, Google+.
I have picked some other related articles you may like,
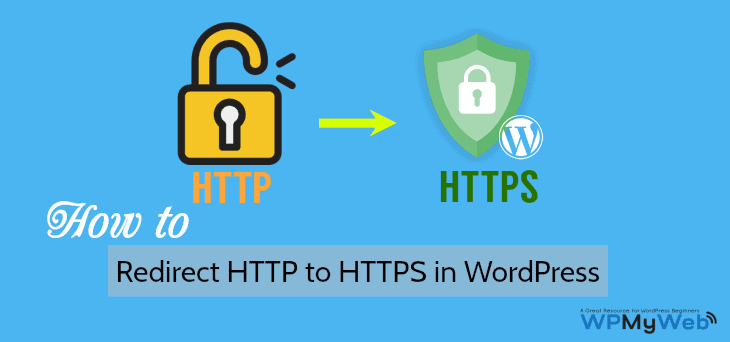
- How to Redirect HTTP to HTTPS in WordPress
- How to Setup CloudFlare CDN to your WordPress blog
- How to Find and Fix Broken Links on Your WordPress Site
*This post may have affiliate links, which means I may receive a small fee if you choose to purchase through my links (at no extra cost to you). This helps us to keep WPMyWeb up and running and up-to-date. Thank you if you use our links, we really appreciate it! Learn more.