How to Easily Change WordPress Admin Username
Installing WordPress is a very easy process and it takes only a few minutes to set up. However, in that quick process, we usually use “admin” as a default admin username for our WordPress site. Once we ready our site, we hardly change our password or the default WordPress admin username. But, it becomes a serious security issue for users who are using or didn’t change the old password and username. You may already know that hackers run a brute-force attack using the site owner’s username, so if you are using a very easy username or password that is easy to guess, then you are giving hackers a way in.
You can change your password from your admin profile, but can you change your WordPress account username? No! By default, WordPress doesn’t allow to change WordPress account username. But don’t panic, there are several ways to change your username easily. In this tutorial, we will show you how to easily change your WordPress admin username.
How to Change WordPress Admin Username
There are 3 ways you can change your admin username in WordPress:-
- You can create a new administrator account and delete the old one
- You can change WordPress username by using a plugin
- Using your database, you can change your username
If you are a new WordPress user, we suggest you use the 1st or 2nd method, apply the 3rd method if you are an advanced user.
1. Create a New Admin Account and Delete the Old One
This is the easiest method to easily change your WordPress account username. If you don’t want to install an extra plugin or any complex process, then this process is better for you. We also recommend you to apply this if you are a beginner WordPress user.
The first step you need to login to your WordPress site as an administrator. Then go to Users> Add New and create a new admin account.
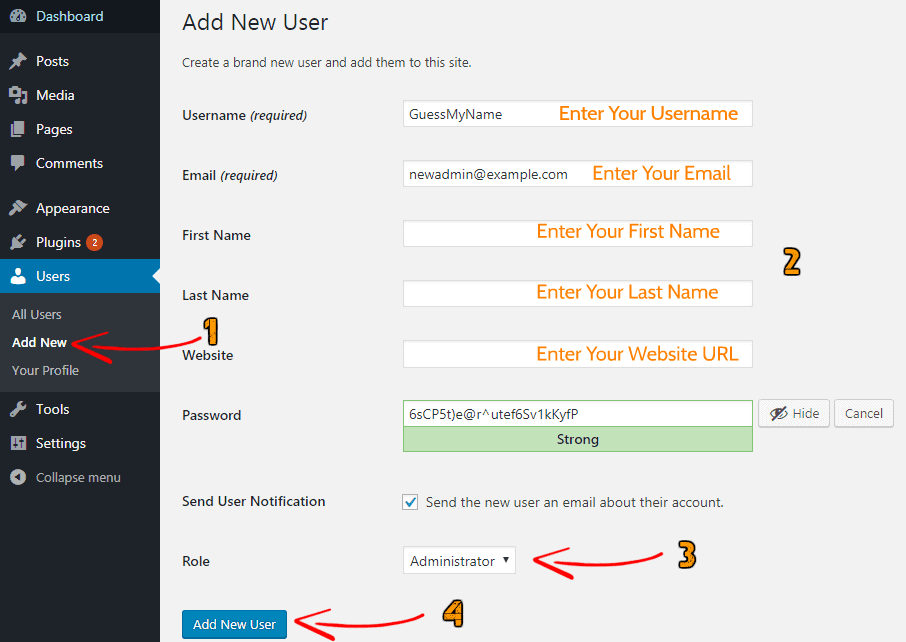
From the page, add a new Username that is unique and hard to guess and enter your email address. The first name, Last name, and website fields are optional but we recommend you to fill this up. Next, you need to enter a password and make sure you use a complex password which contains upper case, lower case, number and special characters.
Make sure you select the role “Administrator” and then click on Add New User to create your new admin account.
Now log out from your WordPress admin panel and log in using your new admin account. After logging in, go to Users> All Users and delete your old admin account.
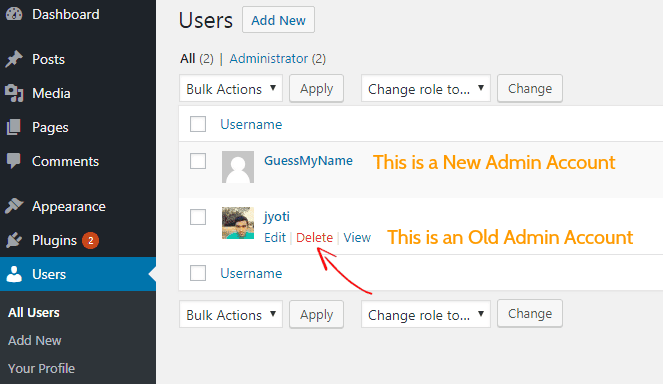
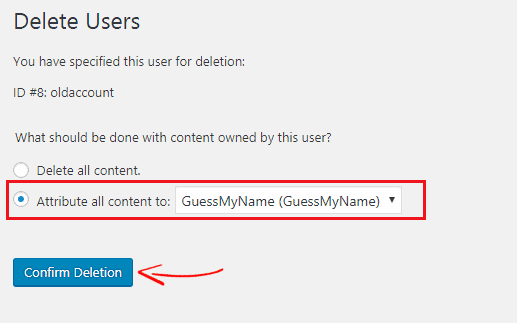
While deleting your old account, WordPress will ask you what do you want to do with content owned by the user. You have now two options:
- Delete All Content: It will delete all contents that are created by the user.
- Attribute All Content to: You can transfer all the contents created by the user to your account. So make sure you have selected “Attribute All Content to: ” and click on confirm the deletion.
That’s it. You have successfully changed your username in WordPress. Now all the contents belong to the new admin and during login time, you have to enter your newly created admin user details. Once done, you can add a profile picture, add short author biography and social accounts from Your Profile.
2. Change WordPress Account Username By Using Plugin
Another simple way to change the WordPress username is by using a plugin. If you want to install a plugin instead of any manual process, then you need to install the Username Changer plugin.
Using this plugin, you can easily change your WordPress username in just one click and it’s a very straightforward process.
First, install and activate Username Changer plugin, then go to Users> Your Profile and go to username option. There you will find the “Change Username” option.

Click on the Change Username option and enter a new username. Once done, click on Save Changes and it will ask you to login back. After logging in, you can go to your profile and check that your username has been changed.
As this plugin has no other features and you hardly want to change your username again, so it’s better to delete the plugin. But don’t panic, by deleting this plugin, your new username will be the same.
3. Change WordPress Username Using phpMyAdmin
Changing your WordPress username using phpMyAdmin is a bit complex process and not recommended for beginners. If you do something wrong, your site may stop working. So, follow these steps carefully.
The first thing you need to login to your hosting cPanel and scroll down to database section and click on phpMyAdmin.

After clicking on the phpMyAdmin option, you can see how many databases you have created or using on your hosting. Then select the database that your WordPress site is being used.
You can see database tables. By default, WordPress uses wp_ table prefix and if you have changed your database prefix before, you can see different table prefix.
Now select the table which contains “wp_users” on the left-hand side and then click on edit username that you want to edit.
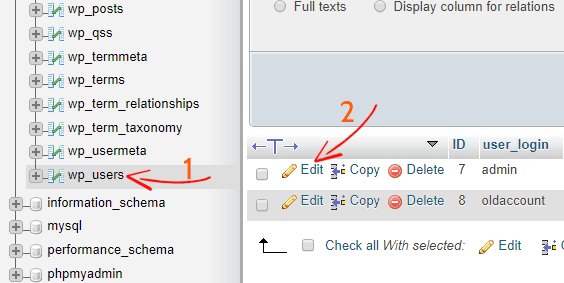
After that, change the “user_login” value to whatever you want. For example, I have changed my username “admin” to “WhatIsMyName”, you can use any username as you want.

Now click on the Go button and you are done. You have successfully changed your WordPress username using phpMyAdmin.
I hope this tutorial helped you to change your WordPress username. Again, if you are a new WordPress user, we suggest you use any of the first two methods for changing your username in WordPress site.
Related Articles,
*This post may have affiliate links, which means I may receive a small fee if you choose to purchase through my links (at no extra cost to you). This helps us to keep WPMyWeb up and running and up-to-date. Thank you if you use our links, we really appreciate it! Learn more.
