How to Manually Update WordPress, Plugins & Themes
WordPress updates are so important and you should always update your WordPress version, plugins, and themes. With every update, WordPress adds some features, improves security, fixes bugs and much more. The good thing about self-hosted WordPress is that you will be automatically notified if there is an update available. It is very easy to update WordPress version and it can be done from your WordPress admin dashboard. But, in some cases, the one-click update doesn’t work and users get an error “Update Failed”. If it occurs, you need to manually update WordPress version.
In this article, we will show you how to manually update your WordPress version, themes, and plugins.
Backup Your Database & Files
Before you start updating your WordPress site, you should always take a full backup of your site and database. In case you did something wrong, you can always revert back to older version. If your hosting provider doesn’t provide a daily backup option, you can easily take a full backup of your site using BackUpBuddy.
Ok, Time to start updating WordPress version manually.
1. Manually Update WordPress
First, download a fresh copy of WordPress latest software from WordPress.org website and extract it to your desktop. After extracting it, you will see a folder named wordpress. If you don’t have FTP software installed, download it from FileZilla and install it on your computer.
If you are using cPanel hosting, you can create your FTP account easily. To create a new FTP account, go to your hosting cPanel and find FTP Account option and from there create a new FTP account. If you already have an FTP account, then you don’t need to create a new one.
Now you need to connect your site using FTP client from your computer. Once connected, go to your website’ root folder. Now upload all the files inside the wordpress folder and copy from your computer to your website’s root folder.
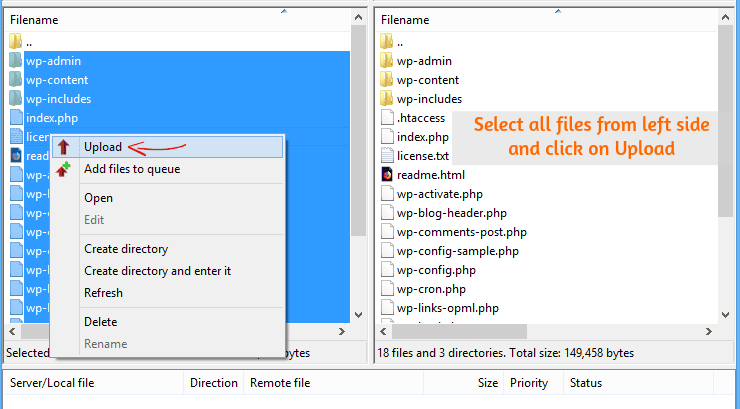
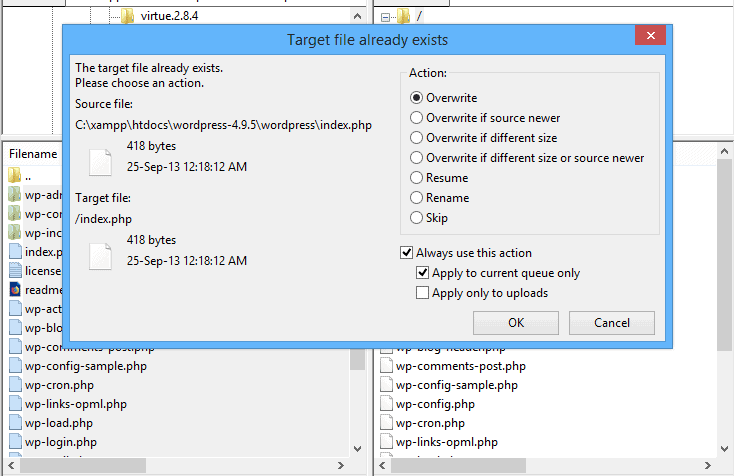
During uploading time, it will ask you if you want to overwrite the old files. Then select Overwrite option and click on OK. Here is the screenshot you can follow. By doing so, all the old WordPress files will be overwritten with new files. The is the fastest method for updating your WordPress site.
Once the upload completed, now you need to update your WordPress database.
Update WordPress Database
After manually updated your WordPress site, you need to update your WordPress database.
If you didn’t update your WordPress version for a long time, you will be asked to update your WordPress database. Don’t panic if you don’t see any database updating message.
In case you are getting Database Update Required notification, log in to your WordPress admin panel and click on Update WordPress Database.

This process may take a few minutes. After this, you can log in to your WordPress site to make sure everything is fine.
That’s it. You have successfully updated your WordPress to the latest version manually.
2. Manually Update WordPress Plugins Using FTP
Updating WordPress plugins manually is a very easy process and it is same as updating WordPress version. You need to take a full backup of your WordPress site and database if you haven’t already.
First, download a new copy of that plugin you want to update. For example, we are taking Yoast SEO plugin. After downloading, unzip it on your computer and you will find a folder inside the archive file, named wordpress-seo.
Now connect your website’s root directory with your computer using FTP client. Once you have connected to your website through FTP, go to wp-content/ plugins/ plugin-name. There you need to replace the old files with the new files using FTP client.
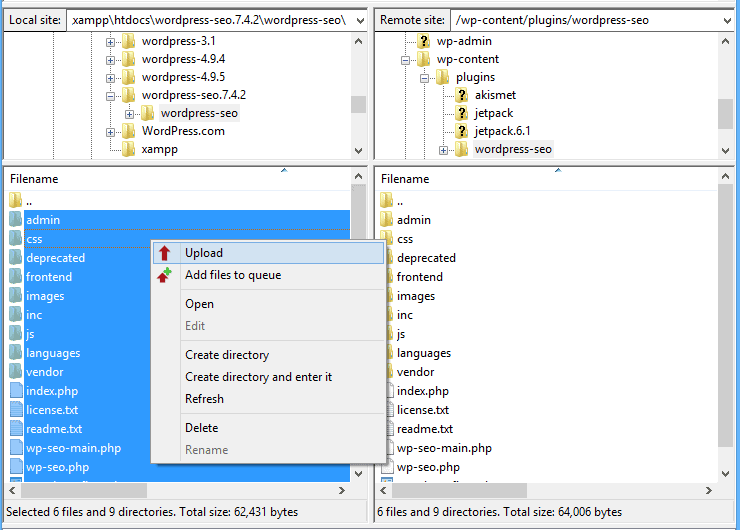
From the wordpress-seo folder, select all files and click on Upload and it will start uploading files. During uploading time, it will ask you to Overwrite those files, then click on overwrite and Ok.
Now log in to your WordPress site and go to Dashboard> Plugins> Installed Plugins to verify that the plugin is updated to the latest version. That’s it. You have successfully updated your WordPress plugin manually.
3. Manually Update WordPress Theme Version
If you want to upgrade your WordPress theme version, we highly recommend you to take a full backup of your site and database.
If you directly upgrade your theme version, you will lose all the customizations that you have made to the old version theme. We recommend you to save the customizations or codes to a notepad file on your computer, so after upgrading your theme version, you can easily apply to the new theme.
First, download the zip file of the theme that you want to upgrade and unzip the file onto your computer. Then, simply connect your computer to the website via FTP client. Once connected, go to wp-content/ themes/ theme-name and replace old theme with the new one by uploading the unzipped theme files. It is the same process as the above one.
Now, log in to your WordPress site and go to Appeanence> Themes and verify that the theme has been updated.
Conclusion
Updating WordPress version, theme and plugins are essential. WordPress made this updating process easy. You just need to login to your WordPress dashboard and click on Update.
But many times, the One-Click-Update process failed and the site shows a maintenance page. That’s why users hardly upgrade their WordPress site to the new version software. If the automatic update function doesn’t work, you can update your WordPress version, themes and plugins manually. In this article, we have shown you a step by step process how you can manually upgrade your WordPress site.
If this tutorial helped you to update your WordPress, plugins and theme version manually to the latest one, do share it with your friends. If you are facing any issue regarding this tutorial, drop a comment below.
*This post may have affiliate links, which means I may receive a small fee if you choose to purchase through my links (at no extra cost to you). This helps us to keep WPMyWeb up and running and up-to-date. Thank you if you use our links, we really appreciate it! Learn more.
