How to Setup Google AMP on WordPress Site (Using AMP Plugin)
Do you know many site owners lose 47% of revenue because of their slow page speed? Yes, you heard right. Maintaining page speed is a vital fact for SEO, ranking factor both. If you already optimised your website of desktop version, you must care about mobile version site optimisation, as half of organic traffic comes from mobile devices. So, here comes Google Accelerated Mobile Pages, also known as Google AMP. It’s quite new term to new site owners. So in this article, we will share What is Google AMP and How to Setup Google AMP on WordPress site.

What is Google AMP?
On October 2015, Google announced a mobile based project, called mobile accelerated mobile pages, also known as Google AMP. It is an open source project that is supported by Google, Facebook, Twitter. Accelerated Mobile Pages (AMP) are only included only basic HTML, CSS pages. AMP page loads more quickly than normal pages.
Many users use very slow internet to surf web pages which include HTML, CSS, JS, ads and some scripts. So using the slow internet, it takes a lot of time to open pages. The goal of AMP is to increase page load speed faster like liquid.

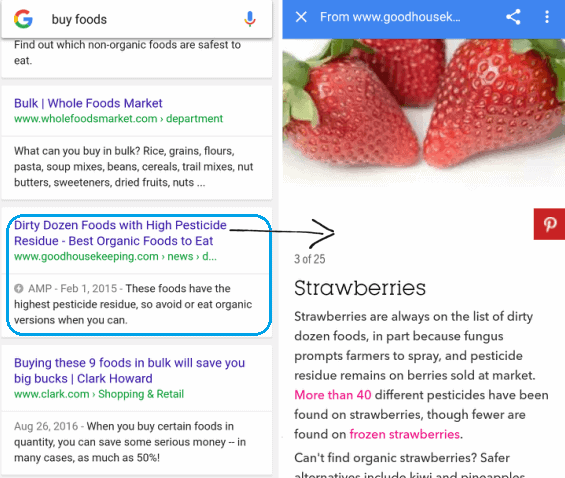
This is an example of AMP enabled site.
Why should You Enable Google AMP Right Away?
If you use Accelerated Mobile Pages (AMP), then your website will be displayed in a certain way on Google(especially with an AMP sign). The difference between AMP pages and regular pages can be seen in their carousel and through their AMP label in Google search results. Besides, there are some benefits of using AMP,
- Speed matters: There is no doubt that AMP enabled pages are slightly better than normal pages. Many users usually leave a website that takes longer than 3 seconds to load. So, AMP could help to reduce bounce rates down and increase conversions.
- Improves Search Engine Ranking: Although AMP is not yet meant to be an independent ranking factor. But Google currently has the mobile-friendly ranking boost, and because AMP pages are mobile-friendly, they receive the same ranking boost.
- Increases click-through-rate: If your content is displayed in the carousel, it will have much higher visibility, which will increase the likelihood of a reader clicking through to your website.
- Support Ads: AMP pages also supports variety type of ads like AdSense, MediaNet, Infolinks and many more.
- Many Big Company Support AMP: You don’t need to fear about AMP, because it is supported by big technology providers like Twitter, Pinterest, WordPress, Chartbeat, Linkedin etc.
# There are many rumours that many AMP users can’t customise their pages, can’t add ad codes, social share buttons. But this is not true. Let me explain why.
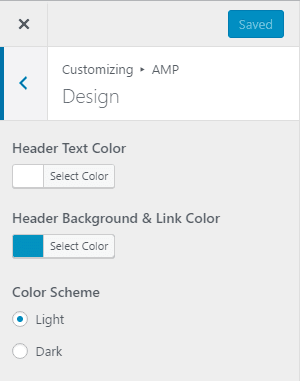
Well, the main WordPress AMP plugin by Automattic comes with very few features which we described in #1 section, scroll down to see it. We also mentioned how it looks like when you setup AMP plugin.
So, you need another plugin AMP for WP to get more customisation option. You can add all stuff like network ads, social share button, Google Analytics etc.
How to Setup Google AMP
There are many AMP plugins available on WordPress plugin directory.
#1 AMP by Automattic

This plugin allows you to setup Google AMP on your WordPress site. It is an open source initiative that aims to provide mobile optimised content that can load instantly everywhere, even on the slow internet.
After activating this plugin, all posts on your site will be generated AMP-compatible versions. You can also access to your AMP posts by appending /amp/ to the end your post URLs.
For example, if your post URL is “http://example.com/2016/12/20/hello-world“, so the AMP version will be “http://example.com/2016/12/20/hello-world/amp/“.
Don’t forget to click on Save button.


There is some limitation of this plugin. Pages and archives are not currently supported and you can’t add share button, category, related posts, ads. By default, this plugin allows your site logo and site name.
#2 AMP for WP

This plugin “AMP for WP” is highly recommended for those who want to enable Google AMP on their site. This custom AMP Editor allows you to override your Content that you had written in Post or page. So you can add the different content just for AMP. It is fully responsive plugin and comes with 2 different designs. With drag & drop feature, you can set page/post options manually.
More than that, you can add custom logo, social share button, related posts below the post, integrate Google Analytics and able to add ads in 4 different positions.

To setup this plugin, you need to install first the default AMP plugin by Automattic. Or you will be asked to install it. After activating this plugin, you will see an AMP option on in your WordPress admin panel.
From the dashboard, you can setup Google AMP options as your need.
Features:
- Custom AMP editor.
- Mobile redirection.
- Drag & Drop Page builder.
- Inbuilt with two designs.
- AMP WooCommerce Support.
- Translation Panel & RTL available.
- Internal AMP linking.
- Related posts below the post.
- Social share buttons.
- Total 4 ad slots across the layout.
- and many more…
How to View Accelerated Mobile Pages (AMP) in Google Search Console
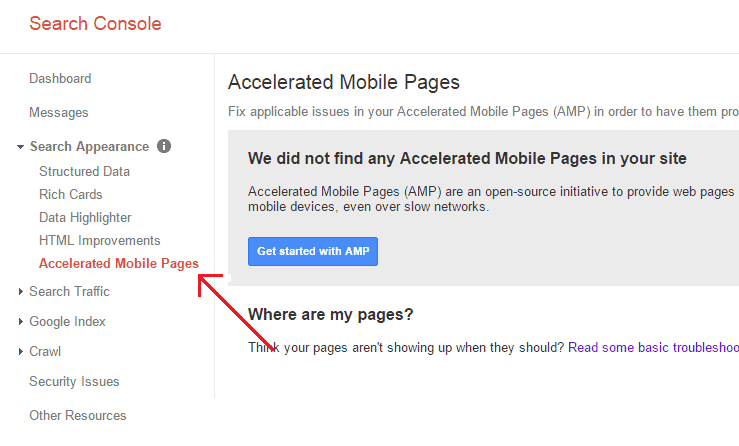
When you setup Google AMP in your WordPress blog, you can view those Accelerated Mobile Pages from Google Search Console. To view it, log into Google Search Console. Now go to Search Appeanence> Accelerated Mobile Pages.

If you properly setup Google AMP in your WordPress blog, then you can view those Accelerated Mobile Pages. If not appears, wait a while. It will show you those pages, which are already indexed. In case you didn’t submit your Sitemap to Google Search Console, it will not appear.
Learn, How to Properly Submit your Blog Sitemap to Google Search Console.
*This post may have affiliate links, which means I may receive a small fee if you choose to purchase through my links (at no extra cost to you). This helps us to keep WPMyWeb up and running and up-to-date. Thank you if you use our links, we really appreciate it! Learn more.


