How to Install WordPress on Linux using Cloud Hosting – SkySilk VPS
Want to seriously step up your WordPress game? Consider looking into WordPress Hosting in the cloud! Easily deploy and install a custom WordPress site in a matter of minutes. This guide will teach you how to install WordPress on Linux using SkySilk Cloud Services and a FREE virtual private server.
Why use WordPress Hosting in the Cloud?
Advantages of WordPress Hosting
Hosting a WordPress website in the cloud is becoming an increasingly popular choice for webmasters, developers, and businesses across the globe. The reasons being, cloud hosting allows for:
- Flexibility & Scalability
- Customized Security
- Full Root-Access to the Server
- Accessibility from Anywhere w/ Internet
Utilizing the cloud for WordPress Hostings means that the owner gets access to the actual server where the website resides, instead of just its domain name.
How to Install WordPress on Linux
Method 1 – One-Click WordPress Template (Easy/Beginners)
SkySilk has a pre-configured WordPress template that allows for a WordPress website to be installed in just a few minutes, no previous programming experience required. Follow the steps below to get your site up and running.
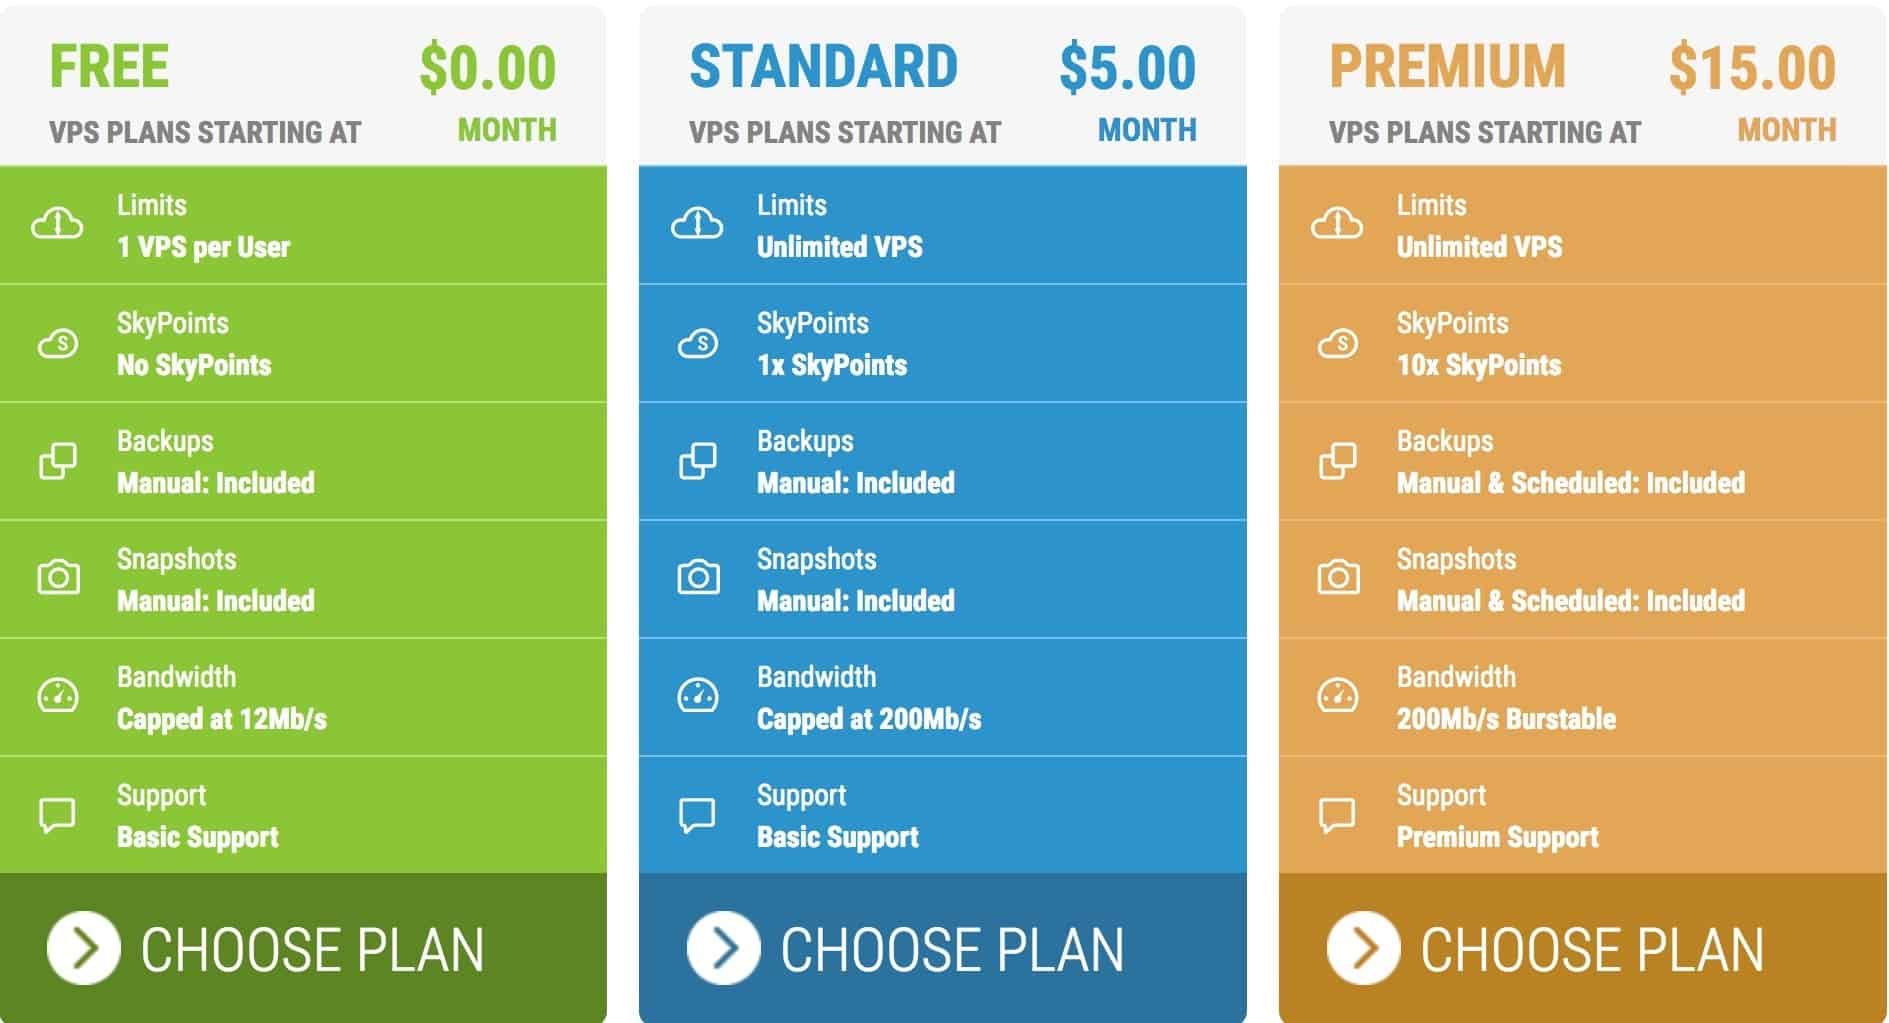
Step 1 – First of all, log in to your SkySilk account and navigate to the VPS dashboard. Click “Create Container” and choose your desired plan . In this case, we will be selecting the FREE plan:
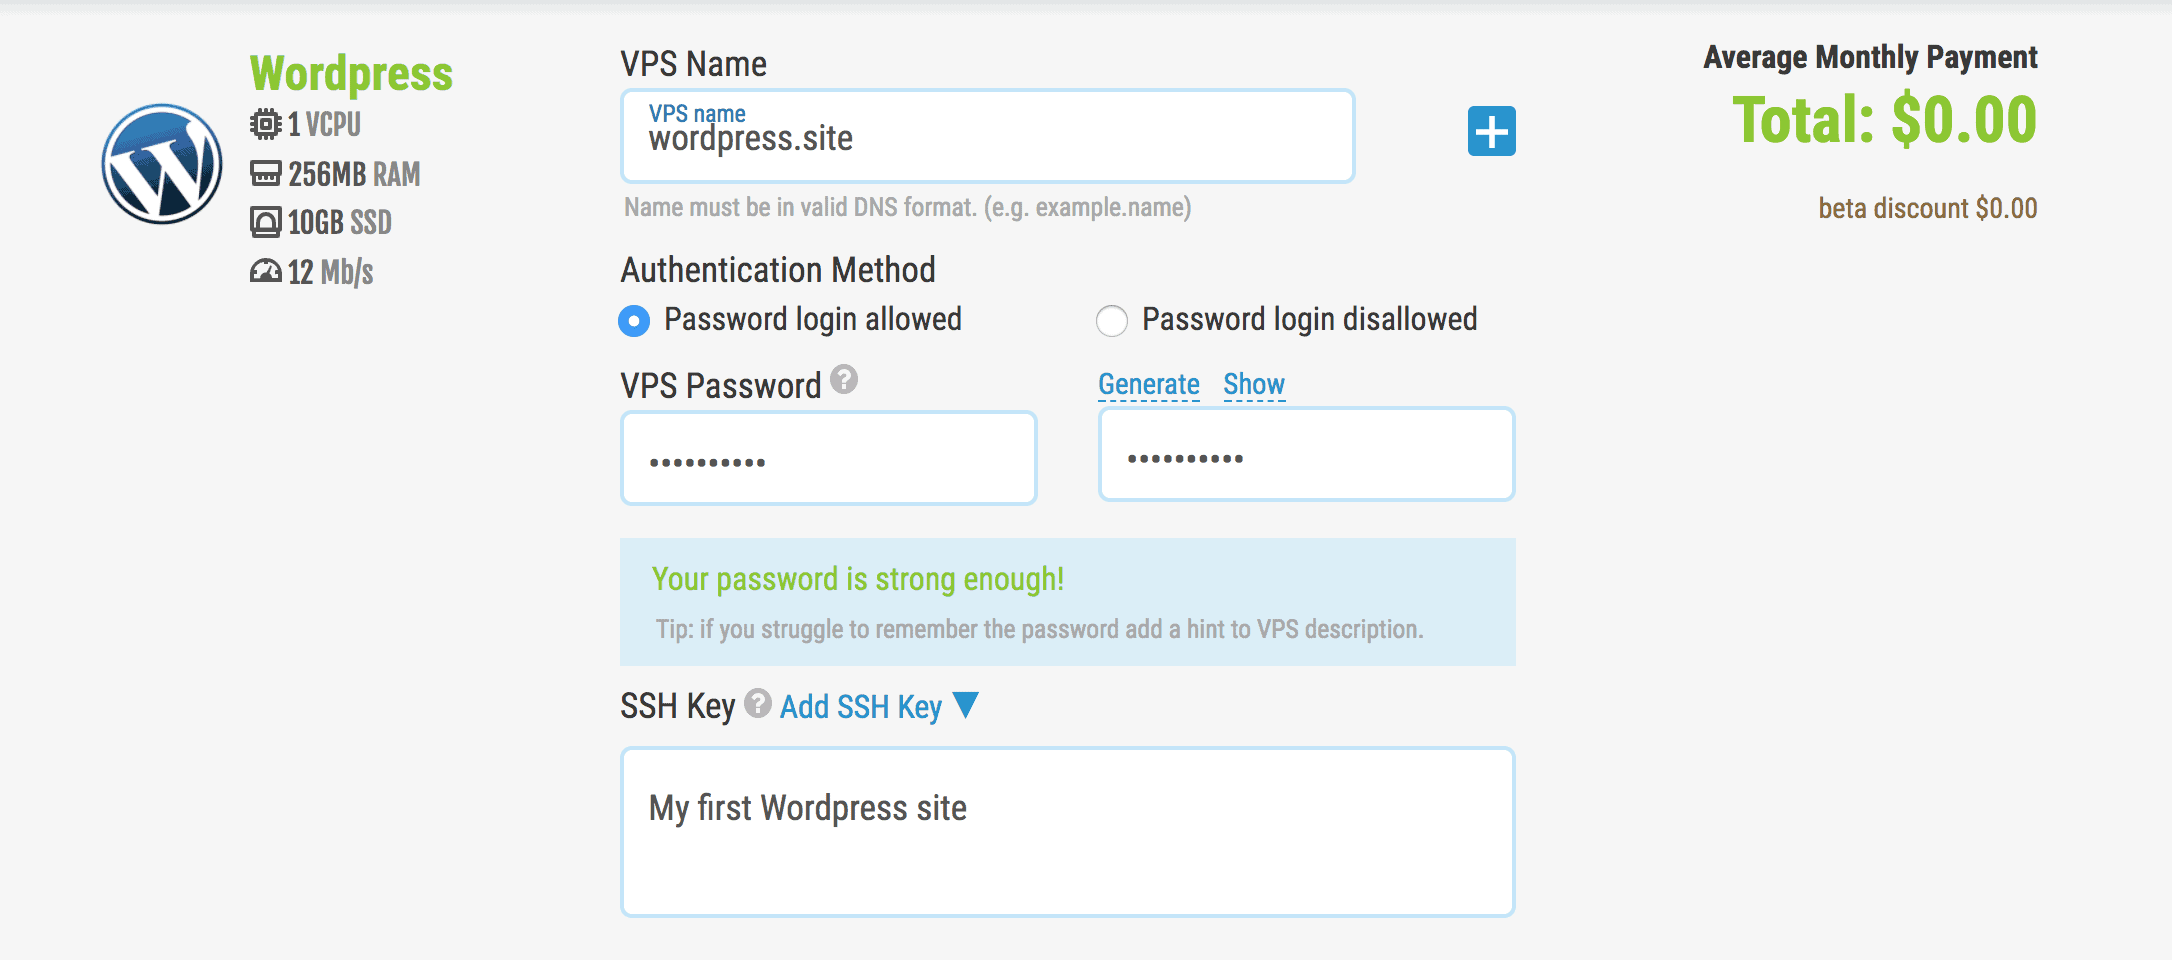
Step 2 – Once you have your plan, scroll down and switch to the “Apps and Tools” tab. Select WordPress and fill out the information for your Linux VPS.
Step 3 – After you hit “Go!”, you will be taken to your VPS dashboard and your VPS will deploy. You can then log into your machine and complete the WordPress installation process and in just a few sites your site will be up!
Method 2 – Manually Install WordPress on Linux (Advanced/Experienced)
For those who would rather launch a clean OS, WordPress will have to be installed manually. These steps will provide your VPS with the tools it needs along with WordPress.
First of all, log in to your SkySilk account and navigate to the VPS dashboard. Click “Create Container” and choose your desired plan.
Once you have your plan, scroll down and switch to the “Clean OS” tab. Select the Linux OS Distro of your choice and fill out the information for your Linux VPS.
Step 1: Install Apache Web Server
First of all, to install Apache web server issue the command below:
[code]$ sudo apt-get install apache2 apache2-utils[/code]
We need to enable Apache2 web server to run when the system starts, as well start the service:
[code]
$ sudo systemctl enable apache2
$ sudo systemctl start apache2
[/code]
Note: The Apache default root directory is /var/www/html, all your web files will be stored in this directory.
Step 2: Install MySQL Database Server
Next, we need to install MySQL database server by running the command below:
[code]$ sudo apt-get install mysql-client mysql-server[/code]
During the package installation, you will be prompted to set the root user password. Set and confirm a password for your root user.
The database server deployment is not yet secure, for this reason, issue the following command to harden its security:
[code]$ sudo mysql_secure_installation[/code]
You will be asked to install the ‘validate_password’ plugin, so type in Y/Yes and press Enter, and also choose the default password strength level.
If you do not want to change the root password, then type N/No when prompted to do so. Answer Y/Yes for the rest of the subsequent questions.
Step 3: Install PHP and Modules
Next, we need to install PHP and a few modules for it to work with the web and database servers using the command below:
[code]$ sudo apt-get install php7.0 php7.0-mysql libapache2-mod-php7.0 php7.0-cli php7.0-cgi php7.0-gd [/code]
Now we have all the tools we need to start running WordPress!
Step 4: Install WordPress CMS
Download the latest WordPress package and extract it by issuing the commands below on the terminal:
[code]
$ wget -c http://wordpress.org/latest.tar.gz
$ tar -xzvf latest.tar.gz
[/code]
Then move the WordPress files from the extracted folder to the Apache default root directory, /var/www/html/:
[code]$ sudo rsync -av wordpress/* /var/www/html/[/code]
Next, set the correct permissions on the website directory:
[code]
$ sudo chown -R www-data:www-data /var/www/html/
$ sudo chmod -R 755 /var/www/html/
[/code]
Step 5: Create WordPress Database
Execute the command below and provide the root user password, then hit Enter to move to the MySQL shell:
[code]$ mysql -u root -p[/code]
At the MySQL shell, type the following commands, pressing Enter after each line of a MySQL command. Remember to use your own, valid values for database_name, database user, and also use a strong and secure password as databaseuser_password:
[code]
mysql> CREATE DATABASE wp_myblog;
mysql> GRANT ALL PRIVILEGES ON wp_myblog.* TO ‘your_username_here’@’localhost’ IDENTIFIED BY ‘your_chosen_password_here’;
mysql> FLUSH PRIVILEGES;
mysql> EXIT;
[/code]
Go the /var/www/html/ directory and rename existing wp-config-sample.php to wp-config.php:
[code]$ sudo mv wp-config-sample.php wp-config.php[/code]
Then update it with your database information under the MySQL settings section (refer to the highlighted boxes in the image below):
[code]
// ** MySQL settings – You can get this info from your web host ** //
/** The name of the database for WordPress */
define(‘DB_NAME’, ‘database_name_here‘); /** MySQL database username */
define(‘DB_USER’, ‘username_here‘); /** MySQL database password */
define(‘DB_PASSWORD’, ‘password_here‘); /** MySQL hostname */ define(‘DB_HOST’,
‘localhost‘); /** Database Charset to use in creating database tables. */ define(‘DB_CHARSET’,
‘utf8‘); /** The Database Collate type. Don’t change this if in doubt. */ define(‘DB_COLLATE’, ”);[/code]
Afterwards, restart the web server and mysql service using the commands below:
[code]
$ sudo systemctl restart apache2.service
$ sudo systemctl restart mysql.service
[/code]
Open your web browser, then enter your server address: http://server-address to get the welcome page below. Read through the page and click on “Let’s go!” to proceed further and fill all requested on screen information.
Your WordPress site is now up and running, and as a result, you are now able to edit the site to your liking.
WordPress Hosting Wrap-Up
Congratulations! If you made it this far, you now have the understanding needed to install WordPress on Linux in just a matter of minutes. From there, the sky is the limit! Thus, thanks to the cloud, WordPress Hosting can be utilized by anyone and customized to suit the needs of any project.
SkySilk Cloud Services is a good hosting site to consider because they offer completely free WordPress Hosting that is easy to launch and scale as needed. Between their one-click WordPress template and the multiple clean Linux OS options, there is no excuse to not know how to install WordPress on Linux using Cloud Hosting.
To get started with a SkySilk VPS for FREE WordPress Hosting, please click the button below:
[thrive_link color=’green’ link=’https://beta.skysilk.com/products/cloudplatform’ target=’_blank’ rel=’nofollow’ size=’medium’ align=’aligncenter’]Sign Up to SkySilk [/thrive_link]
Related Articles,
- How to Install Free SSL on Your WordPress Site
- Blogger Vs WordPress? Which one to choose and why?
- How to Add Security Questions to WordPress Login Page
*This post may have affiliate links, which means I may receive a small fee if you choose to purchase through my links (at no extra cost to you). This helps us to keep WPMyWeb up and running and up-to-date. Thank you if you use our links, we really appreciate it! Learn more.