How to Setup CloudFlare CDN for Your WordPress Blog for Free
No one likes if your website load speed is slow or your site got DDoS attack. So if you are one of them like slow page load, then you got its solution. And for this you don’t need to spend any money. CloudFlare CDN is one of the best CDN(Content delivery network) system. But if you have no idea about CloudFlare, then read what is CloudFlare and how to Setup CloudFlare CDN.
What is CloudFlare CDN:
CloudFlare is a third-party service which provides security and optimization for your websites on the internet. It acts as a proxy between visitors and your server which helps protecting your website against DDoS. Not only that, it provides Free CDN includes 86 data centers around the world. So your site never gets slow.
How to Setup CloudFlare CDN:
There are two CloudFlare plugins available you can use. Firstly we recommend W3 Total Cache Plugin, Check out how to setup W3 Total Cache Plugin in your WordPress Site and other is CloudFlare plugin.
1. First go to CloudFlare and Sign Up there.

After this you will get a confirmation message and your account is ready to use.
2. Then click on Add Site. After doing this it will start scanning your domain name.

After completing scan, click on Continue Setup.
3. It will show you DNS Records of your site. Do nothing there and press Continue.
4. There are four type of plan available- Free Website, Pro Website, Business Website and Enterprise Website.

Click on Free Website and then continue.
[popup_manager id=”1″]
5. Now you have to change your Name Server from your hosting cPanel. And put

How to change Name Server from cPanel:
Open your cPanel from your hosting provider. Select your Domain and change your default nameservers to custom: clint.ns.cloudflare.com & sara.ns.cloudflare.com
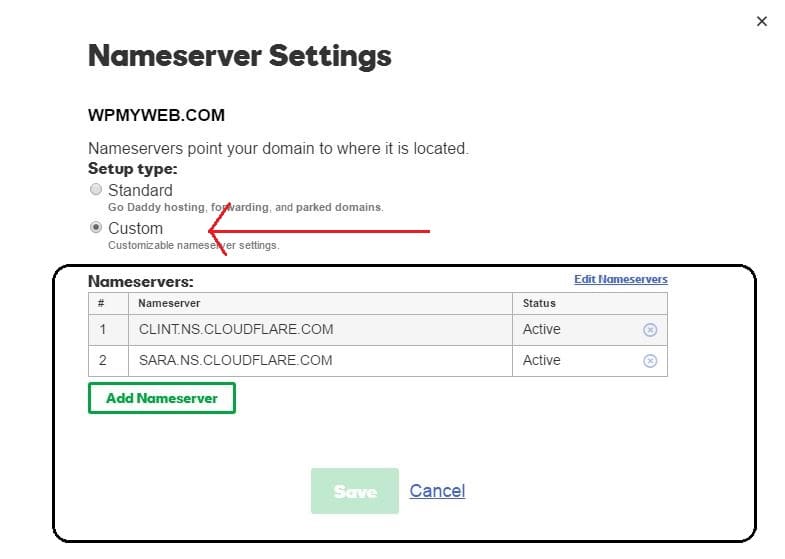
6. After this, you have to wait a maximum 24 hours. Because Name server changes usually take 24 to 48 hours to fully start working. In this time your site will stay online, so nothing to worry.

You can check this CloudFlare status as Active after some hours.
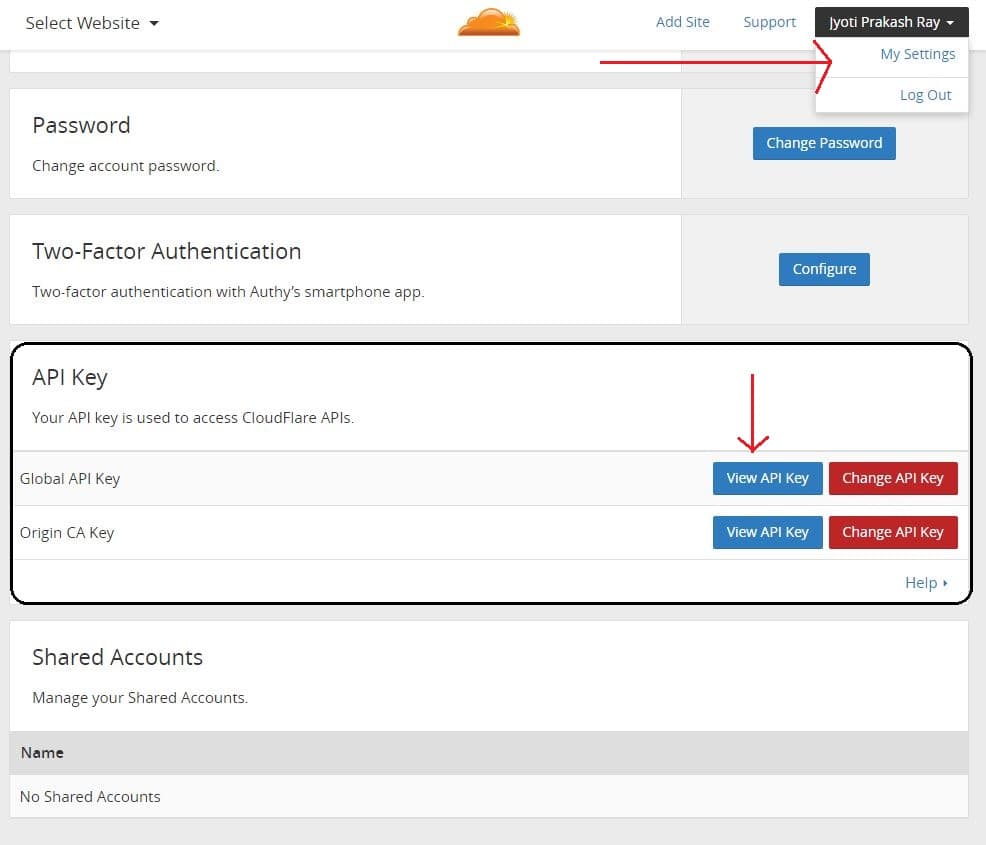
Go to My Settings and get your API key from Global API key.
7. Now go to your Admin Dashboard and W3 Total Cache setting. And then select Extensions, enable ClouFlare and provide your details: CloudFlare account details, your website name and API key.
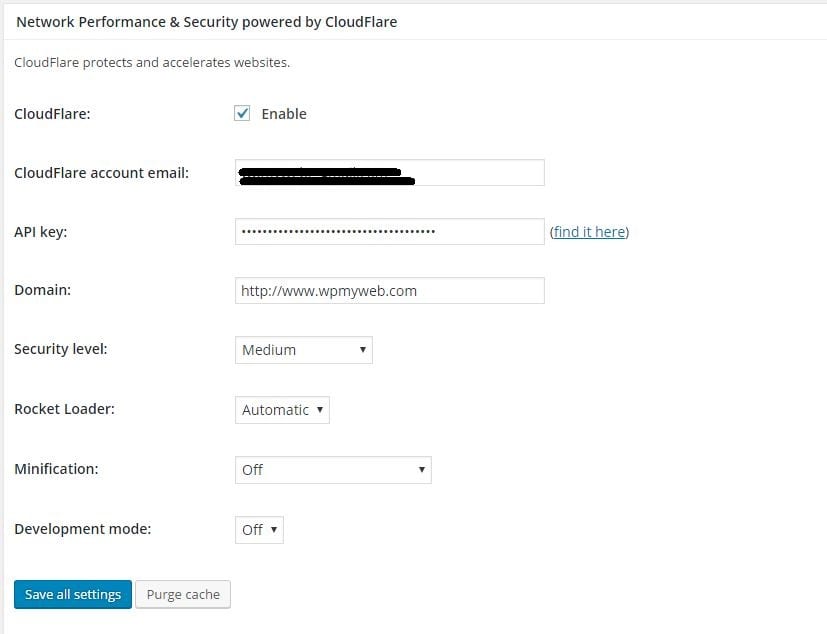
Save it and you are done! Now your site is protedted by CloudFlare CDN.
But if you installed only CloudFlare CDN, then just provide your site details and API. But its sure using W3 Total Cache Plugin gives you more extra features. You can also setup CloudFlare CDN from your cPanel if there is an option.
*This post may have affiliate links, which means I may receive a small fee if you choose to purchase through my links (at no extra cost to you). This helps us to keep WPMyWeb up and running and up-to-date. Thank you if you use our links, we really appreciate it! Learn more.


Hello Ray, I think W3TC plugin is too heavy and slow. Many bugs.
I will recommend you : https://wordpress.org/plugins/cf-littlebizzy/
Thank you. I will check it out.